Command entry:
Modify panel

Make a selection.
Modifier List
Object-Space Modifiers
Skew
Command entry:Make a selection.
Modifiers menu
Parametric Deformers
Skew
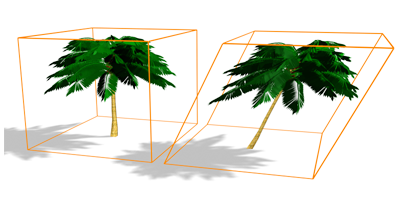
The Skew modifier lets you produce a uniform offset in an object's geometry. You can control the amount and direction of the
skew on any of three axes. You can also limit the skew to a section of the geometry.
Procedures
To skew an object:
-
 Select an object, go to the Modify panel, and choose Skew from modifier list.
- On the Parameters rollout, set the axis of the skew to X, Y, or Z. This is the axis of the Skew gizmo, not the axis of the
selected object.
You can change the axis at any time, but only one axis setting is carried with the modifier.
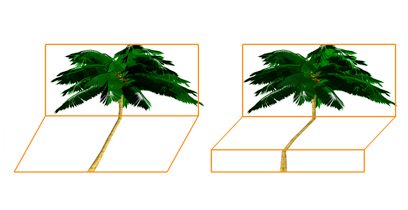
- Set the amount of the skew. The amount is an offset in current units parallel with the axis.
The object skews to this amount beginning at the lower limit, by default the location of the modifier's center.
- Set the direction of the skew.
The object swivels around the axis.
You can reverse the amount and direction by changing a positive value to a negative value.
To limit the skew:
- Turn on Limits group Limit Effect.
- Set values for the upper and lower limits. These are distances in current units above and below the modifier's center, which
is at zero on the gizmo's Z axis. The upper limit can be zero or positive, the lower limit zero or negative. If the limits
are equal, the result is the same as turning off Limit Effect.
The skew offset is applied between these limits. The surrounding geometry, while unaffected by the skew itself, is moved to
keep the object intact.
- At the sub-object level, you can select and move the modifier's center.
The limit settings remain on either side of the center as you move it. This lets you relocate the skew area to another part
of the object.
Interface
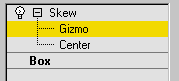
Modifier Stack
- Gizmo
-
At this sub-object level, you can transform and animate the gizmo like any other object, altering the effect of the Skew modifier.
Translating the gizmo translates its center an equal distance. Rotating and scaling the gizmo take place with respect to its
center.
- Center
-
At this sub-object level, you can translate and animate the center of the Skew effect.
For more information on the stack display, see Modifier Stack.
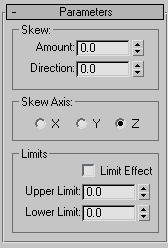
Parameters rollout
Skew group
- Amount
-
Sets the angle to skew from the vertical plane.
- Direction
-
Sets the direction of the skew relative to the horizontal plane.
Skew Axis group
- X/Y/Z
-
Specify the axis that will be skewed. Note that this axis is local to the Skew gizmo and not related to the selected entity.
Default=Z.
Limits group
- Limit Effect
-
Applies limit constraints to the Skew modifier.
- Upper Limit
-
Sets the upper limit boundaries in world units from the skew center point, beyond which the skew no longer affects the geometry.
Default=0.
- Lower Limit
-
Sets the lower limit boundaries in world units from the skew center point, beyond which the skew no longer affects the geometry.
Default=0.