The door models provided let you control details of a door's appearance. You can also set the door to be open, partially open, or closed, and you can animate the opening.

Different door types in a model of a house
There are three kinds of doors. The Pivot door is the familiar door that is hinged on one side only. The Bifold door is hinged in the middle as well as the side, like many closet doors. You can also make these kinds of doors a set of double doors. The Sliding door has a fixed half and a sliding half.
The topic for each kind of door describes its unique controls and behavior. Most door parameters are common to all kinds of doors, and are described here.
By default, 3ds Max assigns five different material IDs to doors. The aectemplates.mat material library includes Door-Template, a multi/sub-object material designed to be used with doors. Each component of the door/material is listed below along with its corresponding Material ID.
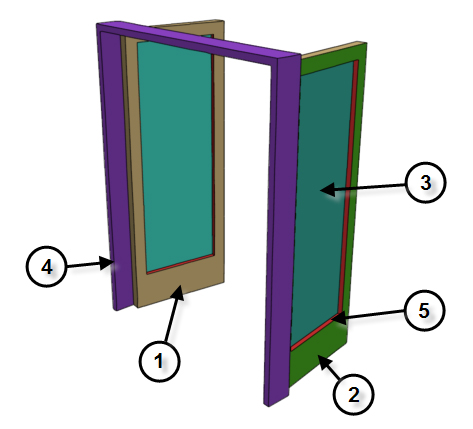
Material IDs for a door or window
| Material ID | Door/Material Component |
|---|---|
| 1 | Front |
| 2 | Back |
| 3 | Inner Bevel (used for glazing when Panels set to Glass or Beveled). |
| 4 | Frame |
| 5 | Inner Door |
To make an opening in a wall, you can perform a Boolean operation with the wall as Operand A, and another object, such as a box, as Operand B. Then, you can create and add a door in the opening, and link it, if you choose, as a child of the wall.
By default, the depth is perpendicular to the line between the first two points and parallel to the active grid.
The height is perpendicular to the plane defined by the first three points and perpendicular to the active grid.
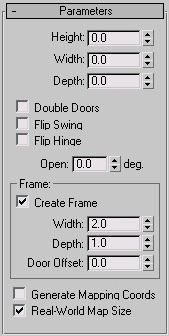
You can adjust the Height, Width, and Depth values on the Parameters rollout.
On the Creation Method rollout, you can change the creation order to width-height-depth instead of width-depth-height.
You can animate a door opening and closing by keyframing the Open setting.
 Open parameter to the amount you want the door to be open at the start of the animation. If you want it to be closed, set
it to 0.
Open parameter to the amount you want the door to be open at the start of the animation. If you want it to be closed, set
it to 0.
The topic for each kind of door describes its unique controls and behavior. Most door parameters are common to all kinds of doors, and are described here.
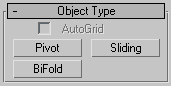
There are three kinds of doors in 3ds Max:
The familiar door type that is hinged on one side only. See Pivot Door.
Has a fixed half and a sliding half. See Sliding Door.
Hinged in the middle as well as the side, like many closet doors. You can also use this type of door to make a set of double doors. See BiFold Door.
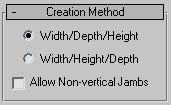
You define each type of door with four points: Drag the first two, followed by two move-click sequences. The Creation Method setting determines the order in which these actions define the door's dimensions.
The first two points define the width and angle of the base of the door. You set these points by dragging in a viewport, as the first step in creating a door. The first point, where you click and hold before dragging, defines a point on the jamb at the hinge for single-pivot and bifold doors (both jambs have hinges on double doors, and sliding doors have no hinge). The second point, where you release the button after dragging, specifies the width of the door, as well as the direction from one jamb to the other. This lets you align the door with a wall or opening when you place it. The third point, where you click after moving the mouse, specifies the depth of the door, and the fourth click, where you click after moving the mouse again, specifies the height.
Lets you create tilted doors. Set snaps to define points off the construction plane. Default=off.
This rollout has controls for the door-jamb frame. Though part of the door object, the frame behaves as if it were part of the wall. It doesn't move when you open or close the door.
Assigns mapping coordinates to the door.
Controls the scaling method used for texture mapped materials that are applied to the object. The scaling values are controlled by the Use Real-World Scale settings found in the applied material's Coordinates rollout. Default=off.
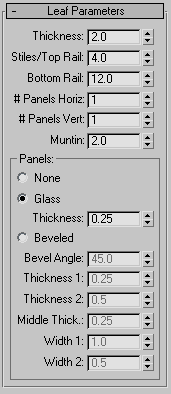
Provides controls that affect the door itself (as opposed to the door unit, which includes the frame). You can adjust the dimensions of the door, add panels, and adjust the dimensions and placement of those panels. The total number of panels for each door element is the number of horizontal divisions times the number of vertical divisions. Pivot doors have a single door element unless they are double doors. BiFold doors have two door elements, or four if they are double doors. Sliding doors have two door elements.
The Pivot door is hinged on one side only. You can also make the door a double door, with two door elements, each hinged on its outer edge.
The Sliding door slides as if on a track or railing. It has two door elements: one remains stationary while the other moves.
The BiFold door is hinged in the middle as well as on the side. It has two door elements. You can also make the door a double door, with four door elements.


 Create panel
  (Geometry)