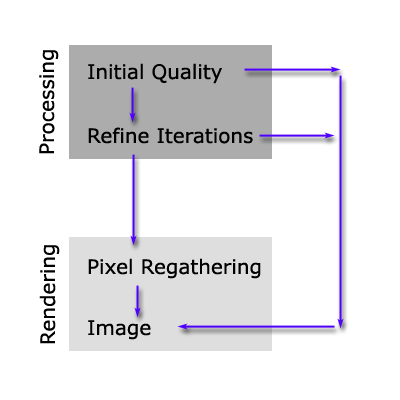
This topic provides an overview of how radiosity works in 3ds Max.
See the section that follows, “Refinement Steps for Radiosity,” for a more detailed description of the solution process.
Refinement Steps for Radiosity
The radiosity process involves three stages of increasing refinement. The first two stages occur during the primary radiosity processing, and the third stage can be used during the final rendering.
Within each of the first two stages, you can stop and start the processing at any time. This can be useful for evaluating interim results or increasing the level of accuracy you desire. For example, you can interrupt the Initial Quality stage at 50% and jump ahead to the Refine stage if you wish. However, once you enter the Refine stage, you cannot continue further iterations of Initial Quality unless you restart the solution.

The stages of a radiosity solution are Initial Quality, Refine, and then Regathering.
In the Initial Quality stage, the distribution of diffuse lighting in the scene is calculated by essentially mimicking the behavior of real photons. Rather than tracing the path of an essentially infinite number of photons, statistical methods are used to choose a much smaller set of “photon rays” whose distribution in space is representative of the actual distribution. As with any statistical sampling process, the greater the number of rays used in the approximation, the greater the accuracy of the solution. During the initial quality stage, the overall appearance of the lighting level of the scene is established. The results can be interactively displayed in shaded viewports.
The initial quality stage performs repeated passes, which are shown in the dialog’s progress bar.
Because of the random nature of the sampling during the initial quality stage, some of the smaller surfaces or mesh elements in the scene might miss being hit by enough rays (or any rays at all). These small surfaces remain dark, and result in the appearance of “variance” or dark spots. To alleviate these artifacts, the Refine stage “regathers light” at every surface element.
You can perform the Refine stage for the entire scene, or for selected objects in the scene.
Even after the Refine stage, it is still possible for visual artifacts to appear in a scene because of the topology of the original model. These artifacts sometimes appear as shadow or light “leaks.” To eliminate even these model-based artifacts, a third, optional refinement stage known as Pixel Regathering occurs at the time of image rendering. This involves a final “regather” process for each pixel of the image. Regathering can add a considerable amount of time to the rendering of a final image, but it also produces the most detailed and artifact-free images possible.
One benefit of using Regathering is that it means the initial modeling and mesh resolution don’t need to be nearly as “refined” or “tight” as would otherwise be required.