The Look At controller is automatically assigned as a transform animation controller upon creation of objects that contain targets, including Target Camera, targeted lights (including IES Sun/Sky) and the Tape helper. It cannot be assigned by the user. To assign the equivalent of a Look At controller to an object, use a LookAt constraint.
Example: To prevent flipping of targeted objects during rotation:
 Move tool and use the coordinate display to position the camera and target at 0,0,0 and 80,0,0, respectively.
 (Select And Link) to link the camera to the dummy, and then link the camera target to the dummy. At this point, the dummy
is parent to both the camera and its target.
(Select And Link) to link the camera to the dummy, and then link the camera target to the dummy. At this point, the dummy
is parent to both the camera and its target.
 Rotate the dummy about its Y axis, and watch the camera.
As the target passes through the zenith and nadir of its orbit, the camera flips.
 Select the camera and go to the
  Motion panel. On the Look At Parameters rollout, turn on Use Target As Up Node.
rotate the dummy about its Y axis.
Motion panel. On the Look At Parameters rollout, turn on Use Target As Up Node.
rotate the dummy about its Y axis.
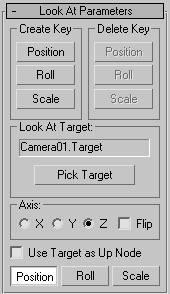
After you create or select an object that contains a Target component, you can access the object's Look At properties on the Motion panel. In this rollout you can change the target, create and delete animation keys, set the axis, and adjust other, related parameters.
When turned on, the controller forces the object on which it acts (source node) to keep one of its local axes aligned with the look-at direction (the vector between the source node and the target node). it also prevents the source node from rotating around the look-at direction, to avoid flipping about the object's local Z axis.
The flipping behavior is most commonly seen when the line between a targeted object and its target is close to vertical; that is, their positions on the World Z axis are nearly the same.
The option works by aligning one of the source node's local axes with one of the target node's local axes. These axes are picked automatically by 3ds Max.
These three buttons let you specify the other rollouts that appear for this controller. In all three cases, the Key Info (Basic) and Key Info (Advanced) rollouts appear. When Position is active, an additional Position XYZ Parameters rollout lets you specify the position axis.


