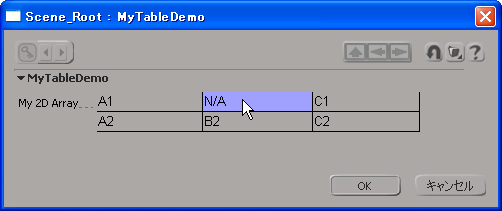
ユーザフレンドリなインターフェイスを使用して、2 次元配列の値を表示または操作したい場合は、プロパティ ページに情報を表示できる GridData パラメータでプロパティ セットを作成できます。
カスタム プロパティ セットを設定します(AddCustomProperty(SceneItem))。
これにグリッド パラメータを追加します(AddGridParameter (CustomProperty))。
グリッド パラメータ値から GridData オブジェクトを取得します(Value(Parameter) *)。
GridData オブジェクトが取得されたら、このオブジェクトの値を一度に 1 つのセルまたは一度に列または行全体に設定することができます(「例: GridData オブジェクトに値の列全体を設定する」を参照)。 また、既存の 2 次元配列をデータとして割り当てることにより、グリッド全体を一度に設定することもできます(「例: GridData オブジェクト内に既存の配列を保存する」を参照)。
SetCell (GridData) * または SetRowValues (GridData) * メソッドを使用して、グリッドを作成することができます。この 2 つの便利なメソッドでは、1 次元の配列を使用して行または列全体を設定できるため、SetCell(GridData)*メソッドを使用してグリッド内のすべてのセルで操作を繰り返す必要がありません。
/*
   This example demonstrates how to create 2 JScript arrays (columns) and
   then store them in a GridData object. It also shows how to set columns
   without using pre-existing arryas and then displays the new grid in a
   property page.
*/
var aCol1, aCol2;

// The top left cell is A1 and the bottom right cell is D3:
aCol1 = new Array( "A1", "A2", "A3" );
aCol4 = new Array( "D1", "D2", "D3" );

// Now create a GridData object and save the arrays in it as columns
var oPSet = ActiveSceneRoot.AddCustomProperty( "MyTableDemo" );
var oGridParam = oPSet.AddGridParameter( "MyTable" );

// This just tweaks the formatting (it will still appear without this)
var oLayout = oPSet.PPGLayout
var oGridCtrl = oLayout.AddItem( "MyTable", "My 2D Array" );
oGridCtrl.SetAttribute( siUIGridHideColumnHeader, true );
oGridCtrl.SetAttribute( siUIGridHideRowHeader, true );
oGridCtrl.SetAttribute( siUIGridColumnWidths, "50" );

// The GridData object itself is in the Value property of the parameter
var oGrid = oGridParam.Value;

// Before setting any values you need to set the dimensions of the grid
oGrid.ColumnCount = 4;
oGrid.RowCount = 3;

// You can use the GridData.SetColumnValues() method to set each array
oGrid.SetColumnValues( 0, aCol1 );
oGrid.SetColumnValues( 3, aCol4 );

// Or you can use it without pre-existing arrays
oGrid.SetColumnValues( 1, new Array( "B1", "B2", "B3" ) );
oGrid.SetColumnValues( 2, new Array( "C1", "C2", "C3" ) );

// You can still change individual values. For example, you can target
// just one cell of the grid (here the middle row, last column):
oGrid.SetCell( 3, 1, "N/A" );

// Display the GridData table on a property page. While you are looking at
// the property page, change the 'N/A' value.
InspectObj( oPSet, null, null, siModal, false );

// Users can change the values in the 2D array through the property
// page: the underlying Grid object is automatically refreshed.
Application.LogMessage( oGrid.GetCell(3,1) );	// <= this will reflect your 'N/A' change

GridData オブジェクトの使い方の一つは、既存の 2 次元の配列を保存してから、プロパティ ページでグリッドを表示することです。 もちろん、この方法が機能するのは、2 次元の配列をサポートする言語(VBScript など)だけになります。
' This example demonstrates how to create a 2D array (3 columns and
' 2 rows) and then store it in a GridData object to display in a
' property page

Dim aTbl()
ReDim aTbl(2,1)

' The top left cell is A1 and the bottom right cell is C2:
aTbl(0,0) = "A1"
aTbl(2,1) = "C2"

' Fill in the rest:
aTbl(1,0) = "B1"
aTbl(2,0) = "C1"

aTbl(0,1) = "A2"
aTbl(1,1) = "B2"

' Now create a GridData object and save the 2D array in it
set oPSet = ActiveSceneRoot.AddCustomProperty( "MyTableDemo" )
set oGridParam = oPSet.AddGridParameter( "MyTable" )

' This just tweaks the formatting (it will still appear without this)
set oLayout = oPSet.PPGLayout
set oGridCtrl = oLayout.AddItem( "MyTable", "My 2D Array" )
oGridCtrl.SetAttribute siUIGridHideColumnHeader, true
oGridCtrl.SetAttribute siUIGridHideRowHeader, true
oGridCtrl.SetAttribute siUIGridColumnWidths, "100"

' The GridData object itself is in the Value property of the parameter
set oGrid = oGridParam.Value

' The Data property of the GridData object allows you to store an
' existing array in one shot (instead of iterating over the array
' and setting up the GridData manually)
oGrid.Data = aTbl

' You can still change individual values. For example, you can target
' just one cell of the grid (here the middle column, top row):
oGrid.SetCell 1, 0, "N/A"

' Display the GridData table on a property page. While you are looking at
' the property page, change the 'N/A' value.
InspectObj oPSet, , , siModal, false

' Users can change the values in the 2D array through the property
' page: the underlying Grid object is automatically refreshed.
Application.LogMessage oGrid.GetCell( 1, 0 )' <= this will reflect your 'N/A' change

' But there is no longer any relationship with the original 2D array
Application.LogMessage aTbl( 1, 0 )' <= this still says "B1"