You can create your own toolbar and use it to hold commonly-used tools and presets. Tools and presets are represented as buttons on the toolbar.
Softimage also includes a couple of blank toolbars that are ready for you to customize by adding your own scripts, commands, and presets:
The lower area of the palette and script toolbar.

The Custom tab of the main shelf (View  Optional Panels Main Shelf).
On the Tree tab, right-click a Toolbars folder and then choose New Toolbar.
For example, to create a toolbar in an Add-on directory, right-click the Toolbars folder under the Add-on directory.
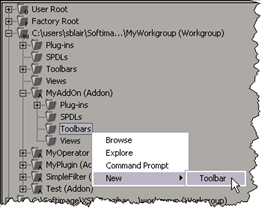
To create a toolbar in a workgroup, right-click the Toolbars folder under the workgroup.
If you want to create an empty toolbar, clear the Populate with Commands from this location check box.
By default, a new toolbar includes all the commands in the same location as the toolbar. For example, when you create a new toolbar in an Add-on directory, the toolbar contains all the commands defined by the add-on.
The Output Directory is the Application\Toolbars folder in the location (workgroup or Add-on directory) you right-clicked in the Plug-in Tree.
You can add a command button to a toolbar by dragging and dropping from the Customize Toolbar window or the Plug-in Manager.
Make sure the toolbar is displayed. For example, select if from the View Toolbars menu.
Choose View Customize Toolbar, or right-click on an empty area of a custom toolbar and choose Customize Toolbar.
In the Customize Toolbar dialog box, select an item from the Command Categories list. For example, if you are looking for a custom command, select Custom Script Commands to display only that type of command in the list.
From the Available Commands list, select an item and drag it to the desired location on a toolbar.
Right-click on a command button and choose Customize Button.
Specify a path for a Bitmap (.bmp file). See Adding Button Bitmaps.
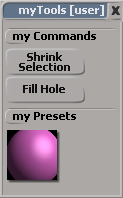
You can add preset buttons to toolbars by dragging them from a browser. You can click the preset button to apply the preset to selected objects. You can also drag and drop the preset button to apply it to an unselected object.
Presets use their embedded thumbnails, if available. You can save a thumbnail of the render region when you save a preset (see Saving Presets [Scene Elements]), or you can attach a thumbnail to a preset using the setthumb standalone (see Creating and Extracting Thumbnail Images for Presets [Standalones]) If a preset does not have a thumbnail, a generic thumbnail is used.

The toolbar widgets are a collection of buttons and separators that you can use on custom toolbars. The following illustration shows how the separators (group labels, horizontal space and line separators, and line breaks) can be used to arrange buttons on a toolbar.
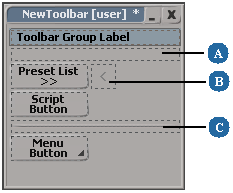
The toolbar widget buttons also allow you to pop-up menus, pop-up lists of presets, and run scripting code:
Menu buttons pop up a menu of commands. You can use the Menu Separator widget to group commands on the pop-up menu.
Preset list buttons pop up lists of presets in a specific location (for example, a list of light shader presets in a workgroup).
Script buttons embed scripting code directly in a toolbar, without creating a script command.
You can move toolbar widgets (such as menu buttons, line breaks, and horizontal separators) by dragging them on the toolbar. Just right-click the toolbar, choose Customize Toolbar, and then drag a toolbar widget to a different location on the toolbar.
Script buttons run scripting code that is saved in the toolbar .xsitb file. Use script buttons to run custom code from a toolbar without creating a command and saving the code to external file. For example, you can use script buttons to call a command with different argument values.
In the toolbar window, right-click an empty area and choose Customize Toolbar. In the Group list, click Toolbar Widgets, and then drag Script Button from the Available Commands list to the toolbar.
In a script editor (or an external text editor), select some scripting code. Drag the code to the toolbar. In the Script Button dialog box, click OK (Script Button should be selected by default). You can drag code from either the history pane or the editing pane of the script editor.
In the Customize Button dialog box:
Script Commands is the scripting code you want to run when the button is clicked. Click Run to test the code.
Scripting Language is the scripting language used by the script button.
Bitmap is the name of a bitmap (.bmp) file displayed on the button. See Adding Button Bitmaps.
You can display bitmaps on script and command buttons on a toolbar.
The size of the bitmap determines the size of the button. Any white pixels (255, 255, 255) in the bitmap are replaced with the background color of the image.
Button bitmaps are displayed only when the toolbar is set to display Thumbnails Only. In the .xsitb file, this translates to:
<properties ... display_as_text_only="False"></properties>
Create a subfolder called bitmaps in the toolbars folder, and add the bitmap file (.bmp) to it.
Tip To quickly access the file system from the Plug-in Tree, right-click a Toolbars folder and choose Browse.
In Softimage, open the toolbar and right-click a script or command button and choose Customize Button.
In the Bitmap box, type the name of the bitmap file without the path or extension. For example, if the bitmap file is "myimage.bmp", type "myimage".
In the toolbar window, right-click an empty area and choose Customize Toolbar.
Drag Menu Button from the Available Commands list to the toolbar.
In the Name Popup Menu Button dialog box, type a label for the button.
To change the button label, you'll have to edit the .xsitb file.
Add commands, view shortcuts, and menu separators to the menu button.
To add a command, click a command group in the Group list of the Customize Toolbar dialog box. Then, in the Available Commands list, locate the command you want and drag it to the menu button.
To add a menu separator between menu items, click Toolbar Widget in the Group list and then drag Menu Separator to the menu button.
Save your changes. In the toolbar window, right-click an empty area and choose Save.
To reorder the items on a menu button, right-click the button and choose Customize Button. In the Customize Popup Menu button dialog box, click a menu item and then click Move Up or Move Down.
To add more commands to a menu button, open the Customize Toolbar dialog box again, and drag the commands to the menu button on the toolbar.
To add items to the default Softimage menus instead of your own, see Standard and Contextual Menus [SDK Guide].
Right-click on a toolbar button and choose Remove Button.
If the button was for a custom command, the command and its associated script are still registered. To unregister a custom command, see Removing Custom Commands.
 Except where otherwise noted, this work is licensed under a Creative Commons Attribution-NonCommercial-ShareAlike 3.0 Unported License


