Image proxies are scaled-down copies of the images that you use in your scenes. Although they do not affect the rendered scene, they can speed up the display considerably by using lower-resolution version of texture images within the Softimage interface.
For example, suppose that you have textured an object with a very large image (say 4K x 4K) image. Each time the image is displayed, in the texture editor or Image shader property editor for instance, it must be loaded and scaled down first. The larger the image, the longer this takes, and the more memory it consumes.
Using image proxies solves this problem by displaying scaled-down copies of the image instead. Whenever a given view needs to display the texture, it requests a proxy of the appropriate size, takes the closest match and scales it to fit the display.
So in the case of a 4K image, the Image shader property editor might use the 16:1 scale proxy, which is 250 x 250, and scale it to fit the display. This requires far less memory and time that using the original image.
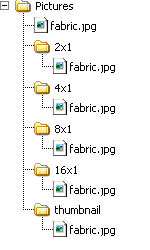
Once they are generated, image proxies are stored in subdirectories of the directory where the original image is stored. Each directory corresponds to a scale (2:1, 4:1, and so on). You can also generate thumbnails along with proxies. They are stored in their own subdirectory alongside the proxies' directories.
If a proxy exists for a given image, Softimage uses it automatically. Thus activating proxies is a matter of simply generating them.You can have Softimage generate proxies automatically, or you can create them yourself.
Generating image proxies automatically is the easier way of working with proxies. Because they are generated for every image that you use, you don't have to keep track of which images have proxies and which ones don't, nor do you have to worry about naming the proxy images properly or creating the proper directory structure. Automatic generation also guarantees that all proxies are up to date, meaning they reflect changes made to the original image.
Open the Preferences view (choose File  Preferences from the main menu) and click Rendering in the explorer pane.
The Rendering Preferences property editor opens in the right pane.
Activate the Generate Automatically option. Proxies will now be generated as they are needed for all of your scene's image clips.
You can now set the remaining options, described in the following steps, to control how the proxies are generated.
Specify a Generation Behavior:
Set the Max Proxy Level. Image proxies are generated at every scaling level up to and including this one. Thus a setting of 4:1 produces 2:1 and 4:1 scale proxies, but not 8:1 or 16:1 scale proxies.
Set the Min Proxy Size. Proxy images below this size are not created, even if the Max Proxy Level setting specifies that they should be.
For example, in the case of a 256x256 image, where the Max Proxy Level is set to 16:1, but the Min Proxy Size is set to 128 pixels, Only the 2:1 scale proxy (128x128) is generated.
If desired, activate the Generate Thumbnail option to generate thumbnail versions of all images for which proxies are created.
If desired, activate the Verbose option to log all operations affecting image proxy use and generation to the command history.
Although generating your image proxies manually is more time-consuming than generating them automatically, it is also a more flexible approach. For example, you may want to render extra information (like the image resolution, copyright information, a watermark, and so on) into the proxy images. You might also want to change other attributes such as the bit depth (proxies generated automatically are always 8-bit).
You can create proxies using any image editing software. Just remember to follow a few simple guidelines to ensure that your proxies are detected and used by Softimage:
Each proxy image must have the same name and file extension as the original image.
Proxy images should be stored in subdirectories of the directory in which the original image is stored. The subdirectories should be named according to the scale of the proxies they contain, as shown in the following image:
 Except where otherwise noted, this work is licensed under a Creative Commons Attribution-NonCommercial-ShareAlike 3.0 Unported License


