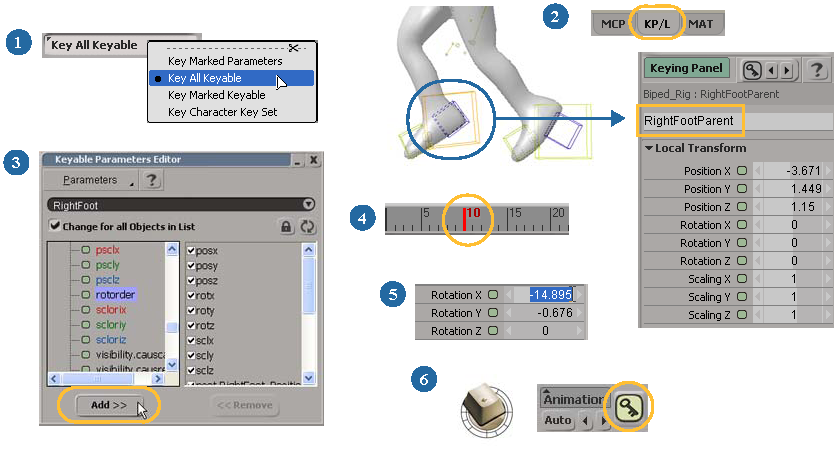
Using the keying panel, you can quickly and easily set keys for specific parameters called keyable parameters (see What Are Keyable Parameters?) of a selected object. Once you have set up the object's keying panel with the keyable parameters you want, you simply select that object and press K or click the keyframe icon to set a key on whatever is in its keying panel.
The keying panel shows you which parameters are keyable on the selected object: what you see is what will be keyed. You can set up these parameters in the Keyable Parameters Editor, as described in The Keyable Parameters Editor.
Here's an overview of the steps you can do to set keys using the keying panel. See below for more details on each of the steps.

Set the appropriate Save Key preference:
Key Only Keyable if you want to key all keyable parameters in the keying panel.
Key Marked Keyable if you want to key only the marked keyable parameters in the keying panel.
See Selecting Which Keying Method to Use for more information.
Select an object and do either of the following to open the keying panel:
Click the KP/L tab at the bottom of the main command panel to anchor the keying panel in the right panel of the Softimage window.
Choose View  Animation
  Keying Panel
  Keying Panel from the main menu to open the keying panel in a floating window.
By default, the selected object's local transform parameters and visibility parameters are displayed.
If you need to change the keyable parameters in the keying panel (add more or remove some), open the keyable parameters editor. See The Keyable Parameters Editor.
Set the values for the parameters in the keying panel — see Changing Parameter Values in the Keying Panel.
If you are working with marked parameters, you need to first mark the parameters you want to animate, then set their values.
Set a key for all the selected object's keyable parameters in the keying panel (see Setting Keys in the Keying Panel).
If you are working with marked parameters, only the marked parameters are keyed if you've selected Key Marked Keyable as the Save Key preference.
The parameters that are displayed in the keying panel are called keyable parameters. You can think of keyable parameters as the parameters that you use and animate all the time: they let Softimage know which parameters are important to that object.
Keyable parameters are simply any parameter that you have flagged as being available to be displayed and keyed in the keying panel. You can set which parameters are keyable or not by using the keyable parameters editor — see The Keyable Parameters Editor.
A keyable parameter is not the same thing as an animatable parameter, which is any parameter than can be animated (as represented by an animation icon). However, the parameters that you will mostly likely flag as being keyable will be animatable.
Keyable parameter information isn't a property of that parameter; rather, it is an internal flag that is set on a parameter that tells Softimage to display or hide it in the keying panel.
Keyable parameters are supported in the rest of Softimage in a number of ways:
In the animation editor's explorer, you can select Explorer  Keyable Parameters for an object to filter for only these parameters (does not include other parameters in the keying panel that are non-keyable
but still visible).
In the timeline, you can right-click and choose the Show Keys  Keyable Parameters filter.
In the explorer, you can set the filter to Keying Panel Parameters. This includes all parameters that are displayed in the keying panel (keyable and non-keyable but still visible).
You can store an object's keyable parameters in an action source for use in the animation mixer by choosing any of the Actions  Store
Store  Keyable Parameters commands.
In the parameter connection editor (for linking parameters), you can set the Driving Source or Driven Target filters to Keying Panel Parameters. This includes all parameters that are displayed in the keying panel (keyable and non-keyable but still visible).
Scripting has commands that return collections of keyable parameters.
The keying panel shows you all the keyable parameters on the selected object: what you see is what will be keyed.
You can view parameters in the keying panel for only one selected object at a time.
If you have multiple selected objects, you can select which one's parameters to display in the keying panel using the keyable parameters editor.
The keying panel lets you work efficiently because you display only the parameters you need for keying per object. For example, when you animate your character rig, you probably always key the same parameters on the same control object — only the translation parameters on one, or only the rotation on X on another, and so on. Using the keying panel, you can make sure that only those parameters are available for keying on that control object. Besides making the keying process go more quickly, the keying panel helps you to prevent animation mistakes from happening because only its contents are keyed, and nothing else.
If you're used to creating marking sets for keying, you can think of the keying panel as an object's marking set. You can even use the keying panel as a single marking set for a whole character. For example, you can make sure that each of the character rig's control objects include all the appropriate rotation and translation parameters as keyable parameters in the keying panel. Then select the character's main control and press Alt+K to set keys for all the keyable parameters on the character's (the branch's) control objects at once.
You can also mark parameters in the keying panel, as you may be used to doing in Softimage, and then set keys on only those parameters. Or if you're switching between Softimage and other programs, you can use a "transition" workflow: use the keying panel for keying the objects' keyable parameters, but put all keyable parameters into a marking set, in case you need to return to the "marked parameter way".
You can view parameters in the keying panel for only one selected object at a time; however, if you have multiple selected objects, you can still switch among them while keeping all objects selected.
Open the keyable parameters editor (see The Keyable Parameters Editor).
From the object list, shown above the parameter explorer, select the object whose parameters you want to display.

If you have multiple objects in the object list in the keyable parameters editor, select the Change for all Objects in List option to apply the same type of changes you make to the keyable parameters to all objects in the list.
For example, if you select this option and then remove the Visibility parameters from the keyable parameter list or clear their check boxes, the same is done for the corresponding parameters for all objects in the list.
You can set a preference for the state of this option (on or off) in the Keying Panel Preferences property editor: choose Preferences from the Keying Panel menu.
The keying panel lets you work efficiently because you display only the parameters you need for keying. Depending on how you like to work, you can choose to set keys on either keyable or marked parameters in the keying panel:
Setting keys on keyable parameters lets you key all parameters in the keying panel at once.
Setting keys on marked parameters let you key only the marked keyable parameters in the keying panel.
Press Alt+K to set keys on all the parameters for the selected object and its children. Choose Set Branch Key from the Animation menu to set keys on all the keyable parameters for the selected object and its children.
Set Key Only Keyable as the Save Key preference. See Selecting Which Keying Method to Use for more information.
If you're using the Maya or 3ds Max interaction mode, this option is on by default.
Go to a frame where you want to set a key on the object's keyable parameters and do any of the following:
Press the K key (or press S if you're using the Maya interaction mode).
If you press Shift+K when you're at a keyframe, it removes those keys on all keyable parameters.
Press Alt+K to set keys on all the keyable parameters for the selected object and its children.
You can also choose Set Branch Key from the Animation menu to do the same thing.
Click the key icon at the top of the keying panel.
If you click the key icon when you're at a keyframe (the icon is red), it removes those keys on all keyable parameters.

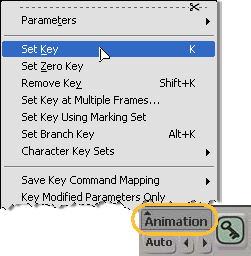
Click the key icon in the Animation panel at the bottom of the Softimage window.
If you click the key icon when you're at a keyframe (the icon is red), it removes those keys on all keyable parameters.

Choose Set Key from the Animation menu in the Animation panel.
Choose Remove Key to remove keys for all parameters in the keying panel at this frame.

Set Key Marked Keyable as the Save Key preference. See Selecting Which Keying Method to Use for more information.
Mark the keyable parameters in the keying panel:
Go to a frame where you want to set a key and do any of the following to set keys as described in Setting Keys for Keyable Parameters. The difference is that only the marked parameters in the keying panel will have keys set on them.
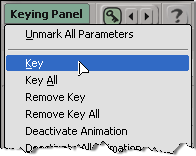
In addition to the other methods for keying, you can also choose Key from the Keying Panel menu in the keying panel to set keys on only the marked parameters in the keying panel.
Choose Remove Key to remove keys for the marked parameters in the keying panel.

Mark the parameters in the keying panel whose animation you want to mute and choose Deactivate Animation from the Keying Panel menu in the keying panel. The parameter's animation icon turns white when muted.

Mark parameters in the keying panel, then right-click on one of these parameters and choose Deactivate Animation.
When you open the keying panel, the selected object's Local Transform and Visibility parameters are displayed by default, meaning that they are set as being keyable parameters (see What Are Keyable Parameters? for more information). However, if you want to display and key other parameters in the keying panel, you need to make them keyable using the keyable parameters editor.

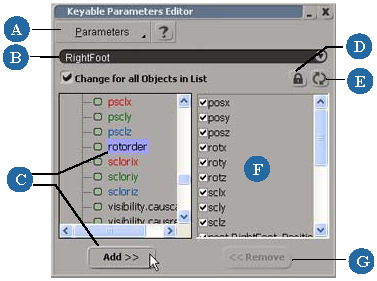
| A |
Select a parameter filter type from this menu. See Making Parameters Keyable for more information. |
| B |
If there are multiple selected objects, choose one from this list. You can display only one object's parameters at a time in the keying panel. |
| C |
Select one or more parameters from this explorer, then click the Add button to add them to the keyable parameter list on the right. See Making Parameters Keyable for more information. |
| D |
Lock icon prevents the explorer from updating when you select another object. |
| E |
Update icon refreshes the explorer with the selected object. |
| F |
List of keyable parameters that are displayed in the keying panel. See What Are Keyable Parameters? for more information. |
| G |
Select a keyable parameter from this list and click Remove to make it non-keyable. See Making Parameters Non-Keyable for more information. |
Do either of the following to open the keyable parameters editor:
Choose Keyable Parameters Editor from the Keying Panel menu in the keying panel.
Choose View  Animation
  Keyable Parameters Editor from the main menu.
If you have multiple objects selected, select which one you want to modify from the object list in the keyable parameters editor.

Select a parameter filter type from the Parameters menu in the keyable parameters editor to determine which type of parameter is displayed in the parameter explorer:
Local Transform displays only the parameters in the local transformation node (basically, position, rotation, and scaling) of the selected object.
Visibility displays only the parameters in the visibility node of the selected object.
Custom displays only custom parameter sets for the selected object. These include marking sets, which are a type of custom parameter set.
You can toggle the Use Script Names command in the Parameters menu to either display the parameter names as they are used for scripting or the parameter name in full. The script name is shorter than the full parameter name but more cryptic.
You can set the preference for the parameter name display in the Keying Panel preferences property editor: choose Preferences from the Keying Panel menu in the keying panel.
In the parameter explorer, select one or more parameters that you want to make keyable.
Click the Add button below this explorer.
This parameter is displayed in the keyable parameter list (on the right) and is immediately displayed in the keying panel.
You can make parameters non-keyable in either the keyable parameters editor or in the keying panel itself.
Clear the check box of a keyable parameter from the list on the right side of the keyable parameters editor. This makes the parameter non-keyable, but still visible in the keying panel. This type of parameter is displayed in green in the keying panel.
Select a keyable parameter from the list and click the Remove button below this list. This parameter moves to the explorer on the left and is immediately removed from the keying panel.
 Except where otherwise noted, this work is licensed under a Creative Commons Attribution-NonCommercial-ShareAlike 3.0 Unported License