


You can import a dotXSI 6.0 (*.xsi) file saved in ASCII format to a Crosswalk-enabled Maya installation. You can export an object, multiple-selected objects, or the entire scene to a single dotXSI 6.0 (*.xsi) file saved in ASCII or Binary format.
For details on which scene elements are imported or exported, see the following topics:
The Import Options dialog box opens.
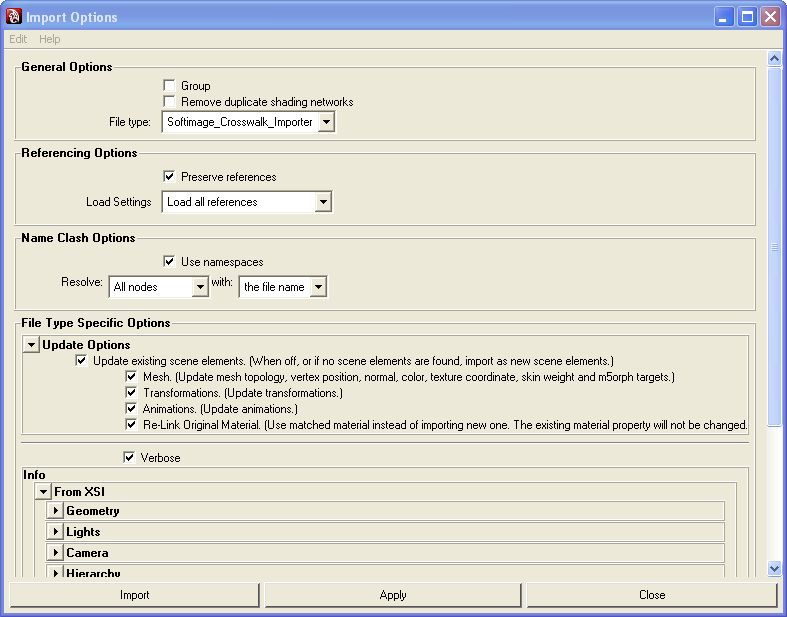
Group: Specifies whether the imported objects are grouped under a single transform when you import the file. Grouping makes it easier to work on the nodes of imported objects. [Default is Off]
Remove duplicate shading networks: Prevents the duplication of geometry and shading networks if you import a file more than once into Maya.
File type: Select from the drop-down list the file type you are importing. Make sure the file type is set to Autodesk_Crosswalk_Importer. The Crosswalk Update options are added to the dialog box.
Model referencing is not supported with the Crosswalk Importer. All references are imported directly into the scene. That is, they are no longer references, but are now objects in the scene.
Use namespaces: When you import a scene with the Use Namespaces option enabled, Maya creates a new namespace that contains the imported data. Using namespaces ensures that all nodes are uniquely named.
A namespace is a grouping of objects under a given name. Each item in a namespace is identified by its own name along with the namespace it belongs to. By default, the basename of the imported or referenced file is added to the beginning of the imported or referenced object names, separated by colons.
For example, if you are importing a scene named foo.ma that contains an object named ball, after it has been imported the ball is named foo:ball.
You can create, name, parent, and remove namespaces using the namespace MEL command.
Namespaces do not effect selection, the DAG, the Dependency Graph, or any other aspect of Maya.
Resolve: When you import a scene into another scene, naming conflicts occur if the nodes share the same name and parent nodes. To resolve these naming conflicts, you rename only nodes with the same name and parents (Clashing nodes) or you can rename (All nodes). When using namespaces, which is recommended, all nodes are resolved.
With: Specifies whether to resolve naming conflicts with (the file name) or with (this string) you enter as the namespace.
Deselect the Update existing scene elements checkbox if you want to add or merge scene elements only. See Merging Scene Elements for an explanation of when this is most useful.
Select the Update existing scene elements checkbox if you want to match and replace the existing scene elements with those being imported. See Updating Scene Elements.
In the Import dialog box, do the following:
In Maya's Import Options dialog box, deselect the Update existing scene elements checkbox if you want to import using the merge mode. Merging scene elements can be useful in the following situations:
You are importing a dotXSI file into an empty Maya workspace. In other words, there is nothing to update, you are simply adding all elements in the dotXSI file to a new/untitled scene.
All modifications and the subsequent output of the scene file will remain within a Maya workflow.
You want to make sure that the data in your currently open Maya scene remains untouched and that the dotXSI file being imported is simply merged as is.
You made modifications to the original Maya scene after exporting it to dotXSI and now you want to re-import the dotXSI file to merge it back without updating any of the modified scene elements.
You have two dotXSI files that may contain scene elements with the same name but are not the same objects. You want to import both files but you do not want to update/replace objects in the first file by objects (with the same name) in the second file.
You want to use the merge mode as a way of duplicating a scene.
You want to preserve vertex user data (this data is overwritten when updating scene elements).
In Maya's Import Options dialog box, select the Update existing scene elements checkbox if you want to match and update scene elements in the dotXSI file with scene elements in the Maya scene.
The update process looks inside the currently open Maya scene for elements that "match" (based on name) with elements that are being imported. When matches are found, the elements in the currently open Maya scene are replaced by the ones being imported in the dotXSI file.
The basic updating workflow is as follows:
Choose File  Import to bring the modified dotXSI file back into Maya.
In the Import Options dialog box, make sure the File type is set to Softimage_Crosswalk_Importer.
Select the Update existing scene elements checkbox.
If no matching scene elements are found, the scene elements are imported as new scene elements. New scene elements are merged into the current scene.
In the case where a new scene element is a child of a matched element in a hierarchy, it will be inserted as a child of the existing element. A new hierarchy is not created.
Select the scene elements and attributes you want to update:
Mesh: Update mesh topology, vertex position, user defined normals, vertex color, texture coordinates, skin weight data, and morph targets.
If custom per-vertex data or custom per-polygon data is present on the matched original mesh, they will be lost (overwritten).
Transformations: Update transformations, hierarchies, and animation.
Animations: Update all animation. Disabling this option is useful when you are updating a scene where only the geometry has been modified.
Re-link Original Material: Use the matched original material instead of importing a new one. The existing material property will not be changed.
In the Import dialog box, do the following:
ChooseFile Export All or Export Selection from the main menu.
The Export Options dialog box opens:
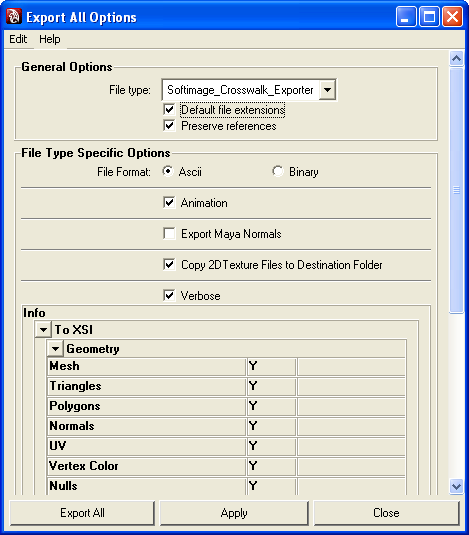
File type: Select from the drop-down list the file type you are importing. Make sure the file type is set to Autodesk_Crosswalk_Exporter. The Crosswalk specific options are added to the dialog box.
Default file extensions: Exports the file with the default extension for that file type.
Model referencing is not supported with the Crosswalk Exporter. All references are exported within the scene. That is, they are no longer references, but are now objects in the scene.
Set the File Type Specific Options:
File Format: Choose either the ASCII or Binary version of the dotXSI file.
Animation: Exports all supported animation to the dotXSI file.
Export Maya Normals: Exports normals as user-defined Maya normals [MAYANormal].
Copy 2D Texture Files: When enabled, copies all 2D texture files, including texture sequences to where the dotXSI file is written. If a 2D texture file does not exist, it is replaced by the noIcon image. If a 2D texture file is missing from a texture sequence, the previous valid file is used instead (or the noIcon if there are no other valid files).
When disabled, only the 2D texture reference(s) are exported without checking for the actual existence of the file(s).
Click the Export All or Export Selection button (depending on which export option you chose from the File menu).
In the Export dialog box, do the following:
 Except where otherwise noted, this work is licensed under a Creative Commons Attribution-NonCommercial-ShareAlike 3.0 Unported License