Keyer


| Setup Matte | Matte Correct | Shapes | FG Correct | Keyer | Composite | Edge Correct | Mask | Output

The keyer uses a matte to composite areas of the foreground image over the background image. The matte can be extracted from either the foreground image or the independent matte input, in terms of chroma, luma, RGB, HSV or a mathematical expression. The keyer offers comprehensive facilities for matte manipulation and color correction.

Requires a background (RGB) and a foreground (RGB).

Optionally accepts an independent matte source (RGB). If a clip is connected into this input, this clip will be used to create the matte, but the original foreground will be used in the final composite.

Produces an output (Any).

Setup Matte

Output

Selects what is displayed and rendered. Select either: Matte, FG Pull, Composite, Cutout, FG Matte, BG Matte, or Edge Profile.

When Matte is selected you see the final matte as it will be applied to the images. It includes the foreground pull matte according to the selection in FG Pull-On, and any shapes you may have created. When FG Pull is selected, you see only the foreground pull matte.

This menu is found on All of the property pages in this property editor, except for Shapes, Mask and Output.

Mode

Sets the extraction method for the matte. SSee the following sections for more information::

The menu displays the currently selected option.

Matte

Specifies which matte is defined by the Setup Matte options. Select one of the following:

Matte: Sets up the main matte.

FG Pull: Sets up the foreground pull matte. This matte is set up in the same way as the main matte, but is independent from it.

The foreground pull matte can be used, for example, where the main matte produces good edges, but has holes in it - in this case the foreground matte could be extracted using a method that does not produce holes but perhaps has poor edges. This could then be used to cover the holes in the main matte.

You can specify how to combine the main matte with the FG Pull matte. See Matte Correct.

Color Difference Mode Options

Key Channel

Specifies the color channel to key. Choose Red, Green, Blue, or Luma.

Spill

Determines how impure the backing color may be and still be removed (for example if keying off blue, how much red or green may be present in the backing color). Set any floating-point value between 0 and 2 using the slider.

If keying off blue, moving the slider to the right will remove magenta, and to the left will remove cyan.

If keying off red, moving the slider to the right will remove magenta, and to the left will remove yellow.

If keying off green, moving the slider to the right will remove yellow, and to the left will remove cyan.

Foreground Level

Determines the maximum color value that will be considered as pure foreground. By increasing the level of foreground you will increase the amount of pure white foreground. Use the slider to set any floating-point value between 0 and 1. Alternatively, click the FG button and pick a value from the foreground of the image in an FX Viewer.

FG Button

Sets the Foreground Level interactively. Click this button then, in an FX viewer, click or drag on the area of matte you want to become foreground. Click the button again to deactivate the picking function.

Background Level

Determines the minimum color value that will be considered as pure background. By increasing the level of background you will decrease the amount of pure background. Use the slider to set any floating-point value between 0 and 1. Alternatively, click the BG button and pick a value from the backing area of the image in an FX Viewer.

BG Button

Sets the Background Level interactively. Click this button then, in an FX Viewer, click or drag on the area of matte you want to become background. Click the button again to deactivate the picking function.

Luma Mode Options

Foreground Level

Determines the maximum luma value that will be considered as pure foreground. By increasing the level of foreground you will increase the amount of pure white foreground. Use the slider to set any floating-point value between 0 and 1. Alternatively, click the FG button and pick a value from the foreground of the image in an FX Viewer.

FG Button

Sets the Foreground Level interactively. Click this button then, in an FX viewer, click or drag on the area of matte you want to become foreground. Click the button again to deactivate the picking function.

Background Level

Determines the minimum luma value that will be considered as pure background. By increasing the level of background you will decrease the amount of pure background. Use the slider to set any floating-point value between 0 and 1. Alternatively, click Pick BG button and pick a value from the backing area of the image in an FX Viewer.

BG Button

Sets the Background Level interactively. Click this button then, in an FX Viewer, click or drag on the area of matte you want to become background. Click the button again to deactivate the picking function.

Reverse

Inverts levels in the matte; that is: new level = 1 - old level.

RGB Mode Options

Use the RGB matte setup options to define the main matte or the FG pull matte, based on a key color. The key color is the main background color that is added to the matte. Once you select main key color, you can add a range of adjacent colors to the matte, and control the transition between the foreground and background.

To define a matte, you adjust the following values:

Key Color

The key color is the main background color that you add to the matte. On the color sliders, it is represented by the red marker.

Tolerance

Tolerance is the range of color values around the key color that are included in the background. On the color sliders, the limits of the range of color defined by the tolerance are represented by a blue marker on either side of the red key color marker.

Softness

Softness controls how sharp the transitions are between foreground and background areas of the matte. On the color sliders, the softness is represented by yellow markers that appear outside of the tolerance range (defined by the blue markers).

Use the controls described below to adjust the values described above.

R, G, B Sliders

The RGB sliders allow you to interactively set and adjust the Key Color, Tolerance and Softness values described above.

The area covered by the semi-transparent overlay of the matte level graph represents the range of color that is added to the matte. The graph's horizontal axis represents color values, while the vertical axis represents the degree to which they contribute to the matte.

The red marker is the key color. Moving the marker adjusts the key color accordingly.

The blue markers control tolerance. Moving them increases or decreases the range of color, around the key color, that is added to the background.

The yellow markers control softness. Moving them increases or decreases the falloff outside of the color range defined by the tolerance. Put another way, softness controls the sharpness of the transition between the matte's foreground and background.

Tolerance + Button

Widens the range of component values that will be converted to background in the derived matte.

Click button, then, in an FX Viewer, click or drag on an area in the image that should be included in the background, but is not currently. The tolerance markers in the RGB sliders are set to the range of component values in the selected area.

You can add more areas of tolerance by Shift-selecting areas in the image.

Click the button again to deactivate the selection function.

Tolerance - Button

Narrows the range of component values that will be converted to background in the derived matte.

Click the Tolerance - button, then, in an FX Viewer, click or drag on an area in the image which is currently included in the background, but which should not be. The Tolerance markers in the RGB sliders move accordingly.

Remove more areas from the tolerance by Shift-selecting areas in the image.

Click the button again to deactivate the selection function.

Softness + Button

Widens the range of component values that will be converted to partial background in the derived matte (in other words it increases the amount of grayness in the nearly white areas of the final matte).

Click the button, then, in an FX Viewer, click or drag on an area in the image which should be included in the foreground, but is not currently. The Softness sliders move outward (away from the key color marker) accordingly.

You can add more areas of softness by Shift-selecting areas in the image.

Click the button again to deactivate the selection function.

Softness - Button

Narrows the range of component values that will be converted to partial background in the derived matte (in other words it reduces the amount of gray in the final matte).

Click the button then, in an FX Viewer, click or drag on an area in the image that should be solid foreground but is partially background. The Softness sliders move inwards (towards the key color marker) accordingly.

Remove more areas from the softness by Shift-selecting areas in the image.

Click the button again to deactivate the selection function.

Key Color (R, G, B)

Sets the Key color to the color defined by the sliders. (The red marker in the RGB sliders represents the key color.)

K Button

Sets the Key color to the selected color. (The red marker in the RGB sliders represents the key color.)

Click the K button, then, in an FX Viewer, click or drag on an area of the matte you want to become the background.

Click the button again to deactivate the selection function.

HSV Mode Options

The controls for setting up mattes using HSV are equivalent to those for RGB.

Expression Mode Options

Matte (expression)

Sets the initial foreground and background levels according to a mathematical expression. For example, if keying off blue, you might use an expression such as:

if (b>max(r, g)) then 1-b else 1

Enter the required expression and press Enter.

See Using Parser Expressions for details on valid variables and arguments.

Foreground Level

Sets the density of the foreground area in the matte. Use the slider to set any floating-point value between 0 and 1. Alternatively click the FG button and pick a value from the foreground of the image in an FX Viewer.

FG Button

Select this button then, in an FX Viewer, click or drag on the area of matte you want to become foreground.

Click the button again to deactivate the picking function.

Background Level (Key)

Sets the background level relative to the full value as defined by the Key Color. Use the slider to set any floating-point value between 0 and 1. Alternatively click the BG button and pick a value from the backing area of the image in and FX Viewer, or set a color value using the Key Color sliders.

BG Button

Select this button then, in an FX Viewer, click or drag on the area of matte you want to become background.

Click the button again to deactivate the picking function.

Key Color (R,G,B)

Sets the Background Level (Key) color defined above. Use the Sliders, or click the K button and click or drag on the area of matte you want to become background in an FX Viewer.

Matte Correct

Matte

These options control the size and edge softness of the main matte.

Erode

Use Erode to shrink or grow the main matte. Erode sets the minimum threshold for the main matte levels Use the slider to set a floating point value. Set a negative value to shrink the main matte. Set a positive value to grow the main matte.

Edge Softness

Use Edge Softness to set the blur to the edge of the main matte. Use the slider to set a positive floating point value.

User Blur Kernel

The kernel size is the area affected by eroding or softening the image. Click the Enable box to activate the Blur Kernel. Then use the slider to specify a Size value.

If you set a large kernel size the image can be dramatically affected by the Erode and Edge Softness slider settings, which can affect image quality. Kernel size should be set to 0 if you want to make very subtle changes using the Erode and Edge Softness sliders.

FG Pull

These options control the size and edge softness of the FG Pull matte. This matte is set up in the same way as the main matte, but is independent from it. The foreground pull matte can be used, for example, where the main matte produces good edges, but has holes in it - in this case the foreground matte could be extracted using a method that does not produce holes but perhaps has poor edges. This could then be used to cover the holes in the main matte.

Erode

Use Erode to shrink or grow the FG Pull. Erode sets the minimum threshold for FG Pull levels. Use the slider to set a floating point value. Set a negative value to shrink the FG Pull. Set a positive value to grow the FG Pull.

Edge Softness

Use Edge Softness to set the blur to the edge of the FG pull. Use the slider to set a positive floating point value.

User Blur Kernel

The kernel size is the area affected by eroding or softening the image. Click the Enable box to activate the Blur Kernel. Then use the slider to specify a Size value.

If you set a large kernel size the image can be dramatically affected by the Erode and Edge Softness slider settings, which can affect image quality. Kernel size should be set to 0 if you want to make very subtle changes using the Erode and Edge Softness sliders.

FG Pull Matte Usage

Menu

Sets the mathematical operation to be performed on the main matte and FG Pull matte.

Off The mattes are not mixed.

Add (A+B) Applies the union of brightness from the foreground and background. Any areas which are shared between the fore-ground and background are affected by the brightness of both images.

Sub (A-B) Applies the foreground brightness. Any areas that overlap with the background are removed from the resulting image.

Multiply (A*B) Applies the shared areas of the foreground and background. This is the multiply function.

Screen (A+B-A*B) Applies the union of foreground and background. Any areas which are shared between the foreground and background are affected by half the brightness of both images.

Xor (A+B-2*A*B) Applies the union of foreground and background. any areas which are shared between the foreground and background are removed from the resulting image.

Min (min(A,B)) Applies the shared areas of foreground and background. The brightness of the image is unaffected.

Max (max(A,B)) Applies the union of foreground and background. The brightness of any areas which are shared between the foreground and the background is unaffected.

Difference (abs(A-B)) The foreground is subtracted from the background.

FG Pull Mix

Sets the proportion of the FG Pull to add to the main matte. Use the slider to set a value between 0 (no foreground pull matte added) and 1 (all of the foreground pull matte value added).

Matte Graph

Input matte levels along the horizontal axis are mapped to output levels on the vertical axis by the response curve. Remap the matte levels by editing the response curve.

Shapes

Creates outlines in the main matte to be filled in with matte white (foreground). Create, animate and blur shapes the same way as you would from the Mask Options.

Once the outline has been created, select Matte from the Output menu to see it (see Setup Matte). If you only see an outline rather than a filled shape, you are probably displaying the foreground pull matte.

FG Correct

Output

Selects what is displayed and rendered. Select either: Matte, FG Pull, Composite, Cutout, FG Matte, BG Matte, or Edge Profile.

When Matte is selected you see the final matte as it will be applied to the images. It includes the foreground pull matte according to the selection in FG Pull-On, and any shapes you may have created. When FG Pull is selected, you see only the foreground pull matte.

This menu is found on All of the property pages in this property editor, except for Shapes, Mask and Output.

Low/Mid/High, Red/Green/Blue

These sliders allow you to adjust dark, mid tone or light colors. For example you can alter just dark colors by using the Low sliders, or you could adjust only light colors by using just the High sliders. If you wanted to alter only mid tone shades of blue you would you adjust only the Mid Blue slider. Use the sliders to set color correction factors between -1 and 1. This correction has no effect on the matte extraction.

BG Correct

Output

Selects what is displayed and rendered. Select either: Matte, FG Pull, Composite, Cutout, FG Matte, BG Matte, or Edge Profile.

When Matte is selected you see the final matte as it will be applied to the images. It includes the foreground pull matte according to the selection in FG Pull-On, and any shapes you may have created. When FG Pull is selected, you see only the foreground pull matte.

This menu is found on All of the property pages in this property editor, except for Shapes, Mask and Output.

Low/Mid/High, Red/Green/Blue

These sliders let you adjust dark, mid tone or light colors. For example you can alter just dark colors by using the Low sliders, or you could adjust only light colors by using just the High sliders. If you wanted to alter only mid tone shades of blue you would you adjust only the Mid Blue slider. Use the sliders to set color correction factors between -1 and 1. This correction affects only RGB channels and has no effect on the alpha channel.

Composite

Settings

Output

Selects what is displayed and rendered. Select either: Matte, FG Pull, Composite, Cutout, FG Matte, BG Matte, or Edge Profile.

When Matte is selected you see the final matte as it will be applied to the images. It includes the foreground pull matte according to the selection in FG Pull-On, and any shapes you may have created. When FG Pull is selected, you see only the foreground pull matte.

This menu is found on All of the property pages in this property editor, except for Shapes, Mask and Output.

Mix

A multiplication factor applied to the matte levels before the matte is applied to the images. Use the slider to set a value between 0 (matte all black - all background no foreground) and 1 (matte unchanged).

FG Gain

A multiplication factor applied to the foreground luma levels. Use the slider to set a value between 0 (foreground completely black) and 2 (foreground twice as bright).

BG Gain

A multiplication factor applied to the background luma levels. Use the slider to set a value between 0 (background completely black) and 2 (background twice as bright).

Reflection Suppression

Mode

Select the color you want to suppress in the foreground. This is usually the color used for the backing and you will be suppressing its reflection in the foreground object. When you adjust the Reflection setting the selected color is removed from the foreground and replaced with a mix of the other two colors. For example, if keying off blue, blue pixels in the foreground will be replaced with a mix of green and red.

Reflection

Sets the amount of the reflection suppression effect. Use the slider or onscreen calculator to set a value between 0 and 2.

Balance (Un-Selected Channels)

Affects how much of the color selected in the Mode menu is removed from the image, using the two unselected. Drag the slider to the left or right to vary the proportion; the default central position will give an equal mix of the two components.

If keying off blue, red is to the right and green to the left.

If keying off green, red is to the right and blue to the left.

If keying off red, blue is to the right and green to the left.

Curves

Output

Selects what is displayed and rendered. Select either: Matte, FG Pull, Composite, Cutout, FG Matte, BG Matte, or Edge Profile.

When Matte is selected you see the final matte as it will be applied to the images. It includes the foreground pull matte according to the selection in FG Pull-On, and any shapes you may have created. When FG Pull is selected, you see only the foreground pull matte.

This menu is found on All of the property pages in this property editor, except for Shapes, Mask and Output.

Graph

The matte is split before it is applied separately to the foreground and background images. You can control how these foreground and background mattes are derived.

Main matte levels are entered along the horizontal axis and mapped to a foreground matte level by the FG Matte curve, and to a background matte level by the BG Matte curve.

The default mappings are that the foreground matte corresponds to the main matte whilst the background matte is the inverse of this (1-main matte level).

Use the graph to remap the matte levels by clicking the FG Matte or BG Matte curve button to select the curve, and adjusting the curve in the graph.

Edge Correct

Selectively applies color correction to the composite image. The correction is controlled by a further matte type image which is comprised of edge information derived from the main matte.

Matrix

Output

Selects what is displayed and rendered. Select either: Matte, FG Pull, Composite, Cutout, FG Matte, BG Matte, or Edge Profile.

When Matte is selected you see the final matte as it will be applied to the images. It includes the foreground pull matte according to the selection in FG Pull-On, and any shapes you may have created. When FG Pull is selected, you see only the foreground pull matte.

This menu is found on All of the property pages in this property editor, except for Shapes, Mask and Output.

RGB Matrix

A correction matrix where a component's level can be adjusted by the levels of the other two components. Set the multiplication factor at each cross-point, as necessary.

HSV

Output

Selects what is displayed and rendered. Select either: Matte, FG Pull, Composite, Cutout, FG Matte, BG Matte, or Edge Profile.

When Matte is selected you see the final matte as it will be applied to the images. It includes the foreground pull matte according to the selection in FG Pull-On, and any shapes you may have created. When FG Pull is selected, you see only the foreground pull matte.

This menu is found on All of the property pages in this property editor, except for Shapes, Mask and Output.

Sat Level

Determines the saturation of the composite image within the areas defined by the edge color correction matte. Set a value between 0 and 10; the default value of 1 leaves the saturation unchanged.

Gamma

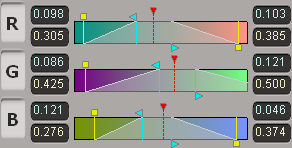
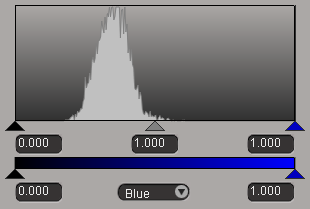
Adjusts component mapping by controlling Gamma, Gain, and Offset for RGB components, as well as Luma. Changes apply to the entire image.

Contrast

Used to remap component values by adjusting contrast for the image's RGB components, as well as the Luma. Changes apply to the entire image.

Histogram

Output

Selects what is displayed and rendered. Select either: Matte, FG Pull, Composite, Cutout, FG Matte, BG Matte, or Edge Profile.

When Matte is selected you see the final matte as it will be applied to the images. It includes the foreground pull matte according to the selection in FG Pull-On, and any shapes you may have created. When FG Pull is selected, you see only the foreground pull matte.

This menu is found on All of the property pages in this property editor, except for Shapes, Mask and Output.

Component Menu

Selects the component, or luma, to be manipulated. Select Red, Green, Blue or Luma. The menu shows the last selected option.

Histogram

The histogram can be used to implement a component level mapping process, using the parameters in the boxes at the four corners of the histogram, or the triangles.

Component levels are placed on the horizontal axis, and the number occurrences of each component level are placed on the vertical axis. The bar underneath the histogram graph represents the output values to which the input values are mapped.

You can remap values by sliding the triangles at the bottom of the graph an on the bar, or by entering new values in the corresponding boxes.

Input Minimum: Input Minimum is the boundary value between the region where all input values are mapped to the output minimum value (to the left) and the region where input values are mapped one-to-one to output values (to the right).

Type a number in the top left-hand box of the histogram display and press Enter, or slide the triangle in the lower-left hand corner of the histogram graph to the desired value.

Input Maximum: Input Maximum is the boundary value between the region where input values are mapped one-to-one to output values (to the left) and the region where all input values are mapped to the output maximum value (to the right).

Type a number in the top right-hand box of the histogram display and press Enter, or slide the triangle in the lower-right hand corner of the histogram graph to the desired value.

Output Minimum: Output Minimum is the output value that all input values below the Input Minimum are mapped to.

Type a number in the bottom left-hand box of the histogram display and press Enter, or slide the triangle on the left side of the output bar to the desired value.

Output Maximum: Output Maximum is the output value that all input values above the Input Maximum are mapped to.

Type a number in the bottom right-hand box of the histogram display and press Enter, or slide the triangle on the right side of the output bar to the desired value.

Gamma: Performs a gamma adjustment on the selected component.

Type a number in the middle box of the histogram display and press Enter, or slide the gray triangle in the lower middle of the histogram graph to the desired value.

Graphs

Output

Selects what is displayed and rendered. Select either: Matte, FG Pull, Composite, Cutout, FG Matte, BG Matte, or Edge Profile.

When Matte is selected you see the final matte as it will be applied to the images. It includes the foreground pull matte according to the selection in FG Pull-On, and any shapes you may have created. When FG Pull is selected, you see only the foreground pull matte.

This menu is found on All of the property pages in this property editor, except for Shapes, Mask and Output.

Graph

Contains four color component level/luma remapping curves on one graph.

Color component/luma values are displayed along the horizontal axis and mapped by the response curve to output values along the vertical axis.

Select a curve by clicking the appropriate button above the graph, and adjust the curve to change the remap values.

Hue Filter

Output

Selects what is displayed and rendered. Select either: Matte, FG Pull, Composite, Cutout, FG Matte, BG Matte, or Edge Profile.

When Matte is selected you see the final matte as it will be applied to the images. It includes the foreground pull matte according to the selection in FG Pull-On, and any shapes you may have created. When FG Pull is selected, you see only the foreground pull matte.

This menu is found on All of the property pages in this property editor, except for Shapes, Mask and Output.

Enable

Turns filtering on and off.

Hue Center

Lets you select a hue to apply a suppression factor to. Move the slider to move the hues in the suppress matte extraction graph. The hue suppression factor is represented on the suppress matte extraction graph as a dip at the center of the horizontal axis.

Hue Filter Curve

This is a response curve which is used to extract a matte based on the hue of each pixel in the image. This matte is combined with the matte generated by the Profile curve to create the final result.

Edge Profile

Output

Selects what is displayed and rendered. Select either: Matte, FG Pull, Composite, Cutout, FG Matte, BG Matte, or Edge Profile.

When Matte is selected you see the final matte as it will be applied to the images. It includes the foreground pull matte according to the selection in FG Pull-On, and any shapes you may have created. When FG Pull is selected, you see only the foreground pull matte.

This menu is found on All of the property pages in this property editor, except for Shapes, Mask and Output.

Graph

The Profile graph represents the edge extraction process. Main matte levels are displayed along the horizontal axis and mapped by the response curve to edge color correct matte levels on the vertical axis.

The default response curve produces an output of around 0 at foreground and background main matte levels, and produces a peak for mid-gray main-matte levels.

Since matte edges usually involve a black to white transition through intermediate gray levels, this produces a color correction matte where the boundaries of the main-matte are highlighted (also any of its gray areas), and the foreground of the old matte is no longer visible.

If necessary remap the matte levels by editing the response curve.

NoteThe hue filter color, hue filter graph, and edge profile are closely linked, and so changes in one parameter may have unexpected effects on the others.

Firstly, the Hue Center slider controls the hue corresponding to the midpoint on the hue graph - if you have not changed the graph, this is the point of strongest effect, but if, or example, you shift the graph, it may not be.

Secondly, if you consider the bottom of the hue graph as mid-gray, and the top of the hue graph as the original matte, the graph level for each hue shows how much the matte will be blended towards mid-gray. This gray value will then be shifted to white by the default edge profile. If, however, you have changed the edge profile, then mid-gray may not go to white, and the hue filter will not work as desired.

Mask

Controls this operator's Mask Options.

Output

Controls this operator's Output Options.

Creative Commons License Except where otherwise noted, this work is licensed under a Creative Commons Attribution-NonCommercial-ShareAlike 3.0 Unported License