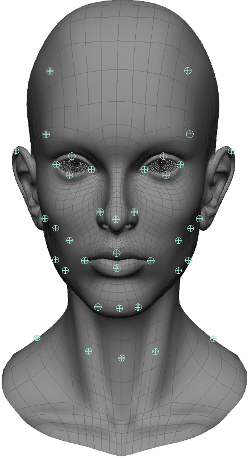
Since head size and proportions can vary greatly for human (and especially humanoid) faces, Face Robot needs to know the salient points (called landmarks) on your character's head to guide its analysis of the facial geometry. This stage let you identify the primary landmarks on the face.
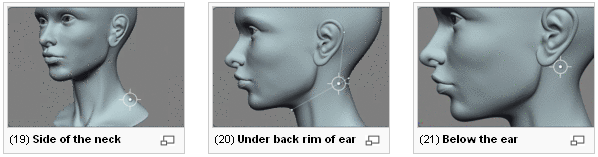
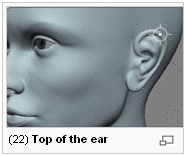
The face images at the top of the Stage 3: Landmarks panel guide you through the picking process required by Face Robot. Face Robot needs to have ALL 39 landmarks defined to analyze the face, so you can't proceed to the next stage until all points have been picked.
Click the Start button at the bottom of the Stage 3: Landmarks panel.
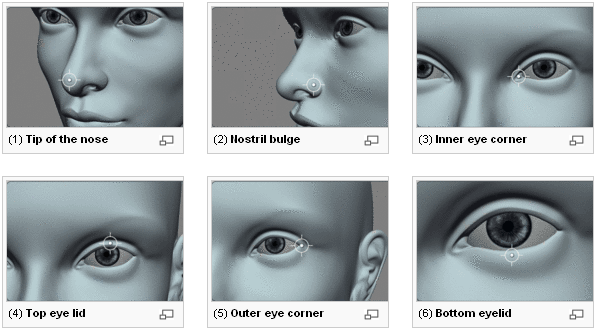
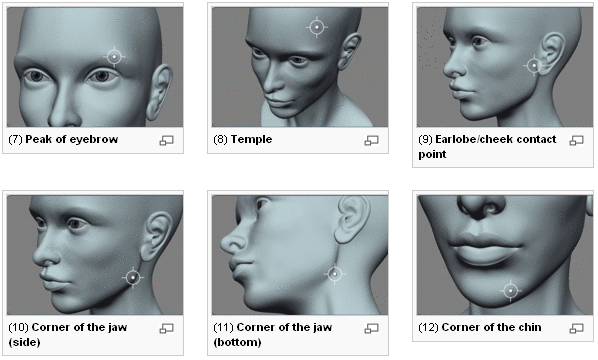
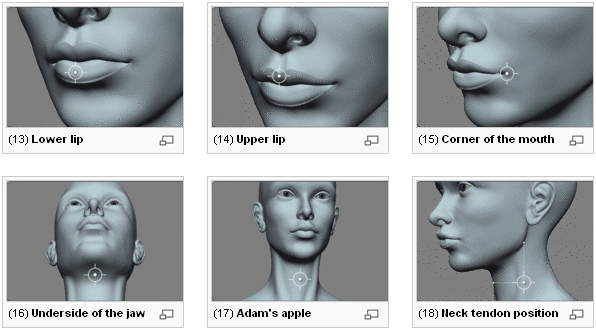
Using the reference face image on the panel as your guide, click on the corresponding landmark positions on the face mesh in the viewport.
Try to position the head in the viewport so that it matches the camera angle for each landmark of the reference face image as closely as possible. This will make for a more accurate positioning of the points.
You can navigate with the camera (orbit, zoom, dolly, etc.) around the head at any stage of the process.
If you had selected Symmetric as the DNA type, you only need to pick on one side of the face to create the landmark points for both sides.
You can click and hold the mouse down while you move the landmark point to exactly where you want. The marker for that point isn't created until you release the mouse button.
You can also move or delete the markers as you like, and then continue where you've left off by clicking the Resume button. If you deleted a marker, you will be prompted to pick a new one before the picking session is over.
Having a mouth that deforms well depends a great deal on the location of the landmark that you pick for the mouth corner. When you pick this landmark point, be very careful that it is exactly in line with the crease that runs inward to form the lip division. Try to pick where the inflection point changes from outside the mouth to inside the mouth. The mouth usually has an edge loop that goes directly into the mouth corner, so you can use that edge as a guide.
If you make a mistake during the process, just middle-click or click the Revert button to go back a step. Then click the Resume button to continue.
Right-click or press Enter to end the picking process at any time.
When you're done picking, all 39 markers appear on the face in the viewport and the status bar is filled. Press Enter or right-click to end the picking session.
Click the Fit button to continue.
Based on the landmark information, the skull geometry is analyzed and the soft tissue is synthesized, creating a parameterized soft tissue model that describes the facial anatomy of the head. A set of deformers is also created, which determines how the face will deform when facial expressions are applied.
The calculations required for this process may take a few minutes.
When the analysis is complete, go to the next stage: Stage 4: Fit.
 Except where otherwise noted, this work is licensed under a Creative Commons Attribution-NonCommercial-ShareAlike 3.0 Unported License