You can constrain the displacement of an object based on the UV values of the constraining NURBS surface object or the U value of the constraining NURBS curve. Much like a surface or curve-based path, the surface and curve constraints orient the Y axis of the constrained object according to the normal value of the NURBS surface's U/V parameter values, or the NURBS curve at its U parameter value. This allows the constrained object to closely follow the surface or curve.
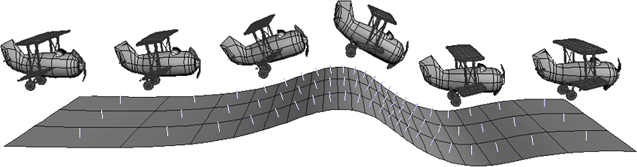
A surface constraint: the airplane is rotated so that its Y axis is aligned with the normal of the surface.
The surface and curve constraints are useful for keeping an object on a surface or curve — usually when the surface or curve is deformed, such as a ship sailing over a section of choppy water or a car driving along a bumpy road.
For more information in general about NURBS surfaces and curves, see Surface and Curve Modeling.
For information on constraining an object to a curve for path animation, see Constraining an Object to a Curve (Path).
Select the constraining object, which must be a NURBS surface object.
In the Surface Constraint property editor, click the Normal tab and select Active. Make sure the Y axis is set to 1 in the Affected Axis controls below.
The constrained object's Y axis is repositioned in the direction of the surface normals of the constraining object.
If necessary, click the eye icon  in a viewport and choose Normals to see the object's normals. If the normals are pointing in the wrong direction, select the surface and choose Modify
  Surface Inverse in the Model toolbar.
If you like, animate the constrained object over the surface using the U/V Location sliders.
Select the constraining object, which must be a NURBS curve.
In the Curve Constraint property editor, click the Up Vector tab and select Active. Make sure the Y axis is set to 1 in the Affected Axis controls below.
The constrained object's Y axis is repositioned in the direction of the normals of the constraining curve.
Also on the Up Vector page, you can select the Point Along Roll Frame option to "lock" the constrained object to the curve to avoid it flipping.
If you like, animate the constrained object along the curve using the U Location slider.
 Except where otherwise noted, this work is licensed under a Creative Commons Attribution-NonCommercial-ShareAlike 3.0 Unported License


