When you constrain an object to another, you often need to offset it in some way from the constraining object. Depending on the type of constraint, this could be an offset in position, orientation, or scaling. For example, if you position-constrain one object to another without an offset, both objects end up sharing the same coordinate points and seem to be on top of one another.


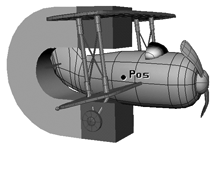
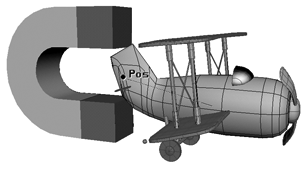
A magnet is set as a constraining object for the airplane.
In the top image, a position constraint is created without an offset: the position of the constrained object's center matches that of the constraining object's center.
In the bottom image, an offset is added to the position constraint. It is applied to the position of the constrained object's center.
You can set offsets between the constrained and constraining objects in most constraints' property editors. For example, you can offset the constrained object's rotation for an Orientation constraint, or offset the constrained object's position in relation to its target object's location for a Distance constraint.
As well, when you set an offset, you can set the coupling behavior between the constrained and constraining objects to determine how closely the constrained object follows its constrainer's behavior (see Setting the Coupling Behavior between Objects).
To set an offset interactively, you can use the Constrain  Constraint Compensation command or the CnsComp button, both found on the Constrain panel. With compensation, you can have the constrained object be interactively offset
from the constraining object and animate it independently while still keeping the constraint.
With almost all types of constraints, you can set offsets using the controls in their property editors. The offset is set between the centers of the constrained and constraining objects on any axis.
When you create an offset for a constraint, you can set the coupling behavior between constrained objects. Although this may sound romantic, the term actually has its roots in the mechanical world and refers to how mechanical parts, as well as many other things, are connected together. For constrained objects, it likewise means how they are connected, more in how they move in relation to each other.
Coupling determines how the constrained object should react when the constraining object is manipulated. When the offsets for both the constrained and constraining objects are set to zero (off), the coupling behavior settings have no effect.
Coupling behavior is available in any constraint property editor that allows you to create offsets for the constrained object. Coupling can be either soft or rigid, depending on how closely you want the constrained object's movement to resemble that of its constrainer.

Soft is when objects are allowed to rotate somewhat independently of one another, much like a ball joint. Soft couplings are represented by a small circle in the centers of the constrained and constraining objects.
Rigid is when the constrained object mimics the rotation of the constraining object. Rigid couplings are represented by a small square in the centers of the constraining objects.
The difference between soft and rigid can be thought of in the same way as the difference between a car with a trailer versus a pickup truck. As with soft coupling, the trailer follows the car but still has a limited range of motion; as with rigid, the truck bed is literally welded to the truck.
To set an offset interactively, you can use the Constrain  Constraint Compensation command or the CnsComp button, both found on the Constrain panel.
You cannot usually edit a constrained object's parameters because they are subordinate to the constraining object. With compensation, however, you can temporarily override the constraint and modify the constrained parameters (such as position, scaling, or rotation). This means that you can animate the constrained object independently while still keeping the constraint.
When you save keys on compensation, it mirrors the keys "below" on the local transformations; this way, even if you remove the constraint, the offset animation remains the same. You can animate the compensation distance between objects using the CnsComp button and setting keys.
This method lets you keep the original distance between the constrained object and its constraining object.
Position the object to be constrained at the required distance from the constraining object.
Click the CnsComp button or choose the Constrain  Constraint Compensation command on the Constrain panel to set the offset.
This will keep the current position of the soon-to-be constrained object in relation to the constraining object.
When compensation is active, the CnsComp button turns red to indicate its state. This is because if you forget to deactivate compensation, you can continue to animate in this manner, which is not usually desirable!

Do either of the following, depending on whether you're using a Position or Distance constraint.
Choose Constrain  Position and pick the constraining (controller) object.
The offset distance value is displayed in the constrained object's X,Y, Z position values. You can adjust the value here.
Choose Constrain  Distance and pick the constraining (controller) object.
The offset distance value is set for the Distance slider. You can adjust the value here.
Deactivate compensation by choosing Constraint Compensation or by clicking the CnsComp button again.
Translate the constraining object. The constrained object also moves, maintaining the distance you set.
After you have created a constraint between two or more objects, you can modify their offsets at any time in the constraint's property editor (see Setting Offsets).
 Except where otherwise noted, this work is licensed under a Creative Commons Attribution-NonCommercial-ShareAlike 3.0 Unported License