Select Animation from the Construction Mode list on the main menu bar at the top of the interface.
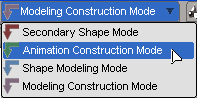
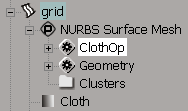
This keeps the ClothOp operator in the object's Animation region in its construction history so that Softimage knows you want to use the cloth as an animated deformation.
For general information on construction modes and the viewing options related to these modes, see Construction Modes and Regions [Data Exchange].
Select the NURBS surface or polygon object to be used as the cloth.
Choose Create  Cloth From Selection from the Simulate toolbar.
In the ClothOp property editor that opens, set the parameters as you like.
Set the Start and End Frame of the cloth simulation itself.
If you want to use the start and end frames set for the scene's timeline, click Copy from Scene.
Likewise, you can copy the values that you set for the Start and End Frame here to the scene's timeline by clicking Copy to Scene.
Apply natural forces as described in Setting Up Forces for Cloth. If the cloth object is not already animated, you need to apply a force (gravity, wind, fan, or eddy) to it to make it move.
Set up the cloth object to collide with obstacles or with itself, as described in Setting Up Cloth Collisions.
If you have applied cloth to a cluster, you must select the object on which the cluster exists to create the collision — collisions with obstacles can be only with objects, not clusters.
To play the cloth simulation, see Playing the Cloth Simulation.
You can change the overall speed of the cloth simulation by changing the Time Warp value. This defines a scaling factor for the dynamic of the cloth simulation. For example, to make the cloth simulation take twice as long, enter a value of 2; to make it half as long, enter 0.5.
Changing this value changes the cloth dynamics but it doesn't change the obstacle dynamics.
To set the precision of the cloth simulation, set the value for Iterations Per Frames. Values higher than 1 create a more precise simulation but take longer to calculate.
To optimize cloth performance, you should keep the Iterations per Frame value as low as possible while preserving the look you want (this requires some tweaking).
Try out a scenario from your scene with only one or two objects being simulated, and start with low interframe iterations, and bring it up until you get the realistic simulation look you want. In some cases, you can get away with low settings like 2. This is highly dependent on the properties you've set, like mass and friction.
If the cloth seems to have artifacts, raise the value and play the simulation again. Also, when the simulator cannot find a solution at a certain frame, a message appears prompting you to modify the settings and play the simulation again.
Defines the name of the cloth property associated with the object. To make it easier to tell apart different cloth objects at a glance, you can rename them, such as Silk_cloth and Satin_cloth.
You can cache or plot a cloth simulation by selecting a cloth object and choosing either of these commands from the Animate toolbar:
Choose Tools Plot Cache Manager to create a point cache file — see Writing Cache Files [Data Exchange] for more information.
Choose Tools Plot Shape to create a shape source — see Sharing Shape Animation between Objects, Models, and Scenes [Shape Animation] for more information. Make sure to remove the ClothOp operator after the plotting is finished.
You can temporarily disable the cloth simulation by muting the cloth operator. When you do this, the cloth object returns to its original undeformed position. This is useful if you want to temporarily change frames without running the simulation, such as for inserting keyframes.
 Except where otherwise noted, this work is licensed under a Creative Commons Attribution-NonCommercial-ShareAlike 3.0 Unported License