


When you tag a rig's elements, you're telling Softimage which part is which on your character, such as its hips, chest, legs, root, and so on. You tag the rig controls or skeleton parts that you normally use to animate the character. These tags are used to create a map (template) for that character. Then when you transfer the animation from the source to the target rig, Softimage uses this tag information to map the animation correctly between their matching rig elements.
The tags you create are referred to internally in a structure file. A structure file is a simplified version of a rig that describes the hierarchy type (biped or quadruped, for example) and basic spatial proportions. It contains the template of each skeleton or rig element with its tag name and type (function) in order to define the components of a skeleton or rig hierarchy. Softimage uses components internally to describe the hierarchies.
In addition to the tag names, the tag template also keeps the rig's spatial geometric mapping in order to map the animation. For this reason, it's good practice to always position your biped rig in the classic "T" pose with arms outstretched when you tag it. This is because both source and target rigs need to be in relatively the same pose (when tagging) so that the animation can be mapped properly when you transfer it.

Before you tag a rig, you must position it in the classic T-pose.
This is because the tagging template includes the rig's spatial geometric data, as well as a tag name, to map the animation data to the rig.
Tags are properties of the rig object that is tagged. The tag property contains the name of the tag and its function type (anchor, root, effector, etc.). Because the tag is the property of an object, you only need to tag a rig element once to identify it. Then if you duplicate a tagged rig or skeleton model, the tag information is also copied so you don't have to do it again for each new character. Bonus!
Before you start tagging, it's important to know your rig well. Make sure that you know which control is the best one to use for receiving and extracting motion information when retargeting the animation.
To get started with tagging, there are sample tag templates in your Softimage installation's \Addons\MotionTransformation\Data\TagTemplates folder that you can load. For example, you can use the biped_biped.tagt file with the default Softimage biped characters. See Loading an Existing Tag Template for more information on how to load them.
This image and the following steps give you a basic overview of the tagging process for a MOTOR rig:
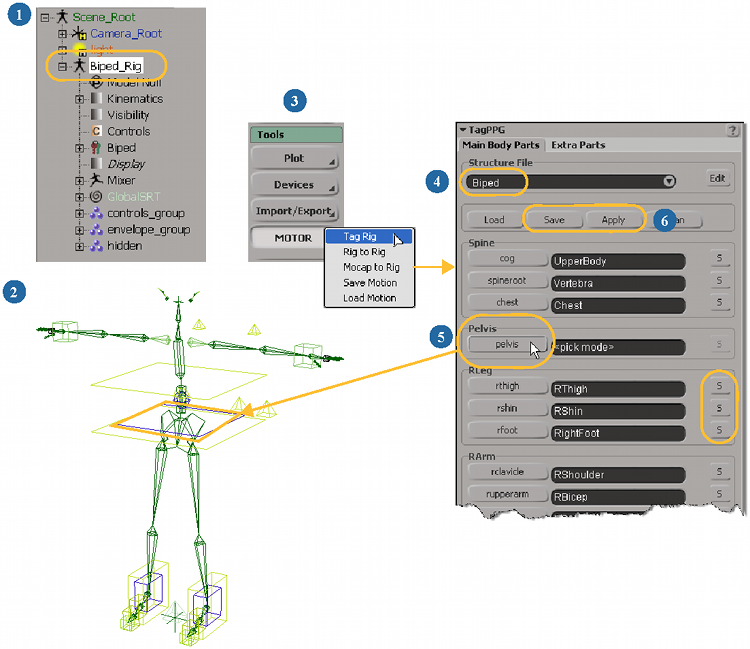
Make sure that the skeleton or rig that you want to tag is in a model.
Pose the skeleton or rig into the default T-pose for best tagging results. This is because Softimage uses spatial geometric data as well as a rig's tag names to create the tag template.
With the skeleton or rig selected, choose Tools  MOTOR Tag Rig from the Animate toolbar.
The Tag property editor opens up, containing a list of buttons that correspond to the elements that you need to tag on your rig.
In the Tag property editor, select the Structure File type for your character, such as Biped or Quadruped.
To edit the structure file, click the Edit button beside this text box. See Creating and Editing Structure Files for information.
Click a tag button, then pick the corresponding element on your rig or skeleton in a viewport or the explorer. These elements are the ones onto which the animation will be mapped.
When the element is tagged, its name appears beside the tag button.
If you picked the wrong element to tag, simply click the button again and pick another element.
When you're finished tagging, click the Apply button to apply the current tag data to the rig elements.
You can also click the Save button to open a browser in which you can save this tag information in a template file (.tagt format).
You can then load the tag template for another character, modify the tags as you need to, then save it to a new name (see Loading an Existing Tag Template).
Here are some tips to help you tag:
If your rig or skeleton doesn't have all these elements listed, just tag the elements that correspond. However, the more elements that are tagged, the better the subsequent animation mapping will be because the retargeting operator will have more information.
For the COG element, make sure to tag the parent object of the skeleton or rig structure. This is often the rig control that determines the torso or core body movement, such as the hips or upper body control.
Click the S button beside an element's name to select it on the skeleton or rig. This makes it easy to check which elements are already tagged as what.
If you accidentally pick the wrong element to tag, simply click the button again and pick another element, or delete the element name in the text box beside the button so that it returns to "undefined".
If you know the names of the rig elements to be tagged, can type their names in the text box beside the appropriate button. This is useful for editing element names when you load a tag template from another rig.
Click the Clean button to remove all rig element tag definitions in this property editor so that you can start over.
The picking session uses symmetry so that you only have to select the element on one side of the body for elements that have a left and right equivalent. The symmetry is based on elements being named in a similar manner, such as RThigh/LThigh or RightToe/LeftToe. The beginning of each element's name matters for symmetry; for example, symmetry works if the element names start with an R or L, or Right and Left, but not if they have these terms elsewhere in the name, such as ArmLeft.
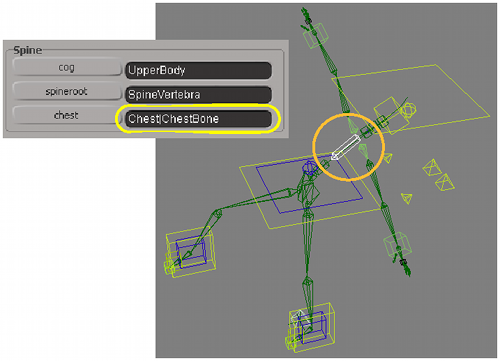
If a rig has controls that are often moved away from the body in order to achieve a position, such as with the feet or upper body controls, these controls aren't always the best ones to use for extracting motion information because they don't always stay in position. However, you need to tag those controls to help create a proper tag map because they're the ones that you animate. So what do you do?
To make sure that you're getting the best control for the motion, you can add another element to a tag. You click a defined tag button, then middle-click on the element from which you want to extract the motion information. The secondary element is added to the tag's definition.
For example, let's say the Chest control is already defined for the chest tag, but you want the motion information to come from the bone in the center of the spine because the Chest control has been offset from the rig. To do this, click the chest tag button, then middle-click the spine bone in the chest area to add that element to the chest tag's definition.
If you have saved the tag information for a rig or skeleton in a template file, you can easily load it for the same rig, such as for editing it, or load it onto a different rig.
Select the skeleton or rig for which you want to load a tag template.
In the Tag property page that opens, click the Load button to open a browser and load the tag template file you want.
If the names on your rig elements match the names of the rig elements from which the template was created, the text boxes beside the element buttons are filled in; if not, the elements are set as "undefined".
If you need to select rig elements for the undefined ones, or if you want to change an element, click an element button in the property page, then pick the corresponding element on your rig or skeleton in a viewport or the explorer.
When you're finished tagging, click the Apply button to apply the new tag definitions to the rig.
You can also click the Save button to open a browser in which you can save this new tag information in a template file (.tagt format) with a different name.
 Except where otherwise noted, this work is licensed under a Creative Commons Attribution-NonCommercial-ShareAlike 3.0 Unported License