No matter what type of map you want to connect to a parameter, the basic procedure is the same.
To connect maps to hair parameters, you must first transfer the maps from the emitter to the hair object. See Connecting Maps to Render Hair Parameters [Hair].
In the case of weight maps and deformations, you can simply select the weight map and then apply the deformation instead of manually connecting it. Since the weight map is selected by default as soon as you create it, this technique is quick and easy.
In a property editor, click on the connection icon  of a mappable parameter. A menu pops up.
Navigate through the explorer and pick the desired map:
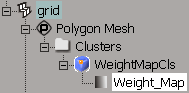
Weight maps are found under the appropriate cluster.
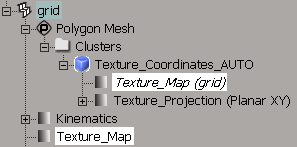
Texture maps are properties directly under the object. They can also be found under the appropriate cluster. Make sure you don't accidentally select the texture projection.
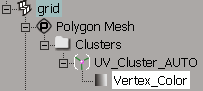
Vertex color properties are also found under the appropriate cluster.
The connection icon  changes to show that a map is connected. When a map is connected, you can click on this icon to open the map's property editor.
If you connect a map that has multiple components, like an RGBA color, to a parameter that has a single dimension, like Amplitude, you can use the options in the Map Adaptor to control the conversion.
 Except where otherwise noted, this work is licensed under a Creative Commons Attribution-NonCommercial-ShareAlike 3.0 Unported License


