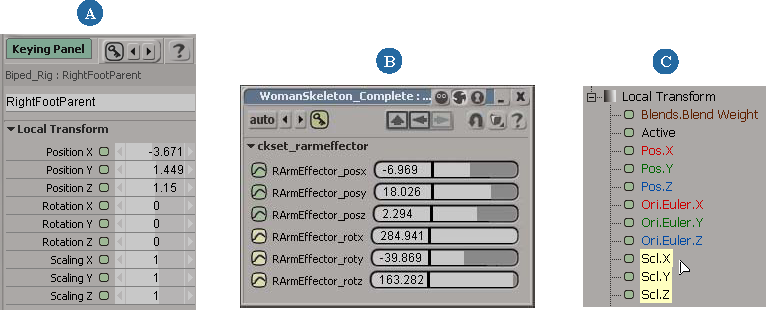
You can set keys for anything in Softimage that has an animatable parameter: this includes an object's transformation, geometry, colors, textures, lighting, and visibility. You can tell that a parameter is animatable when it has an animation icon beside it, which initially looks like a little green box, as shown below (see The Animation Icon for more information).

Animation icon is the little green box beside any parameter that can be animated.
You can set keys for any animatable parameter in any order and at any time. When you add a new key or delete an existing key, Softimage automatically recalculates the interpolation between the previous and next keys. If you set a key for a parameter at a frame that already has a key, the new key overwrites the old one, and Softimage reinterpolates between the new keys.
After you set two or more keyframes to animate a parameter, a function curve is created. A function curve (or fcurve) is a graph that represents the animation of a parameter. When you edit a function curve, you change the animation. See After You Set the Keys for more information.
There are a number of ways in which you can set keys in Softimage depending on what type of workflow you're used to and the tools you want to use. See Methods of Keying for more information on the different ways of setting keys in Softimage.

There are a number of ways in which you can set keys in Softimage depending on what type of workflow you're used to and the tools you want or need to use for your production. While each of these methods result in keyframes being created, they each have their own features which you may prefer.
There are three main keying workflows in Softimage from which you can choose:

| A |
Keyable parameters: Use the keying panel to set keys on all keyable parameters for the selected object or hierarchy. If you're transferring from Maya, you may prefer this method of working. See Keying Keyable Parameters in the Keying Panel for information. |
| B |
Character key sets: Create character key sets to set keys on parameters in the set without needing to select anything. If you're transferring from Maya, you may prefer this method of working. See Keying with Character Key Sets for information. |
| C |
Marked parameters (and marking sets): Mark parameters and create marking sets to set keys on marked parameters on the selected object or hierarchy. If you've been using Softimage for awhile and your animation systems are set up for marking sets, you may prefer using this method. See Keying Marked Parameters for information. |
In addition to the three main keying workflows, you can also set keys on individual parameters in these different ways. These methods do not consider what you've set as the keying preference.
Set keys automatically for individual parameters as you modify their values — see Setting Keys Automatically.
Set keys for parameters in a property editor — see Keying Parameters in Property Editors.
Set keys in the explorer by right-clicking a parameter's animation icon and choosing Set Key.

In an explorer, right-click a parameter's animation icon and choose Set Key or Remove Key.
To see the parameter's value in the explorer, choose Show  Parameter Values in the explorer's command bar. Then use the virtual slider (press F4 and "scrub" the slider) to change the values as you're
setting keys. For more information on the virtual slider, see Entering Values Using Virtual Sliders [Commands and Tools].
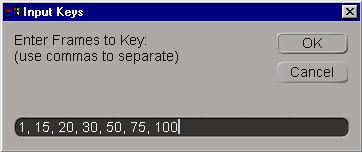
Set multiple keyframes for a parameter at one time by choosing the Set Keys at Multiple Frames command from the Animation menu at the bottom of the window.
Then enter the frame numbers at which to set keys, separated by commas. When you click OK, keys are set at these frames (based on current values and current marking).

Set keys for the parameters' current values at each frame number that you enter.
This is a good way to create "place holders" for future keys. If you use this command while autokeying with the On every value change option selected, you can work very quickly (see Selecting an Autokey Mode).
Keying transformations (scaling, rotation, and translation) is something that you'll probably do a lot because this type of movement is fundamental to animation.
You can use any of the methods and tools described in this section to key transformation values, but there are some other issues about transformations that you should be aware of before you start keying — see Animating Transformations for more information about these issues.
You should also be familiar with transformations in general, as described in Transformations.
Before you start setting keys, you need to set a preference that determines the way in which you key: with marked parameters, with keyable parameters, or with character key sets.
This preference determines which parameters are keyed when you save a key by pressing K, by clicking the keyframe icon in the Animation panel, or by choosing the Save Key command from the Animation menu. It does not affect keying by using a parameter's animation icon.
Set the save key preference in one of these ways:
Select the appropriate Save Key Command option:

Key Marked Parameters sets keys only on marked parameters. This is the default method for working in Softimage. For more information on this, see Keying Marked Parameters.
Key All Keyable sets keys on all parameters (keyable) that are displayed in the keying panel for the selected object. For information, see Keying Keyable Parameters in the Keying Panel.
If you're using the Maya or 3ds Max interaction mode, this option is on by default. You can then press S to set keys on all keyable parameters for the selected object.
Key Marked Keyable sets keys only on keyable parameters that you have marked in the keying panel.
This preference is mixture that lets you set keys on the intersection of parameters that are both keyable and marked. For example, by default all of an object's transformation parameters (scale, rotate, and translate) are set as keyable. However, let's say you need to set keys only on the object's rotation parameters for awhile, but you don't want to remove the translation and scaling parameters from the object's keying panel. By setting this preference and marking only the rotation and parameters, you can easily key only what you want without changing the keyable parameters in the object's keying panel.
If you're using the Maya interaction mode, you can press S to set keys on all marked keyable parameters for the selected object.
Key Character Key Set sets keys only on parameters in the current character (or subcharacter) key set. For information, see Keying with Character Key Sets.
If you're using the Maya interaction mode, you can press S to set keys on all the parameters in the current character key set — no need to select anything first. In 3ds Max interaction mode, use the K key.
Before you start setting keys, you need to set a preference that determines the way in which the resulting fcurves are created when you set keys. This includes the default fcurve interpolation and slope options.
Choose File  Preferences from the main menu, and select Animation or click its icon.
Set the various options in the Curves and Keys areas of the Animation preferences property editor.
For more information on each option, see Animation Preferences [Preference Reference].
When you're keying, you can choose to set keys on all parameters (according to your Save Key preference: marked, keyable, or character key sets), or only on modified parameters that already have fcurves.
For example, if you're working in a pose-to-pose method, you may want to always set keys on all the parameters you're working with, and not just ones that have changed. However, if you're fine-tuning just a few parameters in an existing animation, you may want to set keys on only those parameters that you're modifying.
This preference determines which parameters are keyed when you save a key by pressing K, by clicking the keyframe icon in the Animation panel or the keying panel, or by choosing the Save Key command from the Animation menu or Character Key Set menu. It does not affect keying by clicking a parameter's animation icon, such as in a property editor or the explorer.
Do either of the following to set the keying preference:
Open the Animation menu at the bottom of the interface and select Key Modified Parameters Only.
Choose File  Preferences from the main menu and select Animation or click its icon to open the Animation Preferences property page. Then select the
Save Key on Modified Parameters Only option.
Selecting this option sets keys only on modified parameters that already have fcurves instead of setting keys on all parameters. This option is off by default.
When you set two or more keyframes for a parameter, a function curve is created for that parameter. A function curve (or fcurve) is a graph that represents the parameter's values as they change over time. When you edit a function curve, you change the animation.
You can display and edit the resulting animation in different ways:
Edit the keys directly in the timeline for quick and easy changes — see Editing Keys in the Timeline. You can edit the keys by creating regions of keyframes, as you do in the dopesheet, and then move, scale, cut, or copy and paste them.
Edit the keys in the dopesheet, which is similar to a traditional cel animator's dopesheet — see Editing Animation in the Dopesheet. The dopesheet is useful to doing overall scaling and offsetting of an animation.
Edit the fcurve in the animation editor for more complex or subtle changes, such as tweaking the fcurve's slope to change the timing — see Editing Function Curves.
 Except where otherwise noted, this work is licensed under a Creative Commons Attribution-NonCommercial-ShareAlike 3.0 Unported License