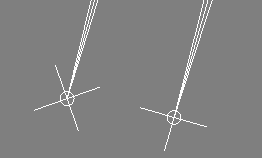
The rotation of the effector is important to the workings of an IK chain because the effector can be used for parenting other objects to a chain. By default, the effector's orientation is the same as the last joint's. In some cases, however, you may want this orientation to be different.
The Effector Rotation parameters in the Kinematic Chain property editor provide two methods for changing the effector's orientation: you can rotate the effector according to global coordinates or to local coordinates to have the same orientation as the last bone.
Select the chain and press Ctrl+R to open its Kinematic Chain property editor.
Determine the Effector Rotation behavior you want:
Select Affected by Last Bone if you want to use the Offsets settings to rotate the effector with respect to the last bone.
Deselect Affected by Last Bone if you want to rotate the effector freely, according to global coordinates.

On the left, with Affected by Last Bone off, the effector rotates freely when translated.
On the right, with Affected by Last Bone on, the effector keeps same angle as the last bone.
For example, say you were using a two-bone chain for a character's leg, with the effector acting as the foot:
If you select Affected by Last Bone, you can blend the effector's orientation between the orientation inherited from the last bone and the orientation coming from constraints or animation. For example, let's say a character grabs a railing and then jumps over it. You would need a way of blending the hand effector's orientation inherited from the last bone with the orientation constraint used on the effector to keep the hand on the railing.
You can also link the effector's FK/IK blending with the chain's overall FK/IK blending (see Blending Between FK and IK Animation).
Select the chain and press Ctrl+R to open its Kinematic Chain property editor.
Make sure that the Affected by Last Bone option is selected for the chain, as described in the previous section.
Select either of the Blend Effector Rotation options: Inheritance Blend or Link with FK/IK Blending.
To blend the effector's orientation against the last bone:
Set the Inheritance Blend value between 1 and 0. This value is blend of the effector's orientation as taken from the last bone (plus any offset) against any other orientation affecting the effector, such as an orientation constraint on the effector.
The default value is 1, which fully constrained to the last bone's orientation. A value of 0 (zero) is fully constrained to anything else affecting the effector's orientation, which has the same effect as if Affected by Last Bone was off.
To link the effector's orientation with the chain's FK/IK blending:
Select Link with IK/FK Blending.
The orientation of the effector is blended by using the Blend FK/IK value (see Blending Between FK and IK Animation) to dictate how much of the "scene level" effector orientation is to be used relative to the rotation given by the last bone.
For example, let's say you have animated a chain in FK, and you have also placed a pose constraint on the effector. You can animate the constraint position in and out with the IK/FK blend. If you then select Link with FK/IK Blending, it also animates in and out the rotation of the effector in sync with what you would expect.
 Except where otherwise noted, this work is licensed under a Creative Commons Attribution-NonCommercial-ShareAlike 3.0 Unported License