Here's what you need to know before using Face Robot for lip-synching:
The character head needs to have gone through the first four Face Robot stages so that it is a solved head.
The character head doesn't need to have a tongue, but you may want to include one if there are close-ups or open-mouth visemes where a missing tongue would be obvious. If you want to add a tongue to a head model that's already solved, you can use the Build Tongue command on the Tune panel—see Adding a Tongue.
The audio file for the dialogue needs to be of a certain format (see Supported Audio File Formats) and have an accompanying text file for better transcription.
English and Japanese phonemes are supported with Face Robot.
The following is an overview of the general steps you need to take for doing lip sync in Face Robot. Information on each step follows this image.
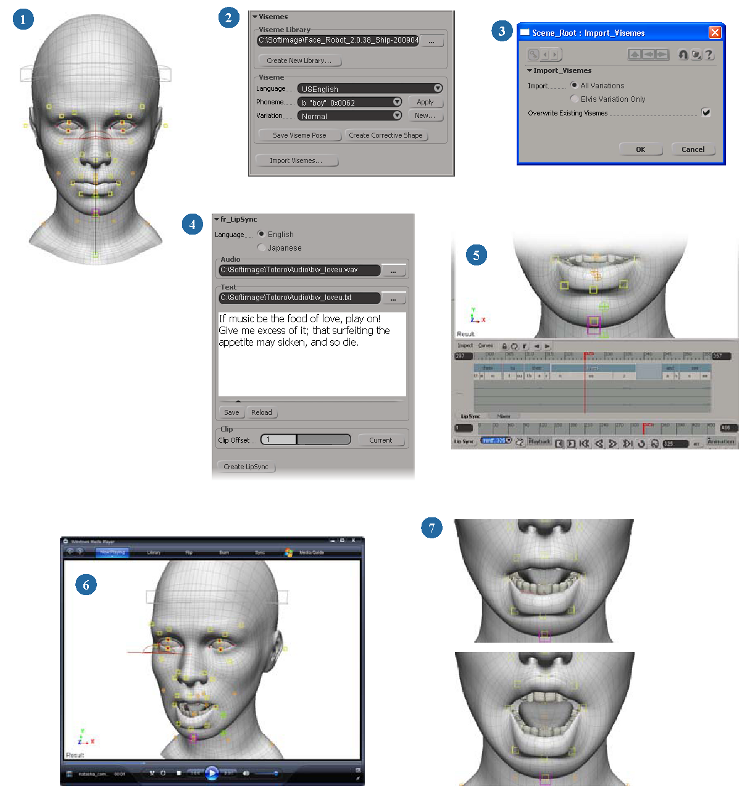
| 1 |
Begin with a solved head in Face Robot. You need to have completed Stages 1 through 4 of the Face Robot process. The Lip Sync tools are on the Act panel (Stage 5). |
| 2 |
Select a viseme library. Face Robot supplies a default library of read-only visemes that map to the phonemes. You can create your own library by copying this one. See Working with Visemes for information. |
| 3 |
Import the viseme library that you've selected or created. See Importing Visemes for information. |
| 4 |
Load the dialogue audio file and its accompanying text file. See Creating a Speech Clip from an Audio File for information. |
| 5 |
Generate the lip-sync animation using this audio information as the base. A few things happen when you do this:
See Creating a Speech Clip from an Audio File for information. |
| 6 |
Run through the animation and play the audio. Click the All/RT button in the timeline so that it's RT for realtime playback. You may also want to render a flipbook at this point to first see where you need to make adjustments. See Playing the Audio for information. |
| 7 |
Edit the viseme poses as you like, including creating variations of them for special purposes. You can edit the viseme poses at any point after creating a viseme library, but you may want to wait until you've played back the lip-sync clip to see what adjustments you need to make. See Editing the Viseme Poses and Creating Variations of the Visemes and for information. |
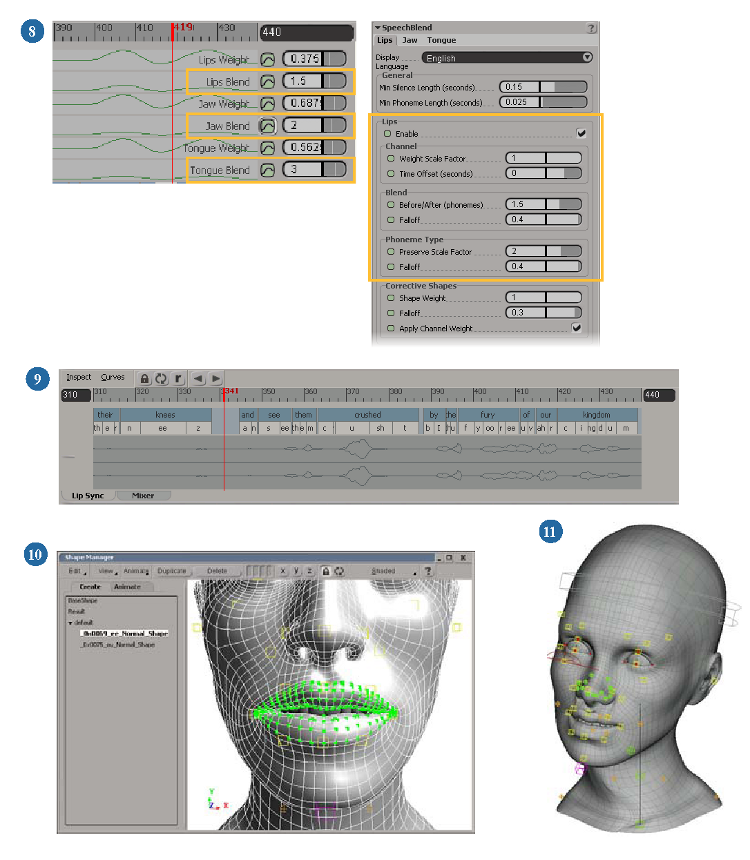
| 8 |
Adjust the overall blending and weighting of the lips, tongue, and jaw animation within the speech clip. Then fine-tune that weighting and blending per phoneme in the Lip Sync view for ultimate control. See Blending the Lip-Sync Animation for information. |
| 9 |
Adjust the timing of the phonemes to match the dialogue better, such as by scaling whole words or individual phonemes, adding words or phonemes, or switching phonemes. See Adjusting the Phonemes for information. |
| 10 |
You can make corrective shapes for the viseme poses at any time. This can help you create certain emphasized mouth shapes that are difficult to achieve for some characters. After the speech clip is generated, you can adjust their blending in a global (overall) way, as well as per phoneme. See Creating and Blending Corrective Shapes for the Visemes for information. |
| 11 |
Blend lip-sync animation in the speech clip with other mocap and/or keyframed animation on the face, using the mixer or other tools. See Blending the Lip-Sync Animation with Other Animation for information. |
 Except where otherwise noted, this work is licensed under a Creative Commons Attribution-NonCommercial-ShareAlike 3.0 Unported License


