You constrain different properties, such as position or orientation, of one object to another object. Then when you animate the constraining object (sometimes known as the constrainer), the other object's constrained properties are animated as well.
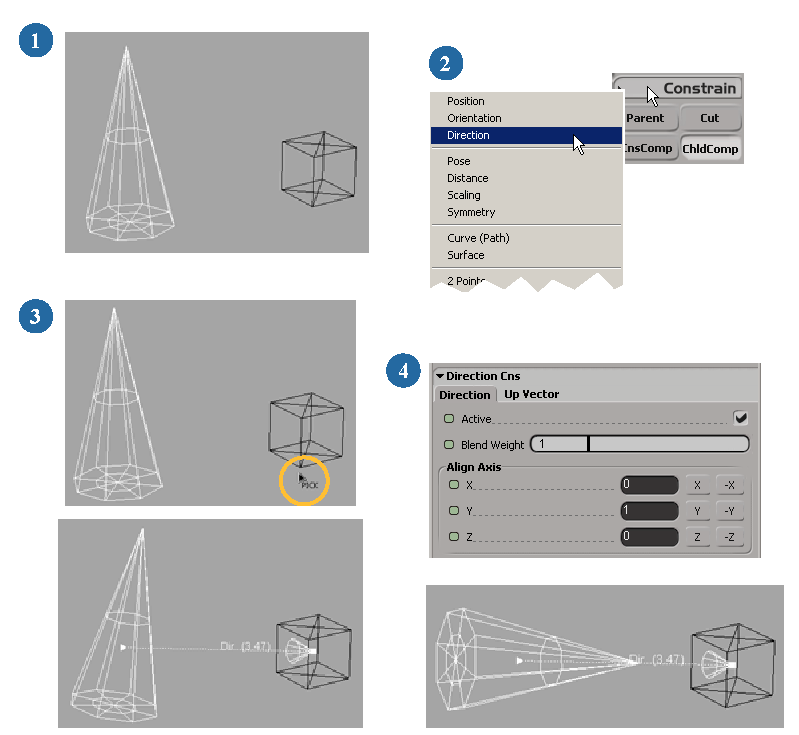
Softimage has a number of constraints packaged into predefined commands. For example, the Constrain  Direction command constrains the orientation of a selected, or "aligned," axis (the default is the X axis) of one or more objects to
another object. The location of the constrained objects do not change, but their aligned axes always point at the center of
the constraining object, no matter where the constraining object is.
This overview shows the four basic steps needed to create any constraint in Softimage.

| 1 |
Select the object to be constrained. |
| 2 |
Choose the constraint command from the Constrain menu. |
| 3 |
Pick the constraining (control) object. |
| 4 |
Set up the constraint in its property editor. |
One important thing to know about constraints is that constrained objects are transformed in global space. Because of this, any edits you make in a constrained object's Local Transform property editor (such as position and rotation limits) have no effect if they are applied before a constraint: the constraint will override them.
The fact that constraints are global also matters when you want to mix constraints with other animation in the animation mixer. For more information on this, see Actions [Nonlinear Animation in the Animation Mixer].
In all cases, the most recently applied constraint overrides older constraints if a conflict between their properties occurs.
Expressions and scripted operators are evaluated before constraints on the same object, and the bounding constraints are applied after all the other constraints.
If you use the value of a constrained parameter in a scripted operator, you may not get the desired results. For example, suppose you want to write a scripted operator to control an object's orientation based on its position: if the object has a path constraint, the orientation is evaluated before the position is updated at each frame, so the operator uses stale values. To achieve the desired result, you could constrain an intermediate object (such as null) to the path, then constrain the object's position to the null. When calculating the new orientation, use the null's position.
You can have more than one constraint applied to a particular object at the same time. When more than one constraint is active at the same time on an object, all constraints are used but the constraint that is applied last takes priority (unless you blend the constraints — see Blending Constraints).
For example, if an object has position and orientation constraints on it, both can control the object. However, if an object has an orientation constraint and then you apply a direction constraint (which also controls the object's orientation), the direction constraint takes priority.
For many of the constraints, you can add a tangency or up-vector constraint to the mix. The tangency and up-vector constraints aren't "real" constraints like the others, but are actually properties of several constraint types that determine the direction in which the constrained object should point.
Tangency constrains the X axis of an object in a specific direction, and the up-vector constrains the Y axis (up direction) of an object in a specific direction. For example, if you apply a Direction constraint to an object, you can also add an up-vector constraint to control the "roll" of the direction-constrained object.
For more information, see Tangency Constraints.
 Except where otherwise noted, this work is licensed under a Creative Commons Attribution-NonCommercial-ShareAlike 3.0 Unported License