The particle direction is the vector in which it travels. You can determine the direction in which the particles are emitted by setting their initial direction.
You can modify that direction by having them randomly emitted within a certain area (cone), or you can set the direction and amplitude at which the particles are emitted according to the position of a controller object that you define, which is useful for creating explosions.
There are also several compounds that let you randomize and turbulize the Direction value to add greater variation to the particles' movement (see Modifying the Particle Direction).
You can determine the direction of the particle movement at emission time. The particle's direction stays the same over its lifetime until some type of force changes it.
Create a particle emission — see Setting Up Any Type of ICE Particle Emission.
In the Emit compound's property editor, you can set the Select Emit Direction using either of two methods:
Use Emit Direction Normal makes the particles move in the direction of the surface object's normal to which it is closest at time of birth.
Use Initial Direction Vector makes all particles move in the direction that you specify using the Direction settings below.
In the Direction text boxes, you can set positive or negative direction values along the X, Y, and/or Z axes. If you set all the axes values to 0, the particles are emitted but stay stuck to the emitter.
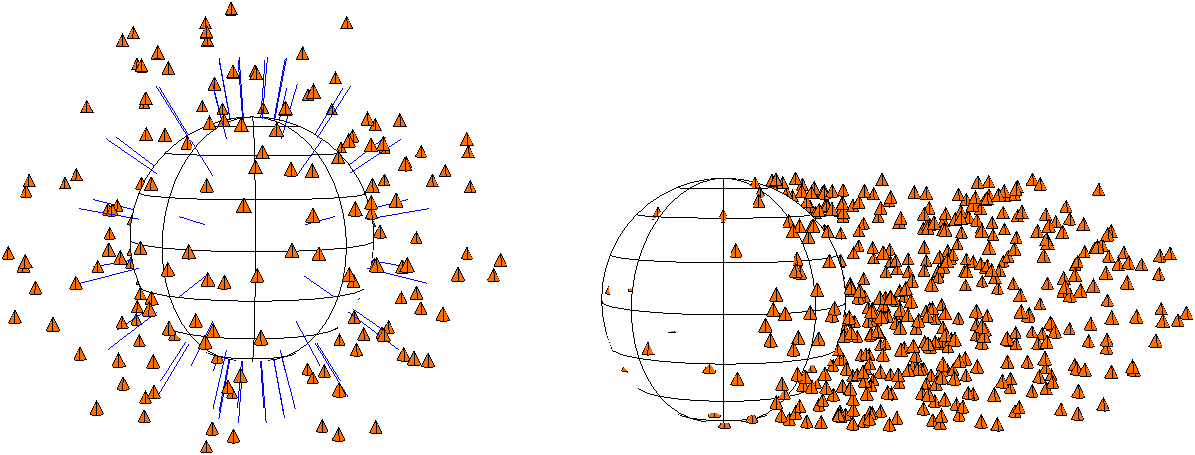
On the left, Particles are emitted in direction of the object's surface normals.
On the right, particles are emitted in a specific initial direction; in this case, it's in the X direction with a value of 1.
To help you visualize the direction of each particle, you can create a display attribute using PointVelocity, then choose to display this as vectors or vector trails. For information, see Creating Particle Display Attributes.
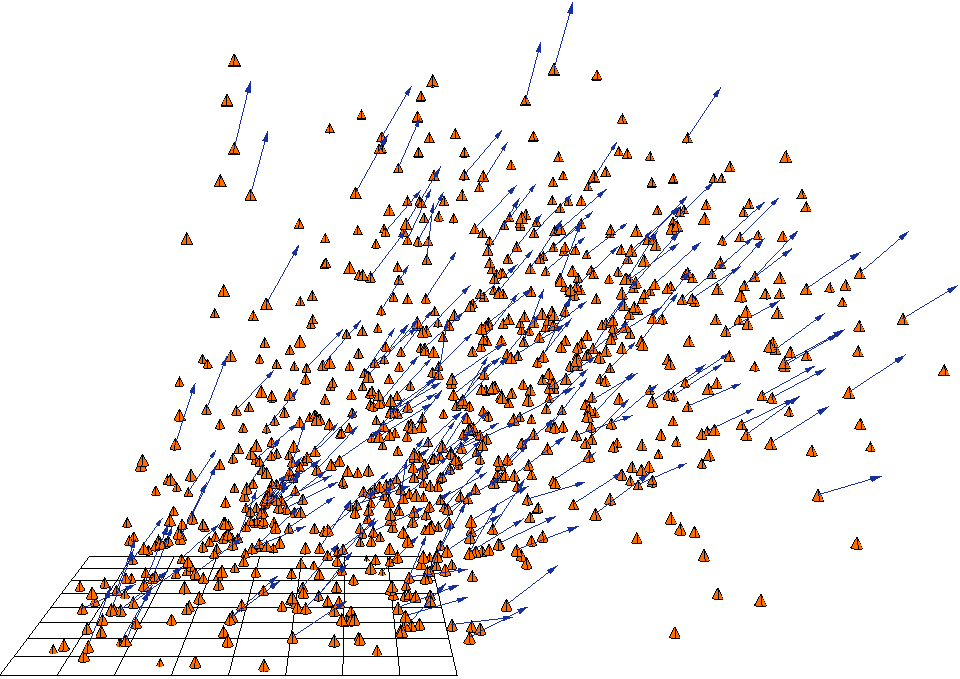
Particles with a display attribute showing their vectors as blue arrows.
You can change the spread of the particles using either the Randomize Direction or the Randomize Vector by Cone compounds. The first compound simply lets you change the spread angle of emission around the emitter, while the second compound lets you specify any vector around which to spread the particles, as well as adds a random seed value.
Using the Randomize Direction command, you can spread the emitted particles in random directions within a "cone" that you define. The angle values you use are calculated from the point of emission for each side of the emission.
You can randomize/jitter the Angle values for more natural-looking emission. However, for explosions and similar effects, the Spread from Controller compound (see Spreading the Particles Away from a Controller) may be a better choice to create the correct look.
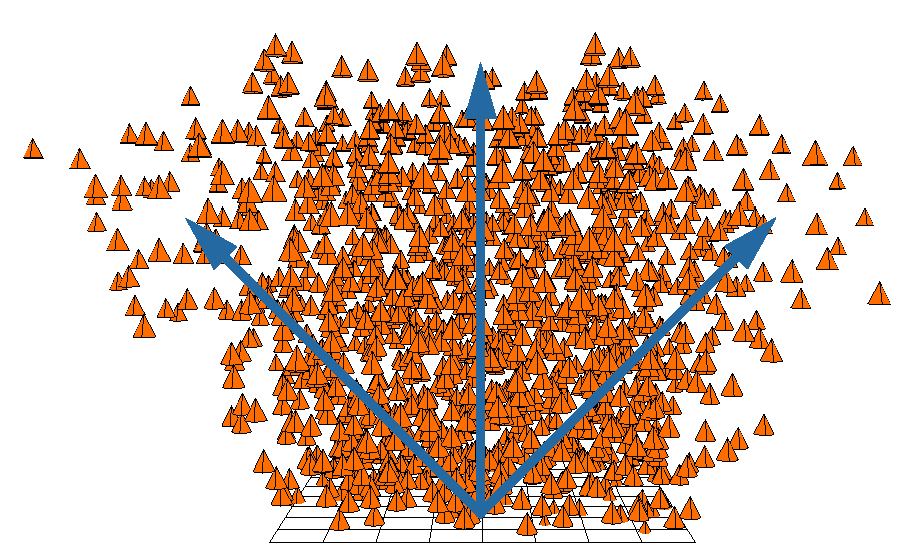
Particles are emitted in a range of 0 - 45 degrees.
Create a particle emission — see Creating a Basic Particle Emission.
Choose the Particles  On Emission
  Randomize Direction command from the ICE toolbar.
This command adds the Randomize Direction compound to the ICE tree, plugging it into the Execute on Emit port of the Emit compound.
In the Randomize Direction property editor, set the Start and End Angle values at which you want the particles to be emitted.
For example, if you set the Start Angle=0 and End Angle=45, the particles are emitted within a total of a 90-degree cone, with 45 degrees on either side of the emitter.

You can use the Randomize Vector by Cone to add a random value to a direction (vector) that you specify so that different particles are emitted in different directions.
Create a particle emission — see Setting Up Any Type of ICE Particle Emission.
In the ICE tree's preset manager, click the Task tab and select Particles.
Select the Randomize Vector by Cone compound from the Modifiers group, and drag it into the graph area.
Plug this compound's Vector output into the Direction port of the Emit compound.
In the Randomize Vector by Cone property editor, set the Base Vector, which is the vector (direction) around which the Start and End Angle values are calculated.
Set the Start and End Angle values at which you want the particles to be emitted.
The Angle values are in degrees for one side of the "cone" in which the particles are spread. The sum of the angle values is calculated from the point of emission for each side of the Base Vector value (0 - 360 is a full circle).
For example, if you set the angle values here to Start Angle=0 and End Angle=45, the particles are emitted within a total of a 90-degree cone, with 45 degrees on either side of the base vector.
You can also select Animated to vary the randomness over time, and set the Seed value, which is the number used as the basis for the randomization of the particle parameters. Change the seed value to get a different random generation of values.
With the Spread from Controller compound, you can set the direction and amplitude at which the particles are emitted according to the position of a controller object that you define. The particles are emitted away from this object's center or surface.
If you don't want to use a controller object, you can also have particles be emitted away from a point in space that you define.
The effect created by this compound is very useful for creating particle explosions, water hoses, or slow spreading fog, depending on the amplitude that you set.
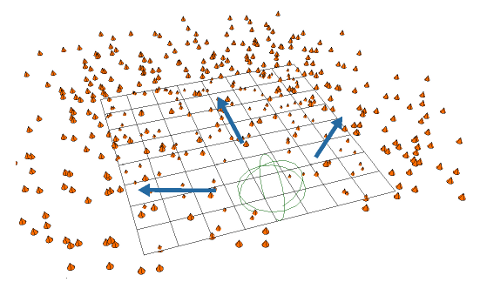
Although particles were emitted in the Y direction, they instead spread in the X direction, away from the null controller at the edge of the grid.
Create a particle emission — see Setting Up Any Type of ICE Particle Emission.
In the ICE tree's preset manager, click the Task tab and select Particles.
Select the Spread from Controller compound from the Emission Control group, and drag it into the graph area.
Create an object to be the controller object, and drag its name from an explorer into the ICE view to create a node for it.
If you want to use a position in space as the control instead of an object, you can set its values in the Spread from Controller property editor (see below).
Plug the controller object's Out Name output into the Spray Origin Controller port of the Spread from Controller compound.
Plug the Execute on Emit output from the Spread from Controller compound into the Execute on Emit port on the Emit compound.
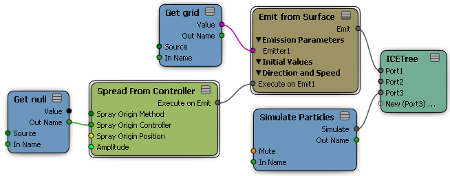
In the Spread from Controller property editor, set these parameters:
If you're using a controller object, select the method by which you want to control the particle emission: Spray Away from Controller Object Center or Spray Away from Controller Object Surface.
If you're using a location in space instead of an object to control the particle direction, select Spray Away from Specified Position as the method, then set the Spray Origin Position values below. These are the XYZ coordinate in global space that determines the point from which the particles are repelled.
Set the Amplitude, which is the force of the particle emission. Using high Amplitude values lets you create blasts or explosions.
There are several compounds on the Task > Particle tab that let you add randomness or turbulence (noise) to the Direction value so that the particles are emitted in more arbitrary directions. Adding randomness or noise helps the particles look more natural for certain types of effects. You can also modify the Direction value over time or based on the particle age or age percentage.
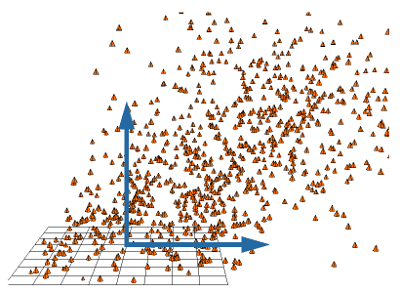
Particle directions are turbulized in the Y and X directions.
Emission Control > Randomize Emitter Value and Turbulize Emitter Value
Modifiers > Randomize Around Value and Turbulize Around Value
See Modifying ICE Particle Values for information on each one of these compounds.
 Except where otherwise noted, this work is licensed under a Creative Commons Attribution-NonCommercial-ShareAlike 3.0 Unported License