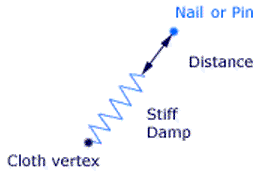
You can attach a simulated cloth or curve object's vertices to those on another object using a pin constraint. When that object is animated (using any transformation or deformation), the vertices of the simulated object attached to it will follow. This is unlike the nail constraint, which fixed the vertices to a certain position.
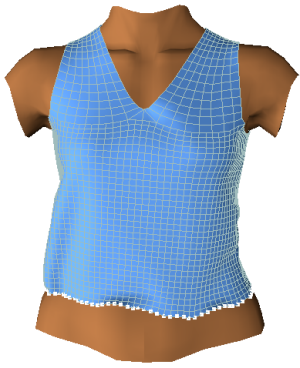
One of the main things that pinning is useful for is to make clothing follow the movements of a character's body. When you play the simulation, the pinned cloth's vertices move and deform along with the deforming body envelope, as displayed with the astounding weight loss of the torso in the images below.
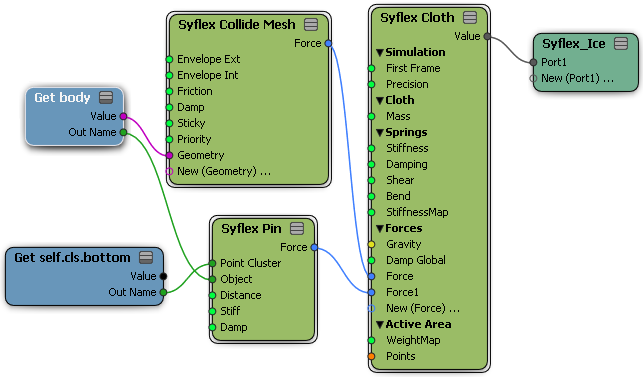
When you use a pin constraint, springs are created between the simualted object's vertices and the constrainer object. You can control the spring's length by setting the distance between the vertices and the constrainer object.
On the cloth or curve object that you want to simulate, select the vertices you want to pin and create a cluster for them.
If you modify the number of vertices in this cluster after creating the simulation, you will need to rerun the simulation.
Create a Syflex ICE cloth or curve simulation - see Creating Syflex ICE Simulations.
Select the cloth or curve object and open the ICE Tree view.
In the ICE Tree view, drag the Constraints  Syflex Pin compound from the Task > Syflex tab in the preset manager into the ICE tree workspace.
Plug the Syflex Pin's Force output into a Force port on the Syflex Cloth or Syflex Curve node.
Drag the name of the cluster you want to use from an explorer into the ICE tree to create a Get Data node for it.
Drag the name of the polygon mesh constraining object from an explorer into the ICE tree to create a Get Data node for it.
Plug the constraining object's Out Name output into the Object port on the Syflex Pin node.
Use a separate Syflex Pin and Get Data node for each cluster that you want to pin.
Set the parameters in the Syflex Pin property editor.
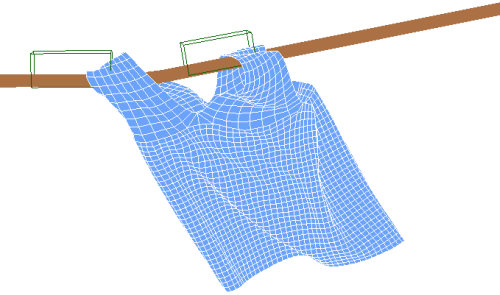
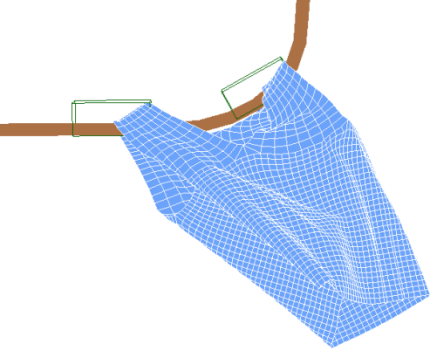
Instead of pinning a cluster of vertices, you can use a null's size, shape, and location (animated or not) to determine the area of cloth's or curve's vertices that are pinned. All the vertices that are within the null object's space are pinned to the constraining object, which can be deforming. You could then animate the location or size of the null to create different constraint effects.
In the images below, the shirt's vertices that are within the two box-shaped nulls are constrained to and follow the shape of the deforming pole.
Create one or more nulls that you want to use to determine the vertices of the cloth or curve object that will be pinned. Set their size, shape, and location as you wish.
Create a Syflex ICE cloth or curve simulation - see Creating Syflex ICE Simulations.
Select the cloth or curve object and open the ICE Tree view.
In the ICE Tree view, drag the Constraints Syflex Pin Null compound from the Task > Syflex tab in the preset manager into the ICE tree workspace.
Plug the Syflex Pin Null's Force output into a Force port on the Syflex Cloth or Syflex Curve node.
Drag the name of the null object from an explorer into the ICE tree to create a Get Data node for it.
Plug its Out Name output into the Null port on the Syflex Pin Null node.
Drag the name of the polygon mesh constraining object from an explorer into the ICE tree to create a Get Data node for it.
Plug the constraining object's Out Name output into the Object port on the Syflex Pin Null node.
Set the parameters in the Syflex Pin Null property editor.
Use a separate Syflex Pin Null and Get Data node for each null that you want to use.

 Except where otherwise noted, this work is licensed under a Creative Commons Attribution-NonCommercial-ShareAlike 3.0 Unported License