The lips, jaw, and tongue each have a different role to play in speech, depending on certain phonemes and the manner in which your character speaks. For example, you may generally want the jaw to have less weight so that the character appears to be whispering, or you could make sure that the lips are always fully weighted for a character who enunciates her words.
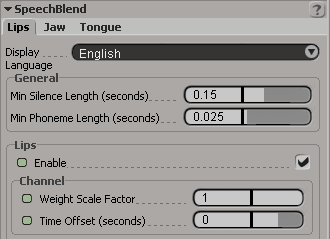
You can set the global (overall) weight of the lip-sync animation per channel (lips, jaw, tongue) using the Weight Scale Factor parameter on each tab in the Speech Blend property editor. Once you've set the global weight, you can have more precise control over the lip-sync animation by changing the percentage of the global weight and its falloff used per phoneme in the Lip Sync view.
Weighting the Lips, Jaw, and Tongue Globally
The Weight Scale Factor parameter on each channel's tab (Lips, Jaw, Tongue) in the Speech Blend property editor sets the amount of influence each of these channels has in the lip-sync animation.
You can also animate this weight value so that each channel's weight changes as you like over the duration of the lip-sync animation. You may want to do this for blending in motion captured or keyframed animation on any of the elements, such as the jaw or tongue. When you want to use the mocap or keyframed animation, set the Weight Scale Factor to 0 for those frames, then set it back to a value over 0 when you want the lip-sync animation (in the Speech action clip) to take over again.
To set the weight value of each channel
Set the Channel  Weight Scale Factor on each tab in the Speech Blend property editor. A value of 1 is 100% of the lip-sync animation coming from the Speech action
clip. You can set this to be any value between 0 and 1.

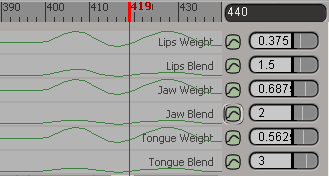
On the Lip Sync tab in the Lip Sync view, select the Curves  Lips/Jaw/Tongue Weight option. This displays a green curve that represents the Weight Scale Factor value for that channel over the duration of the
lip-sync animation.
Enter a value in the Weight slider's text box at the right end of the Lip Sync view.

Change the Weight Scale Factor value in the property editor or in the appropriate Weight slider in the Lip Sync view.
Click the animation icon  beside the Weight Scale Factor parameter or the Weight slider to set a key. You can remove a key by clicking the animation
icon again.
For information on setting weights in the mixer, Mixing and Weighting Clips.
Once you have each channel's weight set in a general way, you can then set the weight of all three channels at once per phoneme in the Lip Sync view—see Weighting the Lips, Jaw, and Tongue Per Phoneme below.
Weighting the Lips, Jaw, and Tongue Per Phoneme
You can change the percentage of the weight of the lip-sync animation that is used for each phoneme. You may want to do this to either emphasize or minimize the mouth movements for certain phonemes. For example, if your character's voice rises as he speaks a few words, you can increase the weight so that his mouth shape is more exaggerated for those phonemes. Or if your character is speaking quickly and there are several shorter phonemes that you want to "gloss over", you can lower each of their weights.
The contribution of each channel in the lip-sync animation is first determined by its Weight Scale Factor value in the Speech Blend property editor. Once this is set, you can set the Weight and Falloff In/Out values for each phoneme in the Lip Sync view. Setting the weight per phoneme sets the weight of all three mouth channels at once based on each of their Weight Scale Factor values; that is, you cannot set each channel's weight separately per phoneme.
If the Weight for each phoneme is set to 1.0, it uses 100% of the Weight Scale Factor value set for each of the channels (Lips, Jaw, Tongue) in the Speech Blend property editor. You can set it to be within a range of 0.0 to 2.0 (which doubles the weight).
You can also tweak how smoothly the lip-sync animation happens going into and coming out of each phoneme by using the Falloff In and Falloff Out commands. Having separate commands gives you lots of control when you need it, such as where there is a change in speech behavior within a phoneme. For example, let's say that your character is speaking slowly then abruptly ends a word: you can lower the Falloff In value so that the mouth hits the phoneme more gradually coming in, then raise the Falloff Out value so that the mouth ends the phoneme abruptly going out.
To set the lip-sync animation's weight and falloff per phoneme
Right-click on one of the selected phonemes and choose Weight or Falloff In/Falloff Out from the menu, then select a value from its submenu.
If the Weight is set to 1.0, the phoneme uses 100% of the Weight Scale Factor value set for each of the channels (Lips, Jaw, Tongue) in the Speech Blend property editor. You can set it to be within a range of 0.0 to 2.0 (which doubles the weight).
If the Falloff In/Out value is set to 0.0, a uniform falloff is used, but you can select a value within a range of -0.5 to 0.5.
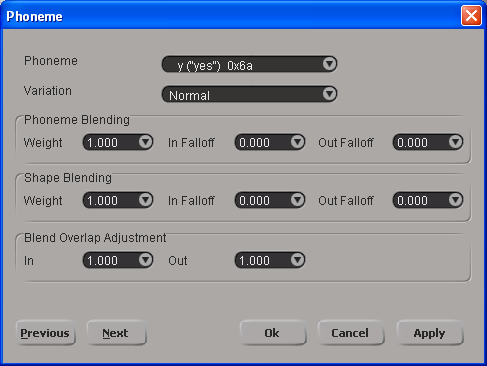
Right-click on one of the selected phonemes and choose Edit from the menu. In the Phoneme dialog box, set the Phoneme Blending  Weight and In Falloff and Out Falloff values.
You can select a preset value from the parameter's list, or enter a value in its text box. The In Falloff and Out Falloff values can be in a range of -1 to 1.
Click the Apply button to apply the values for these parameters to the selected phonemes.
