Using the same concept of clip effects as described in Modifying Action Clips with Clip Effects, you can easily add an offset to an animation in an action clip or a compound clip. Clip effects let you add a "layer" of animation to an existing clip without affecting the action source. This method lets you set offset keys on those fcurves. You can add as many offset keys as you want for the same parameter.
|
|
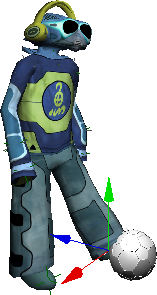
On the left, Club-bot is in the original position with his foot in the ball.
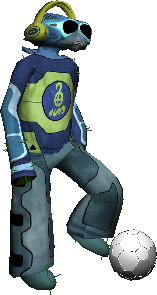
On the right, his leg effector is translated to a position where Club-bot is just about to kick the ball and an offset key is set.
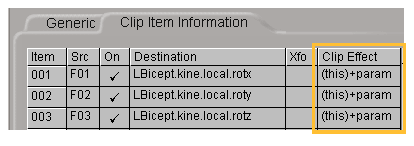
When you create an offset effect, the clip effect expression for each driven parameter in the action is set for you to "this+param" or "whatever was there+param", with param being the per-item offset (unique to each parameter driven by the clip). This is the same as creating a clip effect, except that the clip effect expression is created for you. The offset effect creates corresponding offset function curves that you can edit like any other curve in the animation editor (see Editing the Offset Effect Fcurves).
When you save an offset key for the effect, it computes the difference between the original pose (the one in the original action clip) and a new one that you create and then it sets keys with this difference in the per-item fcurves (the offset curves). Because the offset curves are added to the original motion, the character really has the same pose at the chosen frame.
Once you have created an offset effect, there are two commands you can use to set the offset keys:
The Effect  Set Offset Keys - Marked Parameters from the mixer's command bar.
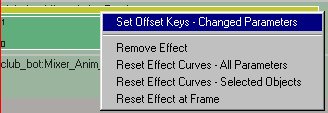
The Set Offset Keys - Changed Parameters command you get by right-clicking the clip effect's yellow bar.
This command calculates only the parameters that are changed in the offset key (so you don't have to explicitly select the components you moved). Also, if you want to create an offset for a compound clip, you must use this command.
Select an action clip or compound clip and choose Effect  Create Offset Effect from the mixer's command bar to create the effect.
A yellow effect bar appears above the clip indicating that there is a clip effect acting upon the clip.

Select the objects that the clip drives and mark the parameters you want to offset.
Go to the frame where you want to add the offset and adjust the desired parameters; for example, move the object to a new position.
Right-click the yellow effect bar and choose Set Offset Keys - Changed Parameters.
This calculates only the parameters that are changed in the offset key (so you don't have to explicitly select the components you moved). Also, if you want to create an offset for a compound clip, you must use this command.
Choose Effect  Set Offset Key - Marked Parameters from the mixer's command bar. This saves a key of the difference on marked parameters. If a marked parameter did not change,
a "0" offset key is saved.
For each modified or chosen parameter, the difference between the original and the new position is saved into the offset effect. You can check the clip's Clip Effect expression in the Instanced Action property editor (right-click the clip and choose Clip Properties) to see how the Clip Effect expression has changed.
Move to a new frame, change the parameters again, and save another offset key using the same command you used before.
Another way of working is to set zero (anchor) offset keys to first mark the range of influence of the offset, then set the real offset keys (ones with values) between these anchor keys.
If you want to save zero offset keys after you have set real offset keys, you need to deactivate the effect — otherwise the parameter you want to keep at its original value could be influenced by the effect. This keeps the value of the parameter as it is in the original action. If you only have zero keys, there's no need to deactivate the effect.
Editing the Offset Effect Fcurves
When you create an offset effect for an action clip, one offset fcurve is created for every parameter driven by your clip. The offset curves reflect the differences between the original animation and the offset animation you created. They are "anchored" at the start and end of your clip and contain the offset keys you set.
Depending on what you offset (perhaps only one parameter changed from the default pose when you set the offset key), you'll see the items in the animation editor beneath clip effect.
Right-click the clip with the offset effect and choose Animation Editor.
In the animation editor's tree, select the clip with the offset effect.
Choose Show  Flattened None in the animation editor to see the clip effects listed.

Each item in this clip effect has its own fcurve in the graph.
Edit the curve as you would any other fcurve. Remember that you are editing an additional (the offset) value for the parameter and not its actual final value.
For information on editing fcurves, see Editing Function Curves.
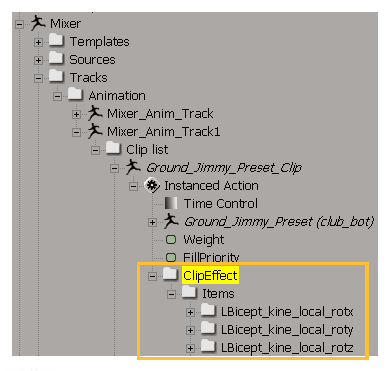
To find the offset parameters in the explorer, you must look deep down in the model's Mixer  Tracks
  Animation
  Mixer_Anim_Track n
  Clip list
  Clip name
  Instanced Action
  Clip Effect
  Items folder.
In the explorer, make sure to choose Show  Animated or Animatable Parameters to see these parameters.
Right-click the clip's yellow effect bar and choose Remove Effect.
Select the clip and choose Effect  Remove Effect on the animation mixer command bar. This removes the animation on all parameter curves and clears the clip effect expression
information for clip and offset effects.
Select the clip and choose Reset Effect Keys - All Parameters on the animation mixer command bar to remove all keys for parameters created with the offset effect except the first and last keys.
Select the clip and choose Reset Effect at Frame on the animation mixer command bar to remove all keys for parameters created with the offset effect at the current frame.