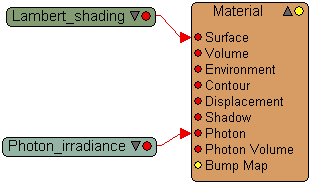
The easiest way to edit or color-correct the photon effect of an object is to edit its Irradiance parameter. This parameter is found on the Indirect Illumination tab of a surface shader's property editor. The Irradiance parameter defines which color is displayed when a photon effect is triggered.
It is also possible to edit and alter caustic and global illumination effects using the render tree. The key to affecting photon effects is connecting a shader or tree of shaders to the Photon input of the material node.

The surface shader connected to the material node is usually connected to the Surface, Shadow, and Photon inputs, so you can control all of these parameters from one shader. If you wish to have independent control of each, you can define a specific shader per input. In this example, a Simple Lambert controls the surface and the Photon Irradiance controls the Photon input.
To add a shader to the photon input
From Render toolbar, choose Get  Shader
  Photon and select a shader. The only types of shaders you can connect to the Photon input are surface shaders (Blinn, Lambert, Phong,
etc.) and special photon shaders. These shaders are:
Photon Irradiance defines a color for the photon effect or applies a texture.
Render Tree Usage defines a separate Diffuse, Specular, and Transparency color (or texture) for the photon effect.
Render Tree Usage specifies a Diffuse, Specular, Transparency, and Reflection color or texture. You also have control over the photon effect's index of refraction.
Create the photon effect set up by defining a light, receiver, and caster as outlined Creating a Photon Effect.