You can cache an object's animated deformations or simulations to a point cache file which stores the object's point position data. The object's point position is stored in local space by default, but you can also choose to store it in global space by selecting the Baked Animation - All Transforms option.
A point cache file stores only the XYZ positions of an object's points (vertices) in space, not the object's transform data (translation, rotation, or scale) in its Kinematics node.
In addition to regular cache files, you can also write Caches List (.cacheslist) files that help you manage how you load multiple objects and multiple cache files.
You can cache point data from these types of simulations and animations with the options on the Write tab in the Cache Manager:
ICE simulations (particles and deformations, including Lagoa) and animated deformations. ICE attributes are also cached.
Animated deformations (any type, including envelopes and animated Face Robot heads)
If you're using the Polygonizer, note that it has its own caching mechanism — see Meshing Point Clouds (and Other Things) for information.
Only the simulated frames of an ICE tree are written to the cache, which doesn't include the first frame of the scene. This frame is considered to be the initial state and is therefore not simulated. For example, if your scene starts at frame 1 and ends at frame 100 frames, 99 simulated frames are written to the cache, beginning with frame 2.
If you're caching instanced geometry for ICE particles, make sure to keep the master object in the scene when writing or reading a cache file: even if the particles are cached, they still depend on the instance master to be there. If you don't want the master objects to be displayed or rendered, you can simply move them out of the camera's view, or you can hide them by selecting the Instance Master Hidden option in each master object's Visibility property editor (Rendering tab).
Caching Animation or Simulation Data
To write animation or simulation data to a cache file:
Select one or more objects whose simulation or animation you want to cache. Each object will have its own cache file.
You can also branch-select a parent object to write cache files for all objects in the hierarchy — see Objects.
Open the Cache Manager — see Opening the Cache Manager.
In the Cache Manager, click the Write tab at the top of the window.
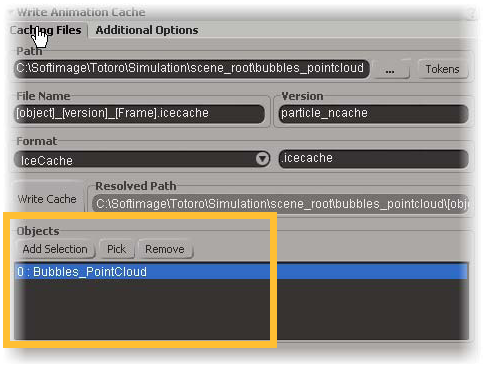
On the Caching Files tab, select the Path, File Name, Version, and Format you want to use for the cache file — see Write.
The current path is displayed in gray in the Resolved Path text box.
In the Object list, select the objects for which you want to create a cache file — see Objects for details.
Using the options on the Additional Options tab, you can:
Select certain frames of the simulation or animation to be cached: set the Start and End values determine the range of frames to be cached, as well as the Step (the interval of frames).
Create a .cacheslist file for multiple objects — see Creating Cacheslist Files for Multiple Objects.
Select certain ICE attributes to cache — see Setting ICE Attributes for Caching.
Select the Baked Animation - All Transforms option to cache the object's point position in global space.
Click the Write Cache button when you're ready to cache.
This plots all frames displayed in the timeline for the selected objects' animated deformation or simulation and saves it in the cache file that you have specified — see Where Do Cache File Sources Live?
Creating Cacheslist Files for Multiple Objects
You can write cache files for multiple objects at a time using a .cacheslist file. For example, if you have a character which has 100 parts and each of them is given a separate cache file. You can then link up all the cache files using a .cacheslist file.
The .cacheslist file is a simple text file that stores information about all the caches you have recorded, including the frames, file format, path, and objects in the list. You can open it using any text editor and make changes as you like.
Select the Path you want to use for the .cacheslist file.
You can see the current path and file name in gray in the text box in the Caches List Options area.
Make sure that all the objects you want to include in the .cacheslist file are in the Objects list on the Caching Files tab — see Objects.
On the Additional Options tab, select the Create Caches List option .
Back on the Caching Files tab, click the Write Cache button to record the caches for each of the objects in the list, as well as creating a .cacheslist file containing a reference to each object and its cache file.
When the .cacheslist file has been created, you can load it in the animation mixer — seeLoading Cacheslist Files for Multiple Objects.
Setting ICE Attributes for Caching
Using the Attributes lists on the Additional Options tab, you can specify which ICE attributes you want to write into the cache file. These are the attributes that are used in the object's ICE tree and in the render tree for rendering (such as those being used by an attribute shader in a render tree).
When you select an object in the Objects list, its attributes are highlighted in the two Attributes lists. This lets you easily see which attributes belong to which object.
If you want to see which attributes were cached for a cache file when you're reading it, click the Dump Header button on the Read tab in the Cache Manager.
Selecting Which ICE Attributes to Cache
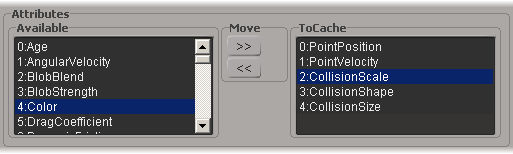
Softimage automatically makes sure that all required attributes are included for the objects in the Object list, as displayed in the To Cache list. However, if you want to cache only specific attributes, you can do so by moving attributes out of the To Cache list and into the Available list. Only the attributes in the To Cache will be cached into the file.
Trimming down the number of attributes you use can make the cache files quite a bit smaller in some cases, especially for heavier simulations like Lagoa-based ones. For example, if you wanted to test only the movement of a particle system, you could specify only the PointPosition and PointVelocity attributes.
Each object type has specific attributes:
Read-only attributes, such as PointCount on a polygon mesh, are not written to the cache file.
Point clouds have many attributes including ones related to rendering: Color, Force, Mass, Orientation, PointPosition, PointVelocity, Scale, Shape, ShapeInstanceTime, SimulatedFrameFraction, Size, SpriteAngle, StateID, StateTransitionTime, StrandOrientation, StrandPosition, StrandSize, and StrandVelocity.
For a description of all attributes, see ICE Attributes.
Tips for Particle Attributes to Cache for Rendering
To keep attributes to a minimum for rendering ICE particle simulations, you may find it useful to cache only the following attributes, depending on your simulation:
Density (Alpha of the ICE Color): only required if you have animated it
Color (RGB of the ICE Color): not required if you set the color in the render tree with a constant color or a gradient
Velocity: only required for align/rotate particle with velocity and motion blur
Custom attributes: any additional ICE attribute you can access in the render tree


