Advecting geometry with Lagoa means adding a particle for every vertex of a mesh, and then using the particle simulation to "drag" the object's points along with it. This is the technique to use if you want the object to interact with a Lagoa fluid simulation.
For best results, the simulated geometry should be as uniform as possible, with all polygons and edges being roughly the same size as each other.
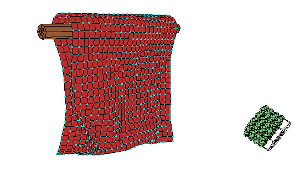
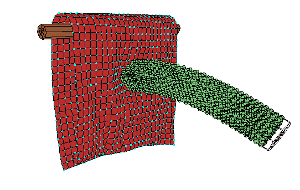
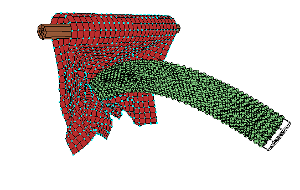
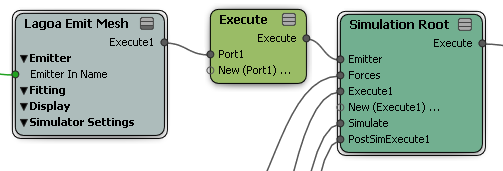
Anatomy of a Lagoa Mesh Advection
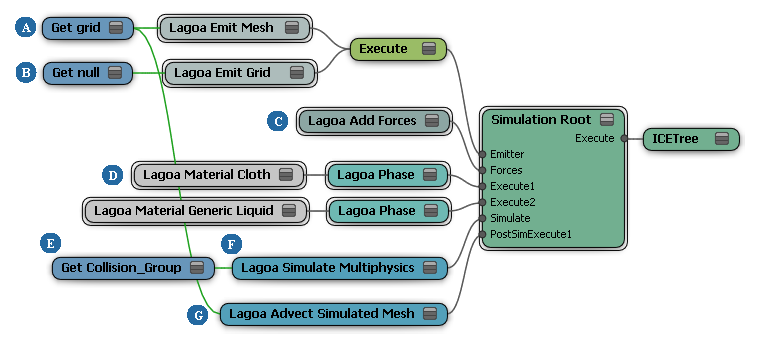
| A |
Lagoa Emit Mesh creates a particle for every point in the mesh. |
| B |
A different emitter is used for the fluid that will interact with the mesh. See Setting Up Emissions in Lagoa Simulations. |
| C |
Lagoa Add Forces controls the forces acting on the geometry and fluid. See Setting Up Forces for Lagoa Effects. |
| D |
Different phases and materials are used for the points emitted from the mesh and the fluid. Together they control how a material behaves in various circumstances, such as compression, bending, stretching, and so on. See Creating Phases for Lagoa Effects and Lagoa Material Properties. |
| E |
The collision object's name is plugged into the Lagoa Simulate Multiphysics node. If you want to use multiple colliders, you must put them in a group and use the group's name. Each collider should have a tree with a Lagoa Set Collision Data node, or else default values will be used for friction and other attributes. See Setting Up Collisions for Lagoa Effects. |
| F |
Lagoa Simulate Multiphysics performs all the calculations for the simulation and updates point positions. You can enable and disable various aspects of the simulation, depending on the effect you want to achieve. See Lagoa Simulate Multiphysics [ICE Reference]. |
| G |
Lagoa Advect Simulated Mesh updates the point positions of the mesh based on the particles emitted from it. |
If you want to use multiple collision objects, add them all to a group.
Choose Particles  Create Mesh Advection from the ICE toolbar.
Pick a collision object or group.
If you right-click to cancel picking, a default collision object is created.
A point cloud is created with an ICE tree and the Lagoa Setup Advect Mesh compound is applied.
Another ICE tree is created on the collision object, and the Lagoa Set Collision Data compound is applied. If you want to add additional collision objects later, see Setting Up Collisions for Lagoa Effects.
Open the ICE tree view, or refresh it if it is locked.
Select the Lagoa Setup Advect Mesh compound and choose Compounds Explode Compound to expose its inner nodes.
Alternatively, you could edit the inner nodes directly, but in that case make sure that you do not export the compound without first giving it a new name or else the modified compound in your user location will take precedence over the factory compound.
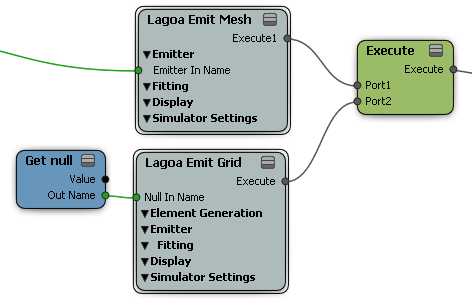
Drag an Execute node onto the link between the Lagoa Emit Mesh and Simulation Root compounds.
To add a fluid that interacts with the advected mesh, add a Lagoa Emit Grid or Lagoa Emit Volume compound to the tree, and connect it to the Execute node's New port. For more information, see Setting Up Emissions in Lagoa Simulations.
Make sure to specify a different Phase in the emitter compound if you want to use a different Lagoa material, and to set up the corresponding Lagoa Phase and Material nodes. For more information about phases and materials, see Creating Phases for Lagoa Effects and Lagoa Material Properties.
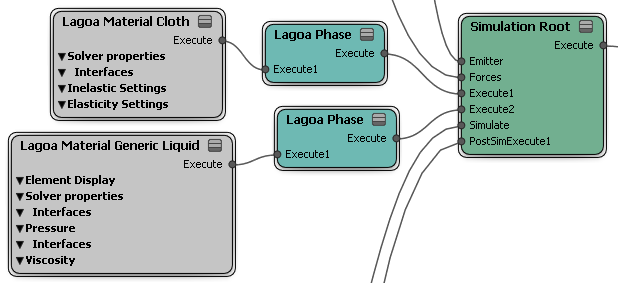
Repeat this step for every fluid emitter you want in the simulation. Remember to set a different Cluster ID if you do not want fluids from different emitters to merge.
If you want to advect a second mesh in the same simulation, connect a new Lagoa Emit Mesh compound to the Execute node. Use a Get Data node to get the mesh and connect it to the Emitter In Name port.
Set up the phase, material, and cluster ID for the second mesh as desired.
Repeat for every mesh that you want to advect in this simulation.
Add forces as desired. See Setting Up Forces for Lagoa Effects.