Property editors are where you'll find an element's properties. They are a basic tool that you will use constantly to define and modify elements in a scene.
You can define how a property editor behaves as you work and select elements in Softimage: it can follow your selection and display the properties of any selected element of the same type; it can recycle and display the properties of the selected element; or it can be locked so that it always displays the properties of the same element. For more information, see Locking, Recycling, and Focusing Property Editors.
Property editors include the following elements:
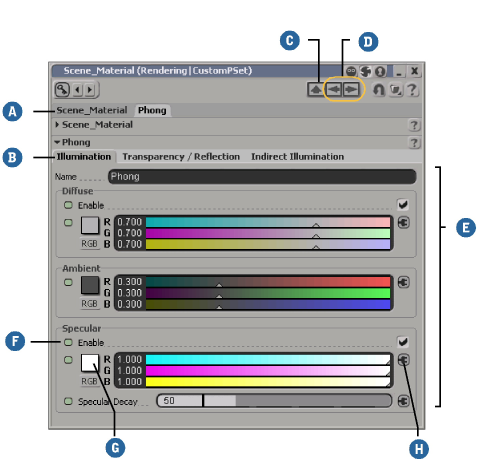
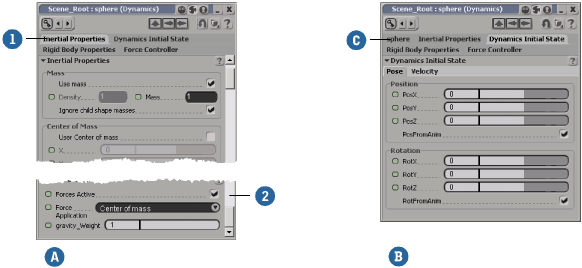
| A |
Switch between different properties displayed in the same editor. Click the arrows below to expand or collapse properties. |
| B |
Switch between tabs of parameters within a property. |
| C |
Open the property of the parent node. |
| D |
Go to the next or previous items in the history of displayed properties. Right-click to select a specific property from the history. |
| E |
Controls for viewing and setting parameter values. |
| F |
Animation icon: Set animation and show current status. Click to set or remove a key. Right-click for the animation icon menu. |
| G |
Color box: Opens color editors, from which you can pick or define the colors you want to use. |
| H |
Connection icon: Links the parameter value to a shader, weight map, texture map, or vertex color property, or inserts a shader. Right-click for a menu. See Connecting Maps [Scene Elements] or Connection Icon Status [Materials and Shaders]. |
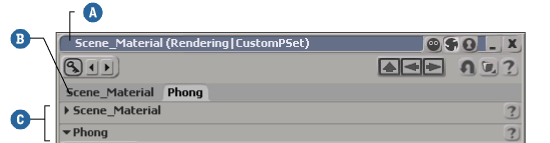
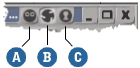
The area in the upper-right corner (below the title bar) contains:
| A |
A Revert icon that lets you reset all controls to the values they had when you first opened the property editor. |
| B |
A Preset icon allows you to save or load presets of parameter values. See Creating Presets of Property Settings [Scene Elements]. |
| C |
A Help icon that gives you information on all properties on the property set selected on the top tabs. Each property set also has its own help icon on its header. |
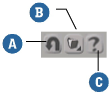
The upper-left corner of the property editor, just below the title bar, contains the following controls related to setting keyframes for properties:

| A |
A keyframe icon that lets you set or remove keyframes for the current settings of marked parameters on the property page. Right-click for more options. For more information on keyframes, see Animating with Keys [Animation]. |
| B |
Two arrow icons that let you move to the previous keyframe and next keyframe. |
Locking, Recycling, and Focusing Property Editors
The three icons near the upper-right corner control how the property editor is updated as you work and select elements:
There is more than one way to access an element's property editor: how you access an editor depends on your current work context:
In the explorer, click the icon of an element or select an element, then click the Selection button on the Select panel to display a menu from which you can choose certain properties. Click the icon of the property set you wish to view.
Use shortcut keys to open a property editor. Pressing Ctrl+K, for example, opens the Local or Global Transform property editor of a selected object. You can also create your own shortcut keys to open a property editor of your choice. For more information on this, see Key Maps [Customization].
Certain property editors can be displayed in other ways:
Move back and forth through previously opened property editors by pressing the Page Up and Page Down keys or choosing the Up, Previous, and Next icons in a property editor's Inspected Nodes controls. (Right-click on the Previous or Next icons to display a selectable list of most recently viewed nodes.)
Right-click in a render region border and choose Properties from the pop-up menu. This displays the View Rendering Options property editor for the region.
Choose Visibility Options from the eye icon menu or Display Options from the Display Modes menu in a viewport. The property editor that displays lets you specify how elements and the viewports themselves are viewed.
In many cases, after you choose a command, a property editor is displayed automatically. When you choose Get  Material and select a material shader from the menu, for example, the material shader's property editor automatically displays.
Property editors that display as floating windows can be closed by clicking the X on the right of their title bars.
They can also be closed (as can all other floating window views) by positioning the mouse pointer over the window and pressing Ctrl+' (left single quote). On most keyboards, the left single quote is found directly below the escape (Esc) key. If the pointer is not positioned over a property editor, the first property editor opened will be closed.
Preventing Property Editors from Displaying
You can prevent property editors from displaying automatically whenever a new object or property is created. In addition, you can temporarily toggle the current behavior by pressing Ctrl while choosing a command.
Docking the Property Editor in a Viewport
By default, property editors display as floating windows but you can also dock them in a viewport by selecting Property Editor from the viewport's Views menu.

This makes it easy to always have a property editor for whatever object is selected (if you recycle it), or always keep a frequently used property editor handy (if you lock it). For information on recycling and locking, see Locking, Recycling, and Focusing Property Editors.
Controlling the Display of Property Editor Tabs
The Tab Style Property Editors preference controls how multiple property sets appear when they are displayed in a single property editor.
The tab-style property editors can be faster when displaying and updating information, particularly when working with large property sets. However, they may require more clicking to switch between property sets.
Editing Multiple Elements with Property Editors
If you multi-select a number of elements and open their property editors, you can edit their common parameters simultaneously. In this situation, the title bar of the property editor displays "multi". When elements in the selection have different values for a parameter, the value appears blank in the property editor (or in the case of checkboxes, displays "?") but you can set all selected elements to the same value by editing the parameter.