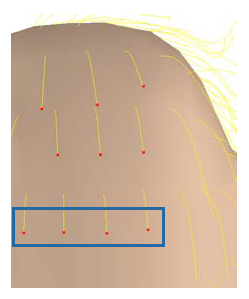
There are different ways in which you can change the length of the guide hairs: using the Hair Scale tool, attenuating, and cutting. You can also reset the hair length.
You can drag selected hair points or tips in Stretchy mode (see Stretching Hair Segments) to quickly change the guide hair length.
You can randomly scale the render hair length by using the Random Scale parameter in the Hair property editor (see Changing the Length of Render Hairs). This doesn't affect the length of the guide hairs.
You can change the length of guide hairs using the hair Scale tool.
Select the hair strands, tips, or points on the hair object (make sure the hair object itself isn't selected). The points on the guide hairs are always equidistant, so you really only need to select one point on a strand to scale the whole thing.
Click the Scale button on the Hair panel, then click and drag in the viewport. This creates a Scale operator for the hair and a property editor.

Do one of the following to change the hair length:
Drag the mouse to the right to lengthen the hairs and to the left to shorten them.
Open the Hair Scale Operator property editor and drag the Scale Factor slider to set the length precisely.
Each time you click and drag, a new Scale operator is applied. The results are cumulative so that an operator that scales by a factor of 2 followed by one that scales by 0.5 negates the scale.
You can animate the Scale factor to create movement on the hair; however, if you do this, you cannot use dynamics on the hair.

Selected guide hairs (with tips selected) are shortened. Drag the mouse to the right to lengthen and to the left to shorten the hairs.
There are two different ways to remove hair, such as for creating bald spots, shaved patterns in hair, or mowed patterns in grass. You can either:
Connect texture or weight maps to the Density Map (see Removing Render Hairs (Density)) or Cut Map parameters (Changing the Length of Render Hairs).
Either of these parameters are especially useful for quickly creating patterns of hair removal. Density Map determines the number of render hairs based on the map that's connected to it (it essentially prevents render hairs from being displayed), and Cut Map determines the render hair length.
You can also scale the guide hairs proportionately to the size of corresponding polygon on the emitter object: smaller polygons produce shorter guide hairs.
Attenuation is good for fur because you usually need the hairs to be shorter in the areas of high detail, and longer in areas of low detail. Choose the Attenuate command a few times in a row to initially set the length, then adjust by scaling the guide hairs to the exact length you want.
You can cut (shorten) the guide hairs similar to what you would do in real life: pick a point and snip! Although it appears that the guide hairs are cut, no segments are actually removed or harmed during this operation; instead, they are scaled to the length you've specified and then refitted to that portion. This makes it possible to undo a hair cut that was too short, something we would have all liked to have done at some point in our lives!
Select a point on the hair strand where you want to cut, or select the hair object itself.
Press Alt+left or right arrow key to move up or down the strand to select a point before cutting.
Choose Modify  Cut. The hair is cut at the selected point, and that point remains selected relative to the length of the strand so that you
can keep on cutting.
If you selected the hair object, one hair segment is cut from each strands' end.
If the cut wasn't exactly what you had in mind, you can change it. In the Hair Cut property editor, you can set the Offset parameter to add a relative offset to the cut, allowing you to change the hair point that was selected and cut. For example, an offset of -1 cuts at the point before the one you selected (resulting in shorter hair), and a offset of 1 cuts at the point after.
To reset hairs along the normals
Select hair strands and choose Modify  Length
  Pop Selected. This resets the hair, returning the hairs to their default state (sticking out in the direction of the emitter object's
normals) at the default length.
Select the hair object and choose Modify  Length
  Pop Zero Hairs to lengthen hairs that have been scaled down to zero and can't be selected (useful if you've gotten a little overzealous
with the cutting!). This also makes the hairs stick out in the direction of the emitter object's normals.