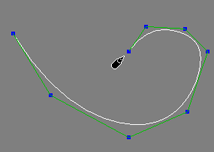
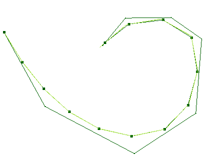
In addition to a spine, you can create a tail chain that can be used in any type of rig. For example, while the quadruped rig allows you to create a tail as part of the setup, you could create a separate tail and attach it to a biped dog leg rig to control the tail on a fantastical bipedal monster creature!
You can create a tail from a single curve or from several 3D objects. A tail is basically a chain where each bone is controlled by a spring so that it reacts (secondary animation) to the skeleton's primary animation. You can override these springs by keying the rotation of the tail control (dark green line) to get precise control over the tail's movement. The tail uses a layer of dynamics that run "on top" of the animation. You can then control the blending of the primary animation with the tail's spring simulation using options in the Tail Control custom parameter set (see Blending the Animation and Simulation).
For information on the tail's spring, including the location of the tail's spring operator, see Spring Operators for Tail, Ear, and Belly Rig Controls.
Tails, Spring Caches, and Models
You can cache the tail spring's simulation to an action source to make for easy playback, as well as for exporting and copying
the simulation (see Caching the Spring's Simulation). This action source is stored in the tail model's Mixer  Sources
  Animation folder.
To make sure that the tail's cached sources are kept intact when copying or importing/exporting it, put the curve from which you want to create the tail into the desired model (the model you will be exporting or copying) before you create the tail and cache the simulation. If the tail curve is under the scene root, for example, you won't be able to export the cached sources created for it because you can't export the scene root's mixer. Also, if you cache the simulation on the tail and then move it into another model, the cache is disconnected from the tail.
Furthermore, if you intend to use tails in referenced models and you want to keep the cached source with the scene, put the tail curve in a nested model (a submodel) within the referenced model. This prevents the tail's cached source from being while removed when changing the referenced model's resolution or updating the referenced model.
If you have already created the tail, you can still get the tail to work in a character by merging the "tail" scene into a new scene. The tail scene is brought into the new scene within its own model, and you can export and import it from there.
For general information on models and referenced models, see Models.
Make sure that the tail curve is in the desired model; that is, put it in the model that you will be exporting or copying. You cannot export or copy the scene root's model.
Select the curve and choose Create  Skeleton
  Create Tail from the Animate toolbar.
Specify the number of bones in the Tail Maker dialog box that appears. The more bones, the more flexible the tail will be.
The tail is created with controllers at the curve's control vertices.

|

|
Parent the tail in your skeleton or rig setup the way you want.
To modify the tail's spring, such as setting the tail's stiffness, see Spring Operators for Tail, Ear, and Belly Rig Controls
Create two or more objects and position them as you want for the shape of the tail.
Select the objects in a consecutive order from base to tip. This is important because the bones in the tail are created in the order in which you select them.
To help select the objects, use the free-form selection tool (press F9) or any selection tool that lets you pick in a definite order. Using a rectangle selection tool selects many objects at once and may not produce the correct shape.
Choose Create  Skeleton
  Create Tail from the Animate toolbar.
Choose the number of bones in the Tail Maker dialog box that appears. The more bones, the more flexible the tail will be.
The tail is created with the controllers at the object centers.

On the left, objects created to make the tail.
On the right, resulting tail with 14 bones. Notice that the controllers created are at the objects' centers.
Parent the tail into your skeleton or rig setup the way you want, such as at the base of the spine.
To modify the tail's spring, such as setting the tail's stiffness, see Spring Operators for Tail, Ear, and Belly Rig Controls.