Control objects are a major part of a rig setup, as they are used to animate the different parts of the skeleton. They become part of a character's hierarchy when you constrain them to parts of the skeleton using different methods. Constraining is a way of increasing the speed and efficiency in which you animate. It's a way of controlling the animation of one object "via" another one's animation.
Expressions are also commonly used in rigs for creating various types of constraints and solving different problems. See Animating with Expressions [Animation] for more information.
There are many different types of constraints in Softimage and many different ways in which you can use them, but here are some of the most common types of constraints you will probably use with controls objects in rigs.
When you're creating constraints and rigging, you often need to use nulls. To quickly create a null exactly where you want,
choose Create  Skeleton Draw 2D Chain and click once, then right-click to end chain drawing. The advantage is that the null will be placed where you click, not
at the global origin (0, 0, 0,).
Skeleton Draw 2D Chain and click once, then right-click to end chain drawing. The advantage is that the null will be placed where you click, not
at the global origin (0, 0, 0,).
When you create a null, you can resize it by adjusting its Size parameter (select the null and press Enter to open its property editor). This can help with rigging issues where you don't want to scale the null.
As well, you can change the shadow shape and color for the null, just as you can for a chain effector or root — see Changing the Chain Element Display.
You can quickly match a null to a control object's scaling, rotation, and translation: select the null and choose Transform Match All Transforms, then pick the control object. The null matches the control object's transformation values.
Pose constraints are also sometimes known as parent constraints because they let you easily constrain a whole rig or skeleton to another. For example, you can easily constrain a shadow rig to your animated rig using a pose constraint, then transfer the animation to the shadow rig (see Controlling the Constraints between Rigs (Models)).
With whole rigs/skeletons constrained together, you can also easily animate the constraint's weight blending between them to shift animation from one rig to another.
For more information, see Pose Constraints [Animation].
Position and Orientation Constraints
Position constraints constrain only a skeleton element's translation (position) to that of a control object. For example, you can use position constraints to constrain an effector to its root, such as a leg's effector to a foot's root.
For more information, see Position Constraints [Animation].
Orientation constraints constrain only a skeleton element's rotation (orientation) to that of a control object. For example, for FK elements such as arms, you can orient-constrain your rig's bones to another's. If the resulting orientation on your rig's bones is not correct, modifying their rotation order may help — see Changing the Bones' Order of Rotation.
For more information, see Orientation (Rotation) Constraints [Animation].
Up Vector Constraints for IK Legs and Arms
An up vector is a special constraint that controls the orientation of a chain when it is animated with inverse kinematics (translating the chain's effector). Up vectors restrict the orientation of the chain to be on a certain plane, called the resolution plane (see The Chain's Resolution Plane). This plane is the only one in which the chain can move.
For more information, see Constraining the Chain's Up Vector (Direction).
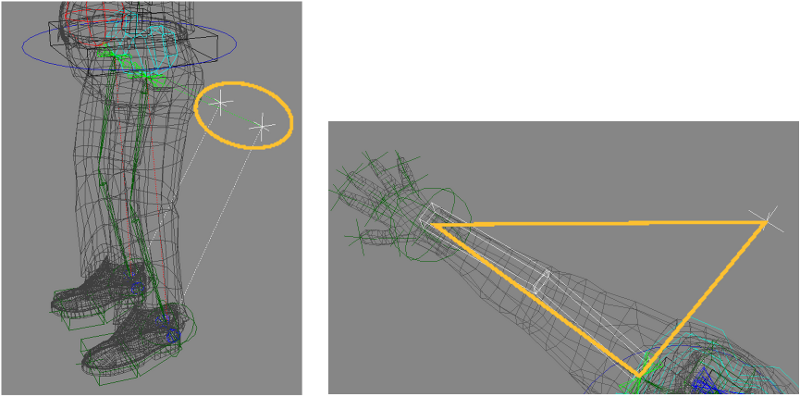
On the left, nulls behind the legs are used as up-vector constraint objects.
On the right, the arm chain's resolution plane appears as a triangle, with the null behind the shoulder being used as the up-vector constraint object.
Constraints in Softimage are powerful and can be applied to more than just the whole geometry of an object: they can also be used with clusters. You can use the Object to Cluster constraint to constrain a chain element to clusters on a control object. The advantage of this constraint is that it lets you determine an exact position on the geometry at which you can constrain the element, instead of the center of the whole geometry when using other constraints.
For more information, see Object to Cluster Constraints [Animation].
When you set up a constraint, you usually do it with compensation, which means that you can preserve the offset between the constrained and constraining objects that existed when you created the constraint.
For more information, see Creating Offsets between Constrained and Constraining Objects [Animation].
Controlling the Constraints between Rigs (Models)
When two characters that are in separate models are constrained together (such as a rig and its shadow rig), you need tools to control the binding between them without interfering with each character's constraint setup within its model. When you create a shadow rig with a Softimage rig (see Creating Shadow Rigs), it's automatically constrained to the rig.
For example, let's say Model A (an animation rig) is constrained to Model B (a hierarchy with motion capture). There are a large number of pose, position, orientation, and chain up-vector constraints that keep Models A and B together. By branch-selecting Model B and choosing the commands, you can select, activate/deactivate, or remove all of the constraints that go from Model B to Model A. None of the constraints between objects within Model B's structure are affected.
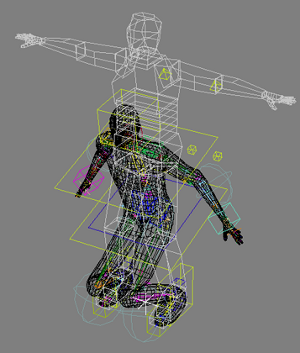
Shadow rig (shown in white) with constraints deactivated between it and its animated parent rig (shown in black with rig control objects).
These commands let you control the use of any constraints on a model outside its structure. The definition of a constraint that is external to a model is when the constraining objects are not part of the same model structure as the constrained object. None of the constraints between elements within a model structure (that is, the rig) are affected by these commands.


