There are two components you need to specify in order to make your custom shader definition appear in the preset manager:
Without specifying the DisplayName, the name that appears in the preset manager defaults to the shader definition ClassName. To specify a display name, use the strategy that matches your situation:
| In the context of... |
... use the following: |
|---|---|
| shader definition plug-in |
the DisplayName attribute on the Context or Context object:
in_ctxt.SetAttribute("DisplayName", "My Nice Name"); |
| shader language parser plug-in |
the DisplayName attribute on the Context or Context object:
// Insert spaces before capitals to make a nicer version of the ClassName
var sDisplayName = sClassID.replace(/_/g, " ");
sDisplayName = sDisplayName.replace(/([A-Z][a-z])/g, " $1");
sDisplayName = sDisplayName.replace(/^ /, "");
in_ctxt.SetAttribute("DisplayName", sDisplayName); |
| the ShaderDef.DisplayName or ShaderDef::PutDisplayName member: oShaderDef.DisplayName = "My Nice Name"; |
You need to specify a category to make your shader definition accessible from the preset manager. You can create your own category, or you can add your shader definition to an existing Softimage category, but you can only specify one category for each shader definition. To specify a custom category, use the strategy that matches your situation:
| In the context of... |
... use the following: |
|---|---|
| shader definition plug-in |
the Category attribute on the Context or Context object:
in_ctxt.SetAttribute("Category", "My Shaders"); |
| shader language parser plug-in |
the Category attribute on the Context or Context object:
// Assign the main Category of "Test Shaders" and then put .pck files under "Parsed (Good)"
// subcategory followed by the .bck files under "Parsed (Bad)" subcategory
if (in_ctxt.GetAttribute("Filename").match(/\.pck$/i)) {
	in_ctxt.SetAttribute("Category", "Test Shaders/Parsed (Good)@100");
} else if (in_ctxt.GetAttribute("Filename").match(/\.bck$/i)) {
	in_ctxt.SetAttribute("Category", "Test Shaders/Parsed (Bad)@200");
} else {
	in_ctxt.SetAttribute("Category", "Test Shaders@300");
} |
| the ShaderDef.DisplayName or ShaderDef::PutDisplayName member: oShaderDef.Category = "My Shaders"; |
These examples demonstrate how to use a single custom category, but you can also refine how your shader definitions appear by using special syntax in the categories string to group them and/or specify subcategories (nesting them).
To group items, you indicate group membership by the @ symbol followed by a number that identifies the group. It is best to use multiples of 100, to give maximum flexibility for interceding groups. For example, suffixing @100 to the Category name for three out of five definitions means that those three will appear after the other two, and each of the two groups will be automatically sorted in alphabetical order. If you then added another set of shader definitions with the group indicator of @200, those will appear at then end.
Each grouping is indicated in the preset manager by a standard menu separator. For an example of grouping shader definitions in the preset manager, see the Puck Shader Language Parser example.
Specify a sub-category using a forward slash (/) preceding each nested level (sub-category). You can nest an unlimited number of levels deep, although it is recommended for clarity and usability to only use up to two levels of depth. For an example of using sub-categorized shader definitions in the preset manager, see the Puck Shader Language Parser example.
Using Native Softimage Categories
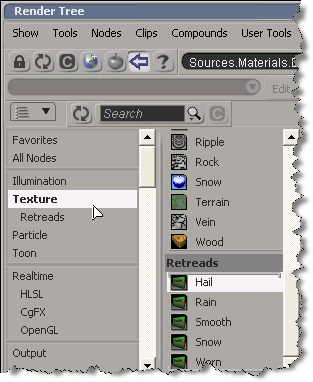
If you want to use a native Softimage category, you can piggyback on one of the categories defined in the RTUserTools\Application\Plugins\RTShaderCategories.js script file under your factory add-ons location. For example, to add a list of custom texture shaders under the Retreads sub-category to the end of the list of native Softimage textures in the preset manager, specify "Texture@100/Retreads@300" as the Category string:
