If you are new to .NET, you may also want to check out the section below on Working with the Global Assembly Cache (GAC).
Open a Softimage command prompt, and type devenv to start Visual Studio .NET.
Starting Visual Studio .NET from a Softimage command prompt ensures that environment variables such as XSI_HOME are set (otherwise you'll get build and link errors).
In Visual Studio .NET, open the .csproj project file.
If a Source Control dialog box appears, click OK, and then in the Change Source Control dialog box, click Work Disconnected.
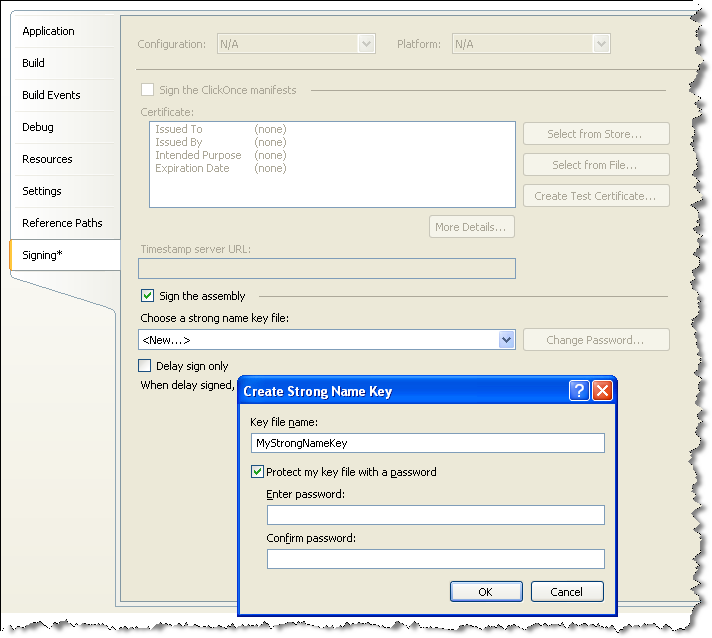
If this plug-in will be loaded from a network share, make sure you also create a strong name key for your plug-in.
Select a configuration (Debug or Release) and build the DLL.
The first time you build the plug-in, you will be prompted to save a Solution File (.sln).
If this plug-in will be loaded from a network share, make sure you also add your plug-in assembly to the GAC (Global Assembly Cache) by running the following from a command prompt:
gacutil /i \servername\<plugin_path>\YourPluginName.dll
Load the plug-in into Softimage by doing one of the following:
Working with the Global Assembly Cache (GAC)
The Global Assembly Cache (GAC) contains assemblies that can be run across multiple applications on a single machine. It performs integrity checks when assemblies are added to the cache, and uses strong names to ensure that the correct version is always loaded.
You can manage this cache with the Global Assembly Cache Utility (gacutil), which allows you to install and uninstall assemblies in the cache as well as list the assemblies installed. In order to use the gacutil, you must install the .NET Framework SDK, which is available from the MSDN Framework Developer Center.
For Softimage, you may need to check to see whether the Softimage SDK assemblies are installed and which versions are running. If they aren't installed, you may need to install them.
To find out whether the Softimage assemblies are installed
Run these commands from the Softimage command prompt:
gacutil /l Softimage.XSIOM
gacutil /l Softimage.XSIUtil
gacutil /l Softimage.XSIMath
You may see the following message when you try to run this utility:
'gacutil' is not recognized as an internal or external command, operable program or batch file.
Check under the C:\Program Files\Microsoft SDKs directory (for example, C:\Program Files\Microsoft SDKs\Windows\v6.0A\bin for Microsoft Visual Studio 8) and add the folder to your %PATH%.
If they have been properly installed, you will see something like this:
The Global Assembly Cache contains the following assemblies:
	Softimage.XSIMath, Version=1.0.0.0, Culture=neutral, PublicKeyToken=a90401fcf6bc5571, processorArchitecture=MSIL
Number of items = 1

The Global Assembly Cache contains the following assemblies:
	Softimage.XSIUtil, Version=1.0.0.0, Culture=neutral, PublicKeyToken=a90401fcf6bc5571, processorArchitecture=MSIL
Number of items = 1

The Global Assembly Cache contains the following assemblies:
	Softimage.XSIMath, Version=1.0.0.0, Culture=neutral, PublicKeyToken=a90401fcf6bc5571, processorArchitecture=MSIL
Number of items = 1
If they haven't been properly installed, this message appears:
The Global Assembly Cache contains the following assemblies:

Number of items = 0
To install the Softimage assemblies in the GAC:
Open a Softimage command prompt (it automatically opens at the Application/bin directory under the factory location) and enter the following three commands:
gacutil /i Softimage.XSIOM.dll
gacutil /i Softimage.XSIUtil.dll
gacutil /i Softimage.XSIMath.dll
If the installation was successful, you will see the following message:
Assembly successfully added to the cache
Strong names are encoded signatures that help to keep assemblies unique on a system. In order to add your assembly to the GAC, you need to use a strong name key, often stored in a file (.snk).