You can create a movie from shots or slides. You can do this with individual or multiple shots or slides. Before you do this,
you need to have created at least one of the following:
- At least one shot
- A sequence of shots
- A storyboard containing one or more slides
Be aware of the following regarding video creation:
- If you are using the 64-bit version of Showcase, 32-bit video codecs will not work.
- Windows AVI files cannot be bigger than 2 GB. For more information, see http://support.microsoft.com/kb/193656.
NoteSupport for slides in movies comes with the R1 release of Showcase 2012.
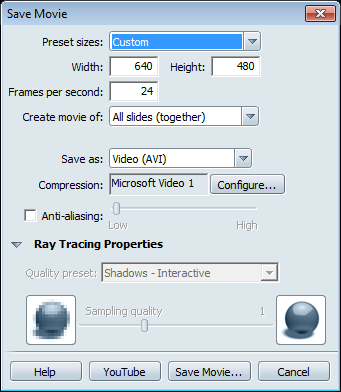
To create a movie from shots or slides
- Select .
The Save Movie window appears.
- Specify the movie properties (width, height, frames per second). You can also select from a variety of standard sizes in the
box.
- From the box, select what you want to include in the movie. You can select one of the shots or slides in the scene to make the movie,
or:
- —creates one movie containing all slides in the order they appear in the Storyboard.
- —creates multiple movies, one for each slide shown in the Storyboard.
- —enables you to select the slides you want and creates one movie from them.
- —enables you to select the slides you want and creates multiple movies, one for each slide.
- —creates one movie containing all shots in the order they appear in the Shots interface.
- —creates multiple movies, one for each shot shown in the Shots interface.
- —enables you to select the shots you want and creates one movie from them.
- —enables you to select the shots you want and creates multiple movies, one for each shot.
- Set to be either a compressed video or a series of images in either TIFF or JPEG format.
- If you selected AVI in the previous step, you can click (beside the Compression field) to set the AVI codec to use. Available video codecs are determined by your system.
- You can include anti-aliasing for a smoother look in Hardware rendering. Select , then move the slider towards or depending on your needs.
Note
The Hardware anti-aliasing settings specified in are ignored when saving the movie.
- Click .
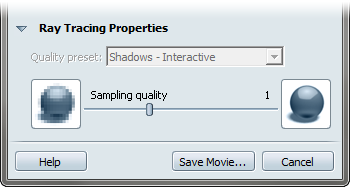
Specify a Quality Range and Sampling for Ray Tracing output
For Ray Tracing image output, the Quality preset and Sampling quality can be set independent of the Interactive Ray Tracing
settings used to display the image on screen. By default, the current Quality preset for the Interactive Ray Tracing will
be used, but the Sampling quality will default to 1.
To save a movie using specific Ray Tracing settings:
- Enable Ray Tracing using , or by pressing R.
Note
Ray Tracing can be enabled or disabled for the current Save Movie by pressing the key while the Save Movie As dialog box is open.
- Choose a (defines the overall quality and ray tracing effects used in the rendering) from the drop-down menu of presets if the current
one is not desired.
- Set the slider (controls the smoothness of the pixels in the final image) to the desired amount.
- Press to initiate the offline rendering. A browser appears with the filename and location, then a progress bar indicates the rendering
progress.
Note
While an offline Ray Tracing rendering is progressing, the interactive Ray Tracing is disabled. Input for navigating the scene
will be ignored until the rendering is complete.
-
The rendering can be cancelled at any time during its progress.