Open the Environment Properties window
Each custom environment in the scene has properties to change how the lighting and reflections and background appear in that
scene. These properties can be altered on a scene-by-scene basis, or saved to a custom environment in the library.
- If the Environments interface is not already visible, press the E key (or select ).
- In the upper section, "", click on the geometry environment you wish to edit. It will become the currently visible environment
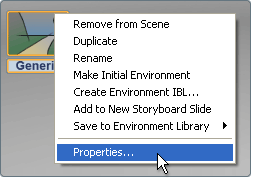
- Select or right-click on the icon for the selected environment and choose from the menu.
- The window opens.
The areas and controls for this window are described here:
Lighting and Background parameters
Editable environments can be recreated from a source HDR panorama, or have the automatically generated textures for the geometry
adjusted or exchanged. In Ray Tracing there are also some unique parameters for each environment as well.
Recreate the IBL lighting and background
- Click the “folder” icon and browse to an HDR panorama.
- Click the button. The Create Environment IBL dialog box will open. ((See Create or obtain images for custom environments for more information on image requirements for environment creation.)
Specify new texture for panorama or ground
- Expand the fold-down under the Lighting and Background section.
- To specify a new panorama image to be mapped to the visible environment geometry, check the Use only lighting, override panorama option, and browse to a replacement image.
- To specify a new image to be mapped to the visible ground geometry, check the Use separate image for the ground option, and browse to a replacement image.
Adjust look of environment lighting and background
Under the Show more controls fold-down, there are adjustment controls for the entire environment, including all of the IBL
maps and the visible background image.
- : adjusts the overall brightness of the input HDR scene when creating IBL maps and the background image. The slider has a
range of -3 to +3, but values beyond these can be entered numerically. This is useful when the IBL effect is either too dark
or too bright.
- : adds a uniform color to the image, but preserves the brightness based on the tone of the color. Using a grayscale color
will desaturate the image.
- : sets the overall saturation of the scene. More saturation will result in a more “colored” environment lighting, while less
will result in a more “neutral” lighting.
Position Environment Textures
The material applied to each part of the environment APF can be mapped like any other image texture. The controls for mapping
environment materials are identical to mapping images on any other object in Showcase.
- Expand the fold-down under each texture in the Show more controls section.
- Specify the mapping type, tiling, transforms, or interactively move the texture on the visible environment.
Note
Deselect all other objects and grips in the scene before moving the environment texture.
For more information on positioning maps with these controls, see the topic Move image maps and its section Move image maps with parametric (UV) mapping and Move image maps with projection mapping.
Ray Tracing properties
- Use reflection lighting map: all reflections of the environment will be based off of the IBL or Light maps. The geometry of the environment will be ignored.
Note
If this is checked, the shadows they cast on the ground and the shape of the environment geometry will have no effect on reflections.
- Use environment shape: all reflections of the environment will be based off of the environment geometry and any textures applied to it. The IBL
or Light maps will be ignored. For best environment reflection results with this option, use an HDR image for the environment
geometry texture.
Note
When using this option, environment reflections will differ between Hardware rendering and Ray Tracing. Reflections may be
dull (if the environment geometry is not textured with an HDR image), and will “shift” compared to Hardware rendering.
Adjust the IBL light maps
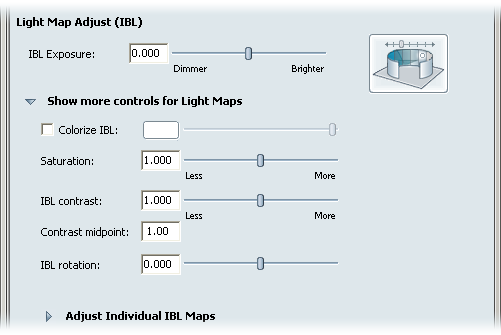
To adjust the IBL maps and background as a group, open the fold-down to show the overall brightness, contrast, color and rotation controls of the background image and all of the IBL
maps.
- IBL exposure
-
Adjusts the exposure of the environment background and IBL maps. Enter any numeric value, or use the slider to make the environment
lighting dimmer (0) or brighter (2).
- Colorize IBL
-
Click this radio button to tint the IBL environment light cast on the material.
- Click the swatch to change the color in the window (to find out about using this window, go to Change colors).
- To change the overall brightness of the color, use the slider.
- IBL contrast
-
Changes the contrast of the lighting on the material (that is, makes the bright parts brighter and the dim parts dimmer).
The default value is 1, and typical values range from 0 to 2.7. Enter any numeric value, or use the slider to make the contrast
greater or lesser.
- Contrast midpoint
-
Sets the midpoint of the IBL contrast scale. That is, the point above which bright parts get brighter and below which dark
parts get darker.
- IBL Rotation
-
Changes the rotation of the IBL maps relative to the scene.
Note that this does not alter the rotation of the Backdrop or scale-independent images, or the environment geometry. See Open the Environment Properties window.
To adjust each IBL map separately from the rest, open the fold-down. These controls are identical to the global controls above, but affect only the individual map.
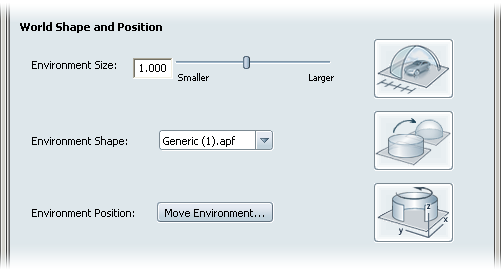
Adjust Environment shape and position
The visible environment in the scene is mapped to geometry. This geometry is defined by an APF file with multiple parts and
texture coordinates. Using an appropriate size, position, and environment shape will greatly enhance the realism of the visible
environment.
- Environment size
-
Scale the environment around the objects in your scene by a scale factor. This scale is applied to this individual environment.
To scale all environments in the scene, use
- Environment Shape
-
Specify the APF file geometry for the entire environment. Preset shapes are included with the installation, and can be found
in the application install location.
- Environment position
-
Opens the Transform dialog box for the environment geometry. Position and rotation can be set for this individual environment.
Note
The transforms for the environment geometry will not affect the IBL maps. Use to affect the IBL map position.
Calibrate the custom environment
Once you create a custom environment, you may need to calibrate it to get the look just right. It might be too dark or too
bright, or lacking in reflection compared to the other environments you are using.
Tip
Load a model into the scene first to see the effect of your calibrations. For best results, choose a model that is of similar
dimensions to your most frequent projects and apply any custom materials you typically use.
- Load the custom environment into the scene.
- Select to open the Environment Properties window.
- To increase or decrease the brightness of the environment, drag the slider.
- To add overall color to your environment, turn on and set a color in the provided swatch.
- To change the contrast of the backdrop and its lighting files, drag the slider.
When you reduce the contrast, you are drawing values towards a pre-defined "gray" value. You can adjust that central gray
value by changing .
- To increase or decrease the color saturation of the environment, adjust the slider.
- If your environment is not correctly rotated on your objects, adjust the to move the lighting, then adjust the of your custom environment Wall and Floor materials. (See Open the Environment Properties window for more information.)
- When you are happy with your adjustments, click , or your changes to your library.
You can now use your customized environment like any other.