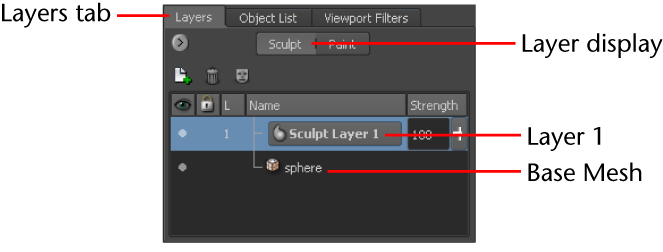
You can store sculpted detail on one or more sculpt layers. Sculpt layers store edits to the mesh and let you create and edit sculpted features, keeping the edits separate from one another, and let you blend sculpted detail between layers. You view and manage layers using the Layers window.
 ) and select New Layer from the list (or click the New Layer icon
  ).
). 
A new layer called Sculpt Layer 1 is created and becomes the active layer. Mudbox stores everything you sculpt on this layer until you select another layer or change subdivision levels.
 ).
).
The details you sculpted on Sculpt Layer 1 disappear when the layer is invisible.

You can lower the Strength setting (next to the layer name) to non-destructively (temporarily) fade out the sculpting for the entire sculpt layer. The Strength value also works as a multiplier; you can either amplify or invert the sculpted information on the layer by entering values over 100 or by entering negative values.
If you want to temporarily hide sculpting in localized areas of a sculpt layer, you can paint with the Mask brush to cover sculpted areas. For more information, see Mask sculpting on a layer.
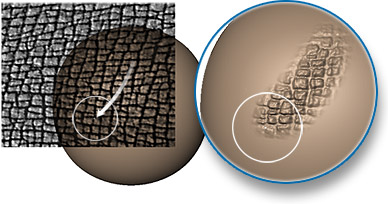
Stencils let you use images to sculpt interesting detail onto a model. Mudbox stencils work similar to real world stencils; black values in the stencil image protect the mesh, while white areas of the stencil image allow the sculpt tool to pass through and affect the mesh vertices.

You’ll create a new sphere for your work with stencils in the steps that follow.
Some stencils have little effect unless the model is subdivided to a high enough subdivision level.

Use the following hotkeys if you need to reposition the stencil in the 3D View:
| To: |
(Windows and Linux) |
(Mac OS X) |
|---|---|---|
| Rotate a stencil | S + drag | S + drag |
| Move a stencil | S + Middle-drag | S + Middle-drag |
| Scale a stencil | S + Right-drag | S + Right-drag |

The stencil disappears as you stroke to let you view the affected region on the model.


 Previous lesson Sculpt a model Previous lesson Sculpt a model
|
Next lesson Paint a model 
|