This section describes how to create a skeleton in 3ds Max for use in MotionBuilder.
To build a skeleton:
- Create a skeleton in 3ds Max. Refer to the following example.
TipUse the Left or Right view to create your bone skeleton as it is easier to view the position of the bone objects as you create,
move and rotate the objects.
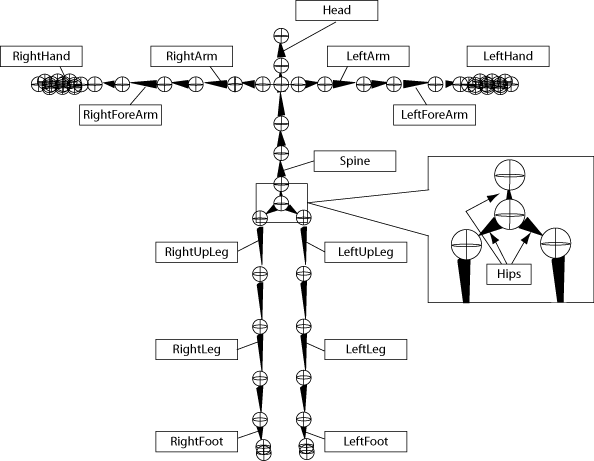
The green bones represent bones that must be dropped into the base slots of the Define pane in the Character Tool in MotionBuilder.
ImportantNegative scaling of objects with weighting applied to them is not supported in MotionBuilder.
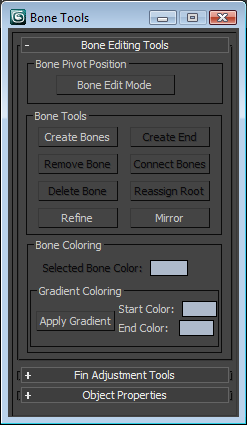
NoteIf you are mirroring bone chains to prevent negative scaling on the bone, select the Bone Mirror option via the 3ds Max Animation
> Bone Tools > Bone Editing Tools rollout.
- Build the skeleton using a standard hierarchy such as the one shown in the following diagram.
- Select the bones you want to mirror.
For example, you may want to mirror the legs and arms.
- From the 3ds Max menu bar, select Animation > Bone Tools.
NoteBones are considered Geometry, which lets you use Scale and Squash channels. However, these channels are not supported in
MotionBuilder.
- In the Bone Editing Tools rollout, click the Mirror option.
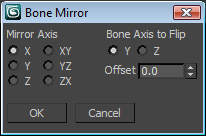
- Set the Mirror axis and Bone axis and click OK.
ImportantNegative scaling of objects with weighting applied to them is not supported in MotionBuilder.
NoteWe recommend that you export skeletons and mesh before skinning (vertex assignment) your characters so you can detect any
negative and/or uniform scaling.
The skeleton is now ready to be exported into MotionBuilder. Use the .fbx file format for merging back into 3ds Max.
You can export geometry as bones in MotionBuilder, but it is treated as bones and is only visible in X-Ray mode.
 Except where otherwise noted, this work is licensed under a Creative Commons Attribution-NonCommercial-ShareAlike 3.0 Unported License