When you transform an object, you can change the way the values that define its location, size, and orientation are displayed. Any transformation value can be defined relative to the scene (globally) or relative to the object itself (locally). Rotation values can also be defined using the Additive Reference mode.
The Reference mode menu in the Viewer window lets you choose which way you want to define transformation values. See Viewer window Reference mode tools.
Select the Global Reference mode if you want an object’s transformation values displayed relative to the center of the scene (the global axis).
When you activate the Global Reference mode while transforming objects, the Translation arrows and Rotation rings are shown with the same orientation as the center of the scene. Scaling handles are always oriented to match the axis of the object itself.
For example, in the following figure, Global Reference mode is selected so that when the object is translated along the Y-axis, it moves along the global Y-axis.
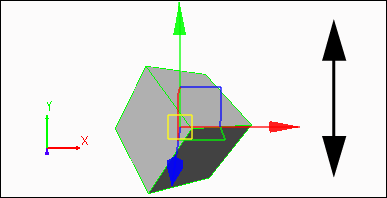
Global Reference mode: The marker translates along the global Y-axis.
Select Local Reference mode if you want an object’s transformation values to be displayed relative to its own center, or from the center of its parent if it is parented. If the object does not have a parent, the values of Local mode are the same as Global mode.
When you activate Local Reference mode while transforming objects, the Translation arrows, Rotation rings, and Scaling handles all display relative to the center of the object itself.
For example, in the following figure, Local Reference mode is active, so the marker is translated along its local Y-axis.

Local Reference mode: The marker translates along the local Y-axis.
The object’s center (its local axis) is determined by the placement of its Transformation pivots. You can offset an object’s Transformation pivots using the Transformation pivots properties. (See Transformation pivots.)
While the Local Reference mode can be used to rotate any group of objects, it is particularly useful when you rotate objects that are part of the same hierarchy, such as a character’s spine, fingers, or tail. Since the rotation of each object in the hierarchy is calculated relative to its parent, you can easily create natural bending.
Select Additive Reference mode if you want the selected object’s transformation values to reflect its actual local coordinates on the current layer only. This is useful when you are working with FCurve values because it lets you work with each axis independently.
The Additive mode lets you perform individual and continuously incrementing axis rotations. It lets each axis rotate freely to show the calculation behavior of the real Euler rotations, which can help identify why gimbal locks occur in your animation.
 Except where otherwise noted, this work is licensed under a Creative Commons Attribution-NonCommercial-ShareAlike 3.0 Unported License


