This legacy workflow is for exporting a 3ds Max characters created in versions of 3ds Max 2011 and earlier. If you do not have the 2012 versions of MotionBuilder and 3ds Max, you do not have access to the Send to 3ds Max option which is detailed in the tutorials.
If you have access to the current version of 3ds Max, or have downloaded a trial version from the Autodesk web site at: www.autodesk.com/3dsmax, use the Sending 3ds Max Scenes to MotionBuilder tutorial included in this Help.
The following procedure shows you how to export a 3ds Max character to MotionBuilder.
To export the 3ds Max Pepe character:
The FBX Export dialog box opens. This is where you specify how to convert the 3ds Max character to an FBX file that MotionBuilder can recognize.
Activating these options enables you to export a mesh with your character, and export textures and materials assigned to it.
Once your character is in FBX file format, you can use it file in any program that supports the FBX file format.
Your 3ds Max character appears in the MotionBuilder Viewer window.
To characterize your Character:
X-Ray mode lets you see through the character skin to the skeleton underneath.

3ds Max Biped Template asset applied to the Character skeleton
The 3ds Max Biped template is specially designed for bipeds created in 3ds Max as they have a different naming structure that the MotionBuilder Character does not recognize automatically.
The Character representation shows green if the characterization is correct, yellow if potential problems are detected, and red if there is an element of the skeleton matching that is incorrect.

You must use the Control Rig Input setting if you intend use keyframe animation on your biped.
Effectors appear on the biped as shown in the following figure (B).
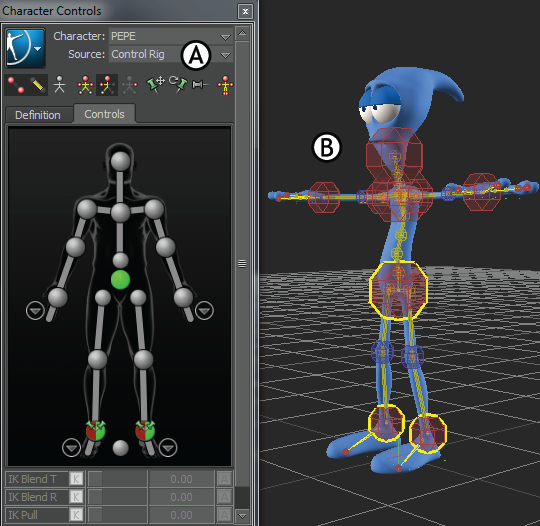
A. Ctrl Rig selected B. Effectors appear on the character
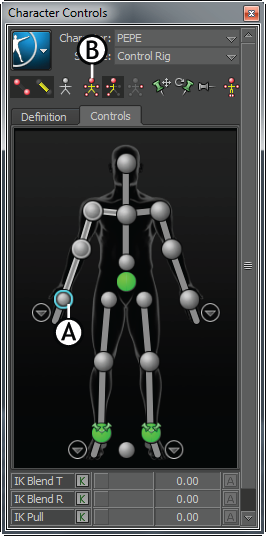
Character Controls A. Right Wrist effector selected B. Full Body icon

As you move the hand, the arm extends and the rest of the body follows in a natural movement.
You can now animate your character with motion capture and key frame animation.
 Except where otherwise noted, this work is licensed under a Creative Commons Attribution-NonCommercial-ShareAlike 3.0 Unported License


