The Picture Format area lets you select the camera’s viewable area using a standard or custom frame size. You can also set the camera’s near and far clipping planes in this area.
Depending on the way you configure the Aperture and Film settings, these two areas work together to determine the camera’s viewable area.
The following are the available Picture format options:
| Picture Format type | Function |
|---|---|
| Custom | The format’s width, height, or pixel ratio has been user-specified, and matches none of the other picture formats. |
| D1 NTSC | Standard format for D1 NTSC (720 by 486). |
| NTSC | NTSC standard for North American television broadcast (640 by 480). |
| PAL | PAL standard for European television broadcast (570 by 486). |
| D1 PAL | Standard format for D1 PAL (720 by 576). |
| HD | Standard format for HD (1920 by 1080). |
| 640x480 | Recommended computer screen format (640 by 480). |
| 320x200 | Recommended format for World Wide Web production. |
| 320x240 | Alternate World Wide Web format. |
| 128x128 | Thumbnail/preview format. |
| Full Screen | Full computer screen format (1280 by 1024 pixels). |
Use the Resolution menu to specify the camera’s viewable area. To see the viewable area, activate the Use Frame Color option (see Use Frame Color).
The selection in the Picture Format field works with the Width, Height, Custom, and Pixel Ratio fields.
The following are the available frame size options:
The values in the Width and Height fields depend on the selection in the Picture Format field.
For example, when the Frame field is set to Fixed Width resolution, the Height field is shown as a ratio of the Width field, which is expressed in pixels.
The Pixel Ratio field automatically sets the pixel ratio to the correct value for any selected Output format.
For example, on output to be viewed on television, the pixels are not square, so a small deformation is created in the Viewer window when rendering to compensate for output to that format.
When you choose from a standard picture format (NTSC, D1 NTSC,) the pixel ratio is recalculated to compensate.
If you change the pixel ratio when the Picture Format menu is set to a standard viewing area (D1 NTSC, NTSC, PAL, and so on), the Picture Format field is automatically set to Custom because the viewing area no longer matches the selected film standard.
The near plane is the viewing limit closest to the camera. Objects between this plane and the camera do not appear in the scene because they are out of the camera’s viewing area.
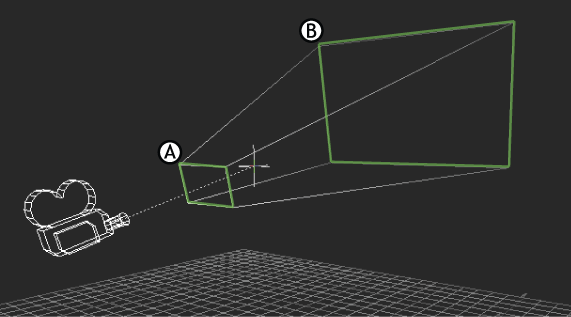
A. Near plane B. Far plane
The far plane is the viewing limit furthest from the camera. Objects that move past this plane do not show in the scene because they are out of the camera’s viewing range.
Use the Far plane field to set the distance in pixels of the far plane relative to the camera’s position.
The Field of View settings let you change the angle of the viewing area starting at the camera eye. When the Aperture mode is set to Vertical, the angle of view changes the angle between the top and bottom clipping plane, and so on.
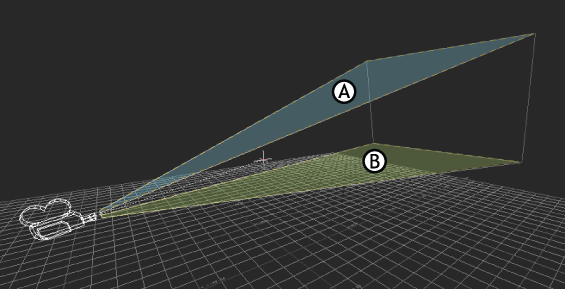
A. Top plane B. Bottom plane
To view a camera’s angle of view, activate the View Near/Far Plane option in the Camera View Options (see Showing the camera Near/Far plane). You can see the camera’s top, left, right, and bottom clipping planes.
When the Aperture mode is set to Horizontal, the angle of view changes the angle between the left and right clipping planes.
The Field of View is expressed in degrees. You can animate this setting but the Focal Length setting is disabled.
The Roll setting lets you set a numerical value for the camera roll which rotates the camera’s view. A negative value rotates the view clockwise, while a positive value rotates it counter clockwise.
The Interest setting lets you redefine the camera interest‘s Null element created when a custom camera is added.
Alt-drag any element from the Viewer window into the Interest field to define it as the interest of a given camera. Click the Interest field to select the camera’s interest and press T on the keyboard to translate it.
The Up Vector field lets you select an element to be used as the Up Vector of a selected camera. Alt-drag an object or marker from the Viewer window into the Up Vector field to assign an Up Vector to the current camera.
An Up Vector is an element that controls the Roll orientation of a given camera by constraining it to orient its Roll toward the Up Vector model's position. The top of the camera always pivots using the selected up vector element as a guide. This prevents the camera from flipping, and provides more realistic camera movement.
Click the Up Vector field to select the camera’s Up Vector and then translate it. To select a camera’s Up Vector, right-click the camera and choose Select Up Vector from the context menu.
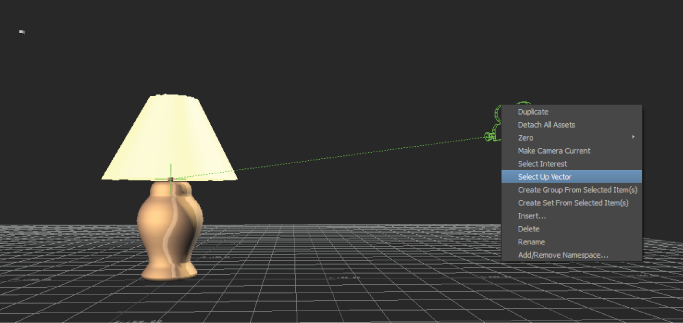
Choose Select Up Vector in the context menu.
The Background Color setting lets you change the background color for the selected camera. Click the Color button to open the Color window and select the background color. See Changing the background and grid colors.
Activate the Use Frame Color option to draw a border around the camera’s viewable area. By default, Use Frame Color is disabled, which means no frame is used.
Use the three fields beside the Use Frame Color option to define the color of the border around the camera view.
Click the Color button to open the Color window and select a specific frame color.
You can keyframe and animate the Field of View, Roll, and Background Colors of cameras using the Keyframe (K) and the Animate (A) buttons beside the corresponding sliders.
Use the Projection menu to select the current camera’s visualization options.

Camera Projection Types. A. Perspective B. Orthographic
| Perspective | Select Perspective to set the current camera’s view to show depth. This setting is the default. |
| Orthographic | Select Orthographic to set the current camera’s view to show the environment without perspective. |
Activate the Lock Camera Navigation option to lock the current camera. When Lock Camera Navigation is active, you can no longer change the camera’s view using the mouse and keyboard commands when the custom camera is made current.
Use Lock Camera Navigation after you position a custom camera that you do not want move accidentally as you select and translate models.
The Lock Interest Navigation option lets you lock the position of the camera interest.
The Reset button lets you remove changes to the camera settings and restore the camera settings to the default, whether it is the MotionBuilder default or new custom defaults created with the Save as Default setting.
It also resets the camera position to X: 0, Y: 145, and Z: 300.
Click Save as Default to retain the current custom values of the camera as a new default setting so that any new cameras use these values by default. Once you set a camera as a Default, every new camera you create uses this custom setting.
This is useful if you need several cameras with very specific custom settings. For example, you can save the picture format, background color, and View options for a camera, and then load these settings for every camera in your scene.
The Save as Default function overwrites any previously saved defaults as only one default exist a time. See Setting a default camera.
 Except where otherwise noted, this work is licensed under a Creative Commons Attribution-NonCommercial-ShareAlike 3.0 Unported License


