The DOF Rotation properties let you limit an object’s rotational movement.
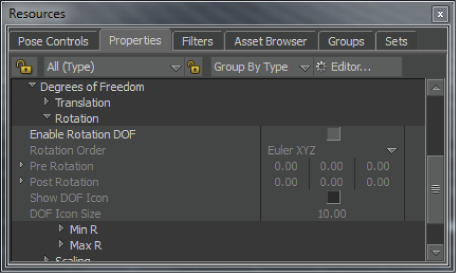
Degrees of Freedom Rotation properties
This option lets you activate or disable the DOF rotation properties. When DOF rotation properties are disabled, the Min R and Max R values are ignored and the object can rotate in any direction. When DOF Rotation properties are active, a wireframe sphere displays on the selected object.
This menu lets you select the order of calculation for Euler rotations, which can help to prevent gimbal locks. The default Rotation Order is X, Y, Z. These options are useful if you want to change the main axis of a bone after the bone structure has already been created. You can also avoid problems such as gimbal locks by making the middle axis something other than Y
When you select a Rotation Order for a bone, the first axis listed is used as the roll axis for that bone. For example, if you select Euler XYZ, the X-axis is used for the roll axis on that bone.
The Rotation Order you select, and thus the roll axis that is used should be an axis that aligns with the bone, as it allows the bone to rotate, or twist on that axis.
You can view the roll axis defined for each bone by turning on the Show DOF Icon property. The DOF rotational sphere also shows you the roll axis.
The following table illustrates the rotation order options you can choose from.
| Rotation Order | Behavior |
|---|---|
| Euler XYZ | Rotation on the Z-axis is calculated first, Y second, and X last. This is the default Rotation Order. |
| Euler XZY | Rotation on the Y-axis is calculated first, Z second, and X third. |
| Euler YZX | Rotation on the X-axis is calculated first, Z second, and Y third. |
| Euler YXZ | Rotation on the Z-axis is calculated first, X second, and Y third. |
| Euler ZXY | Rotation on the Y-axis is calculated first, X second, and Z third. |
| Euler ZYX | Rotation on the X-axis is calculated first, Y second, and Z third. |
| Spheric XYZ | You can use this option for joints that have a wide area of rotation such as the shoulders.Only use this rotation order if you need to keep Spheric rotation limits created in earlier versions of MotionBuilder. This option is not recommended. |
These values let you offset the rotation sphere orientation before the limits on rotation are calculated. As you adjust the values in these fields, the rotation sphere in the Viewer window gives you visual feedback.
This option lets you offset the rotation pivot orientation after the limits on rotation are calculated. As you adjust the Post Rotation values, the rotation sphere in the Viewer window gives you visual feedback.
Shows or hides the DOF rotational sphere.
The DOF rotation sphere displays on the selected object in the Viewer window, giving you visual feedback on the limits on rotation you have set, and identifying which is the roll axis for the selected bone.

DOF Rotation sphere displays on the LeftForeArm bone
Defines the size of the DOF rotational sphere that appears in the Viewer window to visually represent the rotational DOF properties. The default size is 10.
Contains a set of check boxes and fields that let you enable, disable, and define the minimum rotation values allowed per axis for the selected object. The following table describes the options found in the Min R group of properties.
| Option | Description |
|---|---|
| Enable Min X, Y, Z | Activate and disable the limits on rotation specified for each axis in the Min Freedom fields. |
| Min Freedom | Specifies the minimum value the selected object can rotate to on each individual axis. If an object attempts to rotate past these values, its rotation clamps to the minimum value. |
Contains options that let you activate, disable, and define the maximum rotation values allowed per axis for the selected object. The following table illustrates the options found in the Max R group of properties.
| Option | Description |
|---|---|
| Enable Max X, Y, Z | Activate and disable the limits on rotation specified for each axis in the Max Freedom fields. |
| Max Freedom | Specifies the maximum values the selected object can rotate to on each individual axis. If an object attempts to rotate past any of these limits, its rotation clamps to the maximum value. |
If you load MotionBuilder scenes that contain a character or characters that use the “Enable MB 5.5 Limits” property option, you need to update a Control rig to remain compatible with MotionBuilder scene files created in MotionBuilder versions post version 7.5 Extension 2.
To update a Control rig to remain compatible with older versions:
Once you disable the “Enable MB5.5 Limits” option, you are ready to update the rig.
 Except where otherwise noted, this work is licensed under a Creative Commons Attribution-NonCommercial-ShareAlike 3.0 Unported License


