Once you have added your camera switches, you may want to delete, clean up, snap, resize, or have switches snap to exact frames.
Click Delete Key to delete a camera switch. The Delete Key button removes a selected camera switch in the Switcher timeline and also removes the keyframe from the Transport Controls timeline.

Switcher timeline before the Camera 2 switch is deleted

Switcher timeline after Camera 2 switch is deleted. Camera 1 fills the empty space.
Click Clean-up to remove any redundant camera switches that might reduce system performance.
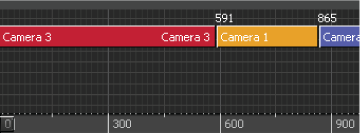
For example, in the following figure, there are three Camera 3 switches. In the figure that follows that, the Clean up button is clicked, and the three switches become one Camera 3 switch that lasts the duration of the previous three.

Three Camera 3 switches in a row
After clicking Clean up, the three Camera 3 switches become one
You can resize the camera switch length by click-dragging the left or right side of a selected camera color’s green highlight in the Switcher timeline.
You can also move camera switch keys added to the Transport Controls by dragging them to another time. The keys on the Switcher timeline update automatically.
You can change the order in which the cameras are used by selecting a camera in the Switcher timeline, then clicking a different camera in the Camera Color row.
The selected camera in the Switcher timeline becomes the new camera for that camera switch. This does not alter the location of camera switches.
For example, if a switch occurs in the middle of two frames, the camera switch is bumped to the next frame.
When you select either of the two snapping methods, a dialog box appears asking if you want to apply snapping to all switches or new switches .

Snap Camera Switch dialog box
The menu to the right of the Snap On Frames button lets you choose two methods of snapping camera switches to frames:
| Option | Description |
|---|---|
| On Frames | Select On Frames to have the Camera Switch snap to the frame rate of the timeline. For example, if your take is set to thirty frames per second, the camera switches are snapped to this frame rate. If you do not have a video clip associated with the camera, a dialog box appears to warn you that there is nothing on which to base the frame snapping. |
| On Back Plate Frame | Select On Back Plate Frame to have the Camera Switch snap on the frame rate you set as the Back Plate in your Camera view. This way, your camera switch is synchronized with any Back Plate video you might be using. |
 Except where otherwise noted, this work is licensed under a Creative Commons Attribution-NonCommercial-ShareAlike 3.0 Unported License


