Auxiliary effectors are supplementary effectors in a Control rig that correspond to existing IK effectors. Every IK effector in a Control rig can have multiple Auxiliary effectors.
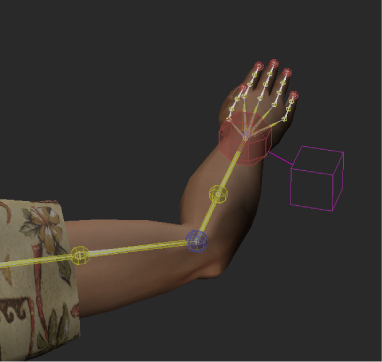
By default, an Auxiliary effector displays as a wireframe cube in the Viewer window . You can change the look, color, and size of Auxiliary effectors in the Properties window.

Auxiliary effector displays on a wrist effector
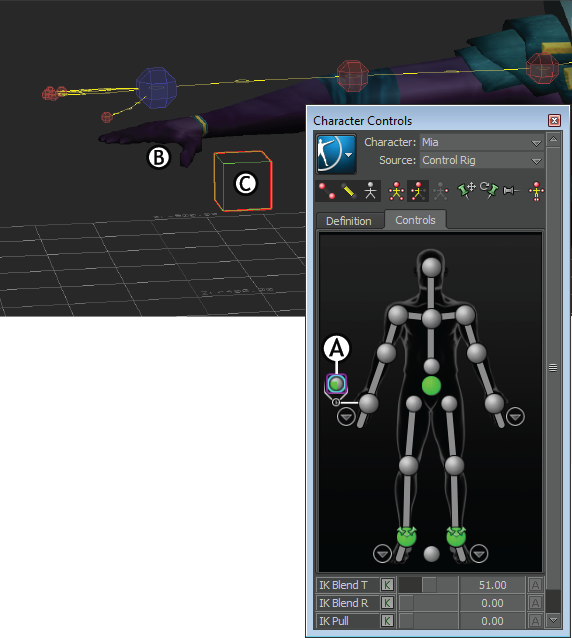
You can translate an Auxiliary effector to the position you want its corresponding IK effector to reach, then control the amount of reach between the IK effector and the Auxiliary effector using the IK Blend options . See also Blend and Pull controls for more information.

Adjusting Auxiliary reach A. Right wrist effector Auxiliary effector selected B. Hand reaches between IK effector and Auxiliary effector C. Auxiliary effector is translated away from right wrist
Auxiliary effectors are useful in many situations to provide an additional level of IK control. For example, you can use Auxiliary effectors to ensure that an arm in the character always reaches towards a prop, such as a weapon.
You can also use Auxiliary effectors to stabilize a feet in the character so that they do not slide on the floor. To do this, you can create an Auxiliary effector for the primary IK foot effectors, then place the Auxiliary effector on the floor where the foot slides. Define the Blend values to maximum reach (100%).
When you play your take, the foot effector reaches toward the Auxiliary effector at the frame where the foot begins to slide, and the IK Blend T and IK Blend R sliders move as the animation plays. To see the keyframes on the Action timeline, select the Auxiliary effector in the Character Controls.
 Except where otherwise noted, this work is licensed under a Creative Commons Attribution-NonCommercial-ShareAlike 3.0 Unported License