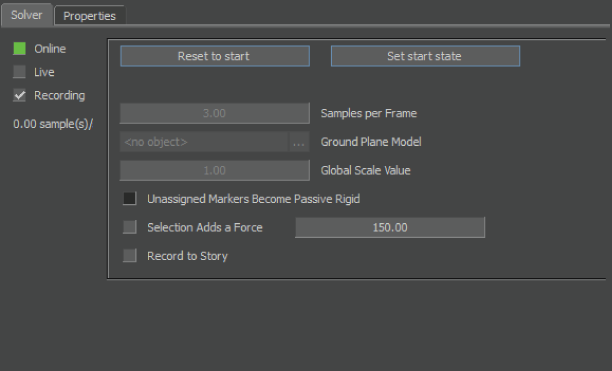
The Physics Solver pane contains controls to activate and record Rigid Body, Ragdoll, and Joint solving.
Note On 64-bit systems, the Physics Solver cannot process objects that have degenerated polygons or invalid normals. When this
occurs, a warning message appears that identifies the models that have this problematic geometry, and bounding boxes are used
to approximate these shapes instead. Using these bounding boxes for the joint solve may produce solve results that differ
from the expected behavior. If possible, use the Cube, Capsule, or Sphere approximations to match your geometry with more
precision. For more complex geometry, reconstruct your model with 3D software to avoid these non-standard geometry problems.
This problem does not occur in the 32-bit version of MotionBuilder.
Physics solving indicators
These indicators are also buttons you can use to activate or disable Physics solving.
| Indicator |
Function |
| Online |
Activates physics solving. In the window, the Online option is referred to as .
NoteYou cannot add Physical properties (for example Rigid Body, Ragdoll or Joint) to objects while the Physics Solver is online.
|
| Live |
Starts the physics solving behavior. Use this textbox as a testing area where you can activate the solve independently of
the timeline so you can test the manipulations and interaction of the objects. When the physics solving behavior is tuned
appropriately, click to record the key-frame data. In the window, the Live option is referred to as .
NoteWhen you set the Physics Solver to Live, if you select an object that has a Physical property, such as Ragdoll, Rigid Body,
or Joint attached to it, you need to deselect the object otherwise the object will ignore the Physics Solver. If the Physical
property object is selected when the Physics Solver is Live during recording, the FCurves are re-evaluated based on the Frame
Rate shown in the Transport Controls.
|
| Recording |
Indicates that the physics solving is ready for recording. In the window, the Recording option is referred to as .
|
Reset to Start
Click this button to define the position from where your animation starts.
Set Start State
Click this button to restore the affect object or model to its Start State.
NoteIf the button is active, the solving begins immediately after you click . To restore the object or model to the starting position without starting to immediately solve, disable the button.
Samples per Frame
Set a value in this field to increase or decrease the precision of the solve record.
This field sets the number of keys or samples that you are going to take per frame. By default, it is set to 3 so that the
solve takes 3 keys per frame.
TipThe more you capture, the better the solve, and you can avoid problems like tunnelling. However, setting a higher amount to
create high-quality solve creates performance speed issues.
Currently, this field does not support decimal values, such as 0.5, as it increases the occurrence of tunnelling problems.
Ground Plane Model
Alt-drag an object or objects from the Viewer window or Schematic view into this field to define it as the “floor” to which
the Physics Solver will refer. You can also select an object from the Asset Selection list.
Global Scale Value
Sets a global scale.
Unassigned Markers Become Passive Rigid
Turn on this option when you want to create rigid, non-active assets from any un-assigned objects in the scene.
Selection Adds a Force
When this option is active, the Physics solving creates a reaction whenever you click an object or model with the mouse. Activate
this option to “tickle” or “poke” the object or model to provoke action. This is useful for testing Physics settings; activate
Live, let objects fall, and click them to push them around. This way you can test things like friction, slip, and their interaction.
NoteIf you select an object in the Navigator window or Schematic view that has the Selection Adds a Force setting active, force
is applied and the object moves.
Record to Story
Turn on this option to record the solve to the story window as an animation track.
