Enhancements to the Character Controls


The unified Character Controls window help to perform multiple character setup tasks. The following figure shows the Character Controls window, in the default mode.

A. Character Controls menu button B. Start pane C. Character menu D. Source menu

Character menu

Lets you select from a list of characters in the scene, and displays the name of the active character.

The options in this menu are:

Source menu

The Source menu:

Start pane

Quickly begin the character setup process using the Start pane in the Character Controls window. Whether you are defining a skeleton, creating a HumanIK skeleton, or importing a motion capture example into a scene, this pane is designed to guide you through the setup process.

When you load a character in MotionBuilder, the Character Controls window appears as shown below:

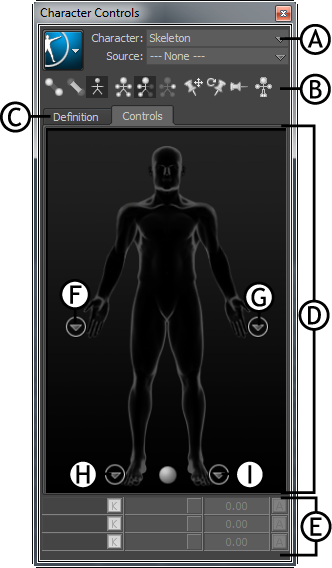
A. Name of the current character B. Character Controls toolbar C. Definition and Controls tabs D. Skeleton representation E. Go to Right Hand view F. Go to Left Hand view G. Go to Right Foot view H. Go to Left Foot view

As you set up your character, the previously independent HumanIK tools appear as tabs in the consolidated Character Controls, simplifying the character set up process.

Each tab contains a different HumanIK tool. The Skeleton, Definition, and Controls tabs appear when you select particular options from the Start pane, Source menu, or the Character Controls menu button.

Character Controls menu button

Menus such as Create, Define, Edit, and Add to Selection are added for better categorization of character controls.

Create >

Provides options to create an Actor or a Control Rig.

Actor
Lets you create an Actor for mapping optical motion capture data to be used as the Source for your defined character.
Control Rig
Let you create a Control rig for the current character, with IK and FK effectors based on the defined skeletal structure. The character must have a valid skeleton definition before you create a Control rig.

Define >

Skeleton
Lets you create a definition for a skeleton. This is required, to create a Control Rig and/or retarget animation to and from the skeleton of a character.

Edit >

Lets you edit the parameters for the Actor, skeleton definition, and control rig.

Actor >

Lock
Locks the current position and rotation of the selected Actor and its Marker set. You can also turn on this option from Resources window > Properties > Actor properties.
IK Manip
Manipulates the Actor using Inverse Kinematics. By default, this checkbox is turned off to manipulate individual body segments on the Actor.
Symmetry Edit
Simultaneously scales and translates the limbs of an Actor. By default, this checkbox is turned on. Turn off this checkbox to independently change the size or length of a limb.
Stance Pose
Positions the Actor in its default stance position. You can use this pose to reset and modify the position of the Actor. Stance Pose only resets rotational offsets. These offsets remain, if you translate or scale the model.
Collapse
Rejoins any detached limb segments of an Actor without resetting the size or stance of the Actor. This may be necessary when adding position offsets to an Actor or when translating source markers further than their initial definition. Some limbs may detach to reach all the markers defined by its Marker set.
Reset Size
Resets the scale of the selected Actor to its default size. If a scaling offset affects the position of a segment, then Reset Size resets the scale of the Actor, but leaves the segment at its new location.
Find Size
Select this option when the Actor is in a T-stance to calculate and size each segment of the Actor based on the selected Marker set and source markers.
Reset Pivot Points
Returns all Actor pivot points to their original positions.
Reset All
Resets the Stance Pose, Collapse, and Reset Size options, simultaneously. This option returns the Actor to its default stance position, reconnects any detached limb segments, and resets the scale of the Actor to the default size.
Edit Properties
Displays the properties of current character in the Properties window. The properties shown in the Properties window are the same as the options in the Character Settings.
Switch To Actor
Lets you switch between the current character and its Actor. If you select Switch To Actor, then the Character Controls window changes to the Actor tab. The Switch to Actor option is enabled in the Character menu, only when the source of the current character is an Actor.

Definition >

Lock Definition
Locks the current setup of the skeleton, as it is mapped in the Definition tab. The skeleton definition must be valid before it can be locked.
Rename
Lets you change the name of the HumanIK character.
Delete
Deletes the current HumanIK character.
Skeleton Lock Sel
Locks or unlocks the skeleton for selection. When this option is active, you cannot select the skeleton.
Skeleton Lock Trs
Lets you select the skeleton, but locks the position and rotation so that you cannot transform it.
Edit Properties
Displays the properties of current character in the Properties window. The properties shown in the Properties window are the same as the options in the Character Settings.
Reset Properties
Resets the definition and/or solving properties of current character back to their default values. Selecting Reset Properties creates the same result as clicking the Reset All Properties button in the Navigator window > Character Settings pane.
Mirror Matching
Enables the mirror matching mode. When this option is turned on, the Definition tab checks for a mirror match on the opposite side of the body for every bone that you map. For example, if you map the L_upperLeg bone, then the tool automatically checks the skeleton for an R_upperLeg bone and automatically maps that bone if exists.

By default, mirror matching mode supports the following pairs of sub­strings:

Left side Right side
Left Right
L (followed by a single space) R (followed by a single space)
L_ R_
_L _R

If you use a different substring in your bone naming conventions to indicate the left and right sides of the body, then select > Edit > Definition > Configure Mirror Matching to add your own strings.

Configure Mirror Matching
Displays the Mirror Configuration window, which lets you add pairs of strings to the list that the Definition tab checks for mirror matching bone names. If you use a different substring in your bone naming conventions to indicate the left and right sides of the body, then select this option to add your substrings.
Load Skeleton Definition
Displays the Load Skeleton Definition window, which lets you map bones by applying a naming template of your own. If your current character is locked, then clicking this option displays a message to unlock your character.
Save Skeleton Definition
Displays the Save Skeleton Definition window to save your skeleton details.
Switch to Actor
Lets you switch between the current character and its Actor. This option is enabled in the Character menu, only when the source of the current character is an Actor. If you select this option, then the Character Controls window changes to the Actor Controls window.

Controls >

Rig Look
Lets you select what style of Control rig effectors to work with.

Rig Look A. Box B. Stick C. Wire

Stance Pose
Resets the Control Rig to its default T-stance pose.
NoteThe Stance for a biped and quadruped character is different.
Retarget Rig
Copies keyframe animation from the Control rig of the character selected as the Source to the Control rig of the current character. Selecting this option displays the Retargeting Options dialog box. The options in this dialog box lets you decide whether you want to allow added keyframes during retargeting, and whether you want to copy the Character Extension animation.

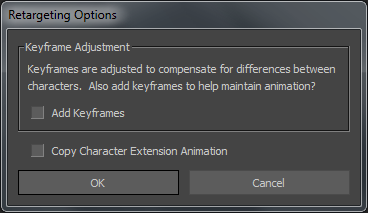
Turning on the Add Keyframes option is recommended, if you are concerned with retargeting your original animation as precisely as possible. While the retargeting process copies animation nearly exactly, slight adjustments to the data are required to compensate for differences between the source and target characters. If you can tolerate these slight changes and you do not want any added keyframes, then disable the Add Keyframes option.

Rename
Renames the control rig for the current character.
Delete
Deletes the control rig for the current character.
FK Lock Sel
Lets you lock or unlock FK markers for a selection. When activated, you cannot select the FK markers. Disable this option to select FK markers.
FK Lock Trs
Locks or unlocks FK markers for transformation. When this option is active, you cannot transform the FK markers, although you can still select them.
Reach Override

Determines the state of the effector pinning and how your character behaves in conjunction with Pull values during manipulation. This option is active by default, which means that each Pull value of effector is ignored during character manipulation. You can only view your Pull settings when you play the animation.

To view the effects of Pull while applying transformations to your character, disable Reach Override. Effector pinning is also disabled since the behavior of a character is based on each Pull values of effector rather than its effector pinning.

Reach Override is only effective in Full Body or Body Part mode.

Stiffness Override

Determines how a character behaves when it is manipulated in relation to the Stiffness values.

Stiffness Override is active by default, which means that the character does not use the Stiffness values during character manipulation. Stiffness settings are only applied when you play your animation.

Stiffness Override is only effective when in the Full Body or Body Part mode.

Rig Connect >

Attach Rig
Displays the Control rig(s) in a scene. Selecting a Control rig displays the Attach Control Rig and Reset Control Rig Hierarchy dialog boxes.
  • Select Yes to reset the Control rig hierarchy to the default structure. For more information about the default rig, see the Control rig hierarchy topic in the Help.

    or

  • Select No to keep the current Control rig structure, including any reparenting or customization created previously.

If the structure of the Control rig does not match the character, then the effectors are created or disabled, as needed, to make the Control rig fit. For example, if you connect a Control rig from a character that contains fingers which do no fit, then the finger effectors are disabled. If the character had an original Control rig, then it is detached and replaced with the new Control rig. The original Control rig is still available and listed in the Scene browser, but no longer connected to the character.

Load UI Configuration
Displays the Select new configuration file window. It lets you select a custom configuration file to be used as the new default layout for the Controls tab.
Update UI Configuration
Reloads the Controls tab configuration file. Use this option to view the changes made to your configuration file, after it is loaded using the Load UI Configuration command.

Add to Selection >

IK
Adds all IK effectors to your selection.
FK
Adds all FK effectors to your selection.
Skeleton
Adds all joint objects to your selection.

Show/Hide >

The options in this menu lets you enable or disable the display of each component of the selected character.

IK
The IK rig is an Inverse Kinematics system that lets you transform the character using IK effectors. Manipulating a character using this system moves the body relative to its hierarchy, similar to the way a human body reacts.
FK
The FK rig is one-half of the Control rig. It is based on the original skeleton of your model.
Skeleton
Use the skeleton to define the nodes used by the character. The Control rig is created based on the skeleton of your model.
Floor Contact
Lets you define how the feet, hands, fingers, and toes of a character should react when they are in contact with the floor of your scene.
Finger Tips
Hides or displays the contact spheres used for the finger tips or toes of a character.
Actor (All)
Five options let you hide or display the interface items related to an Actor. These options are available only when your current Character or Source is an Actor.
Actor Body
Displays (default) or hides the body of an Actor. Disable this option to hide the body of the Actor.
Actor Skeleton
Displays a set of connecting lines representing the bones of the Actor. To display only the bones, activate Actor Skeleton and disable Actor Body.
Marker Set
Hides or displays the markers that belong to the defined Marker set. This option displays as white markers around the body of the Actor. Disable this option to hide the Marker set.
Source Markers
Displays (default) or hides the markers containing motion data. Disable this option to hide the source markers.

When the Marker set and the Source markers are both active, the markers belonging to the Marker set display inside the source markers by default.

Pivot Points
Hides or displays the pivot points for the Actor. Disable this option to hide the pivot point markers.

By default, the pivot points display as orange crosses. To change the way pivot points display, use the Actor Settings in the Properties window. You can also adjust the position of the pivot points using the Body Part Pivots properties.

For more information regarding the menus in the Character Controls menu button and the options in each menu, see Character Controls menu button.

Definition tab

This tab provides a visual interface for mapping the structure of a skeleton. This process results in a HumanIK Skeleton Definition, which is required to create a Control Rig and/or retarget animation to and from the skeleton of this character. This is what is referred to as a HumanIK defined character.

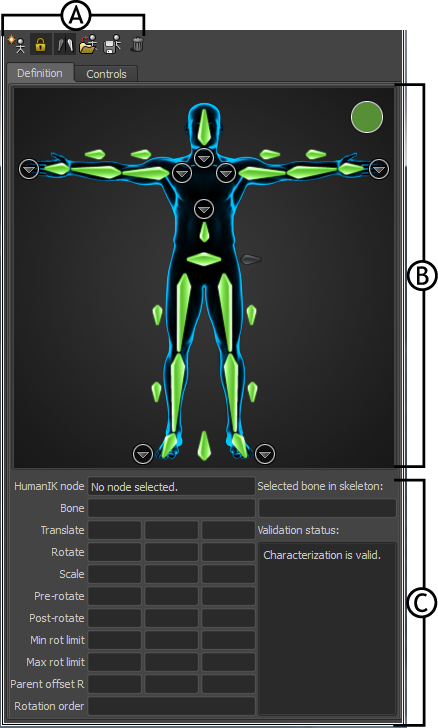
Definition tab A. Toolbar B. Character and Name Match views C. Skeleton properties

To create a skeleton definition, click .

To map a bone, navigate from the:

To change a mapped bone:

  1. Right-click the cell and select Change Assigned Bone. , then
  2. From the drop-down list, select from the listed bone names or type the name of the bone you want to use instead.
  3. Press Enter or click Ok.

To clear a mapped bone:

  1. Right-click the cell in the Character view and select Clear Assigned Bone.

    The name of the selected bone appears in the drop-down list.

  2. Press Enter or click OK.

To clear all mapped bones in the current view (full body, hands, feet, or spine view):

  1. Right-click anywhere in the view.
  2. Select Clear All in View.

To clear all mapped bones for the current character:

  1. Right-click anywhere in the view.
  2. Select Clear All.

To map mirror pairs of bones:

  1. Select > Edit > Definition > Mirror Matching.
    TipAlternatively, click in the Definition toolbar.
  2. Select > Edit > Definition > Configure Mirror Matching to open the Mirror Configuration window.

    This window contains a list of all sub-string pairs currently configured for mirror matching mode.

  3. Click the + or - button to add or remove substrings, respectively.

For more information, see Definition tab.

Definition tab toolbar

This toolbar provides a set of global controls for managing skeleton definitions such as saving and loading skeleton definitions to and from files, locking the current skeleton definition. It also offers controls for enabling and configuring mirror matching mode, and for applying and saving mapping templates.

  Creates a blank skeleton definition.
  Locks and unlocks the current skeleton definition.
NoteLocking the character definition automatically updates the mapping list in the Character Definition pane.
  Toggles mirror matching mode.
  Displays the Load Skeleton Definition window for applying a mapping template and mapping multiple bones automatically by name.
  Displays the Save Skeleton Definition window for saving a mapping template, which can be loaded at a later date.
  Deletes the current skeleton definition.

For more information, see Definition tab toolbar.

Character and Name Match views

You can use the Character and Name Match views to map the bones in your character to their corresponding HumanIK nodes, and to view the information about the current mappings. Both views offer the same controls for mapping nodes, but display the nodes using different layouts.

Toggle between the views by right-clicking anywhere in the view and selecting either the Character View or the Name Match View option from the contextual menu.

Character view
The main Character view lays out the HumanIK nodes in a schematic arrangement that indicates the placement of each bone in a biped. It provides a visual tool for mapping out the structure of your character, and provides feedback on the status of the skeleton definition.

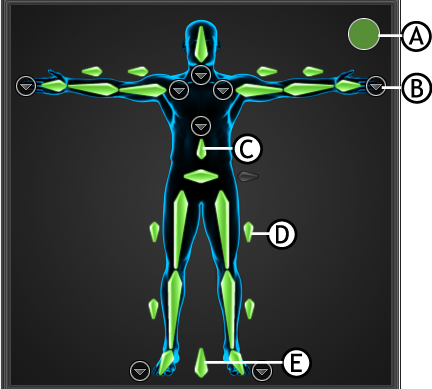
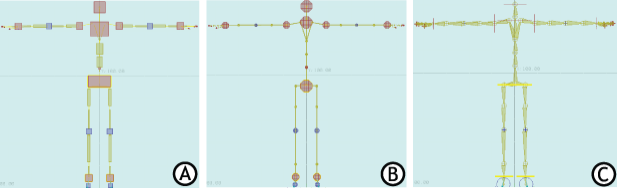
Character view A. Validation status B. To other views C. Required bones D. Roll bones E. Reference

Hand, Foot, Spine, Shoulder, and Neck views
You can switch to detailed views of the hands, feet, spine, shoulders, and neck to map additional bones for those body parts. Click to switch views to a particular body part, or to return to the full Character view.

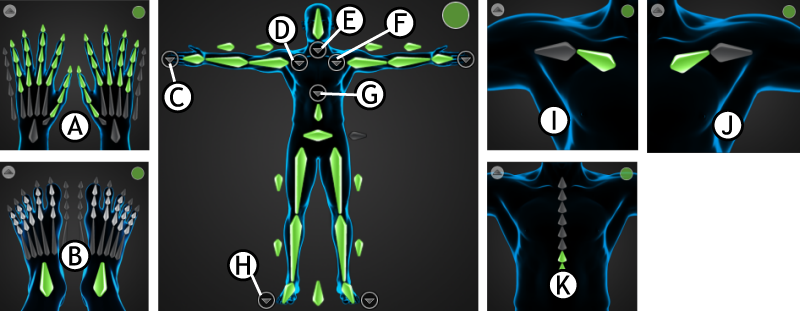
Different views of a character A. Hands B. Feet C. To Hands D. To Right Shoulder E. To Neck view F. To Left Shoulder G. To Spine H. To Feet I. Right Shoulder J. Left Shoulder K. Spine

Validation status
A validation status indicator displays at the top-right of the Character view.
  Valid Skeleton definition is valid.
  Warning Refer to the Validation status error message field for information on areas of the character that require attention.

A yellow symbol can indicate that the position of a mapped bone is not correct. For example, if you rotate a roll bone so it does not point down the X-axis. The Character view also updates to highlight which bone is out of position.

  Not Valid The skeleton definition is not valid. Some required bones may be missing, or multiple bones may be out of position.
Name Match view
Displays all bones in a list, grouped according to their related body part or IK effector. Use this view to get an overview of your skeleton definition, and to view the names of the bones assigned to multiple different nodes. You can map bones to the Name Match view using the same methods as in the Character view.

Load Skeleton Definition and Save Skeleton Definition windows

Load Skeleton Definition window
Lets you select a naming template to automatically map multiple bones by name. To open this window, click in the Definition tab toolbar.
Template
This drop-down list provides several common bone naming conventions. Select the naming template you want to apply.
  • HIK — Use with skeletons created using the HumanIK naming conventions.
  • CAT — Use with biped skeletons created using the Character Animation Toolkit (CAT).
  • Biped — Use with biped skeletons created in 3ds Max Biped.

Or select <Browse> to select your own saved naming template.

Match Scope
Select whether you want to match bones based on a prefix convention, or match only selected bones.
Save Skeleton Definition window
Lets you extract a naming template based on the bone names in the current skeleton definition. To open this window, click in the Definition tab toolbar.
Template Name

Enter a name for the template. This name is added to the list of templates in the Load Skeleton Definition window.

Example Bone
Lists the name of the first valid bone in the current character hierarchy.
Prefix
Enter any prefix string that you want to remove from the beginning of all bone names to be added in the template. This is useful if the bone names for the current character include a standard prefix meant to identify that specific character.

For example, if you have the name of the character appended to the start of each bone name. Entering that prefix automatically removes the prefix from all bone names added to your template.

Controls tab

The Controls tab contains:

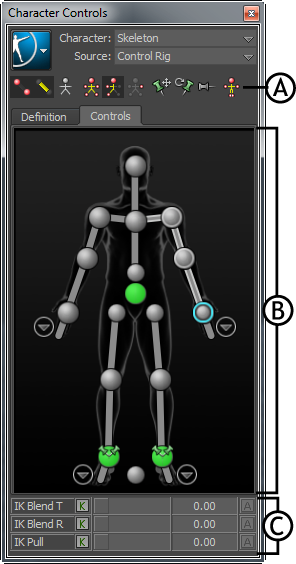
Controls tab A. Toolbar B. Character representation C. HumanIK Controls

The following table provides a brief overview of tasks using the Controls tab.

To... Do this
Create a Control rig

Select Control Rig from the Source menu

or

Select > Create > Control Rig.
Change the appearance of rig effectors Select > Edit > Controls > Rig Look, then select an effector style.
Change to Full Body keying and manipulation mode Click .
Change to Body Part keying and manipulation mode Click .
Display the skeleton of the character Click .
Set the animation source for the current character Select another HumanIK defined character by name from the Source menu.
Create an auxiliary or pivot effector Right-click an IK effector cell and select Create Aux Effector or Create Aux Pivot.
Remove an auxiliary or pivot effector Select the effector in the scene and press the Delete key.
Pin an effector in Translation Select the corresponding IK effector cell, then click .
Pin an effector in Rotation Select the corresponding IK effector cell, then click .
Temporarily release all pinning Click .
Bake the active Source onto the current Character

Select > Bake > Bake To Skeleton

(or)

Select > Bake > Bake To Control Rig

Edit retargeting parameters in the Attribute Editor Select > Edit > Definition > Edit Properties.

Controls toolbar

The toolbar in the Controls tab contains:

Show/Hide

These icons let you toggle the display of FK effectors, IK effectors, and the skeleton.

  Show/Hide IK

Shows or hides the character's IK effectors.

  Show/Hide FK

Shows or hides the character's FK effectors.

  Show/Hide Skeleton

Shows or hides the character’s skeleton.

Manipulation and keying modes

These icons let you set manipulation and keyframing modes for working with the Control rig of the character. You can manipulate and set keyframes on the entire body (Full Body) of the character, a part of the body (Body Part), or only on the selected effector (Selection).

  Full Body Sets the tool to Full Body keying and manipulation mode, letting you select individual effectors to manipulate the entire character. For example, translating the wrist effector of a character in the Full Body mode affects the whole body as it moves to reach that effector.

Forcing a stance pose in this mode will force the entire character into a stance pose and the character will be offset relative to its reference node.

  Body Part Sets the tool to Body Part mode, letting you manipulate and set keys on a single body part, based on the selected effector.

Forcing a stance pose in this mode will force the selected body part(s) into a stance pose. If the hips are part of the selection, the character will be offset relative to its reference node.

  Selection Sets the tool to Selection mode, letting you manipulate and key only the selected effector(s).

In this mode, you can manipulate one effector without solving the rest of the character, then use the HumanIK controls to adjust how much the rest of the character reaches for that effector.

The Character representation displays white highlighting on cells to show which part of the character is active for manipulation and keying. For example, in the Body Part manipulation mode, when you select a left wrist effector, all left arm cells in the Character representation highlight in white.

Pinning

These icons let you activate, disable, or temporarily release pinning on effectors.

Pinning gives you more control over character manipulation, letting you constrain specific effectors from moving or rotating as you make adjustments to the rest of the character position. For example, you can pin the wrist in rotation but let it move in translation, so that as you adjust the wrist position or arm position, the wrist can move but does not twist.

When you create a HumanIK Control rig, IK effectors on the character’s feet are pinned in translation and rotation by default.

Pinning feedback displays on each cell in the Character representation.

  Pin Translation

Pins and unpins the selected effector in translation.

When pinned, the selected effector cannot be moved, and a T displays on its corresponding cell in the Character representation.

  Pin Rotation

Pins and unpins the selected effector in rotation.

When pinned, the selected effector cannot be rotated, and an R displays on its corresponding cell in the Character representation.

  Release All Pinning

Temporarily releases all translation or rotation pinning for the selected effector and effectors down the chain.

Stance Pose
The Stance Pose icon () resets the Control rig to its default T-stance pose.

Selecting this icon in the Full Body mode forces the entire character into a stance pose and the position of the character if offset, relative to its reference mode. In the Body Part mode, the selected body part(s) are forced into a stance pose. If the hips are part of the selection, then the character will be offset, relative to its reference node. Note that this feature does not apply to the Selection mode.

TipYou can also force a stance pose by selecting > Edit > Controls > Stance Pose.

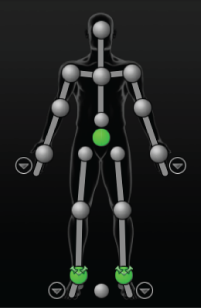
Controls Character representation

Displays an image of a biped character and all the effectors you can use to animate a HumanIK Control rig.

Once you create a Control rig for your skeleton definition, the Character representation displays cells for each IK and FK effector in the rig. These cells provide visual feedback on the pinning, IK blend, and IK pull defined for each effector, and also let you create and select auxiliary effectors and pivot effectors.

IK cell status

Each IK cell of the Character representation updates to reflect the status of the corresponding effector. The following tables describe the various states of each cell.

Selection

Cell Effector state
  Selected
  Not selected
  Selected as part of the active keying group - Full Body or Body Part.

Pinning

Cell Effector state
  Pinned in translation
  Pinned in rotation
  Pinned in translation and rotation

Ik Blend and IK Pull

Cell Effector state
  IK Blend T set to 1.00
  IK Blend R set to 1.00
  IK Blend T and IK Blend R set to 1.00
  IK Pull set to 1.00 (with IK Blend T and IK Blend R set to 1.00)
  IK Pull set to 0.50

Auxiliary and pivot effectors

Cell Effector state
  Main effector has auxiliary effectors. Click the + icon to view.
  Main effector has pivot effectors. Click the + icon to view.
  Auxiliary effector
  Pivot effector

Body Part views

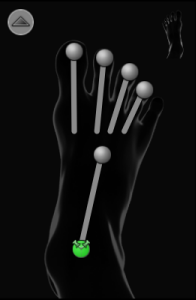
Arrow icons next to the hands and feet in the Character representation let you switch to zoomed in views where you can select individual effectors within the character's hands and feet. Clicking on the hand or foot icon in the upper right corner of each view toggles between the left and right body part.

Hands


Feet


HumanIK Controls

The IK Blend T and IK Blend R (previously called Reach) sliders in the HumanIK Controls let you decide which solution (IK or FK) your skeleton follows. When you set keyframes on the Control rig, both the IK and FK solutions are keyed.

Streamlined window size

The image of a biped character in the Controls tab contains a new A-frame layout, which makes this tab smaller than the Definition tab.

Stance pose on body parts

You can force a stance pose on selected body parts. The active manipulation and keying mode determines how your Control rig reacts when you force a stance pose by selecting the quick access icon or > Edit > Controls > Stance Pose.

This is useful during the pose-to-pose character animation, when only specific body parts need to be reset to create a character pose.