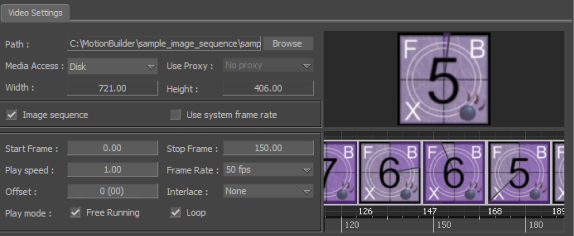
The Video settings let you select various file and playback options for the current video or image.


Video settings
The Media Access menu lets you specify whether a video plays from a disk or from memory.
The Use Proxy menu lets you assign an alternate version of your video file. This is useful if you want to use a low resolution file or placeholder video while you compose the scene.
When you select a proxy setting, a proxy must exist for the selected file. You must determine when to use the proxy file instead of the original high resolution file.
Create a proxy file in the same directory as the high resolution file, and use the file name format:<X>proxy.avi, (where <X> is the name of the high resolution file).
The Proxy Menu contains the following options:
The Image Sequence option will only appear on the Video Settings pane if you import the first frame of an image sequence. Enable this option to ensure all frames of the sequence display and play back in the Video Media viewer.

Turn on this checkbox to use the frame rate set in the Transport Controls. For more information on using custom frame rates to play an image sequence, see Customizing Frame Rate for playing images in sequence.
Enter a frame number in the Start or Stop Frame fields to specify at which frame to start or stop your video.

The Frame Rate drop-down list displays the frames per second rate of the current video file. It contains all the available frame rates in the Transport Controls window and a Custom option. Using this option you can add your own frame rate. See Customizing Frame Rate for playing images in sequence.
Use the Interlace menu to select the Interlace setting. Interlace settings are dependent on the type of VTR and TV used.
| Setting | Purpose |
|---|---|
| Fields | Specifies that the video file is shown as a complete resolution picture with both even and odd fields. This changes the way the video is displayed. |
| None | Specifies that there is no interlacing during the playing or recording of the video file. |
| Half Frame Even | Specifies that the video file is interlaced at half of true resolution, and even lines are used. |
| Half Frame Odd | Specifies that the video file is interlaced at half of true resolution, and odd lines are used. |
| Full Frame Even | Specifies that the video file is interlaced at full resolution, and even lines are used. |
| Full Frame Odd | Specifies that the video file is interlaced at full resolution, and odd lines are used. |
| Full Frame Even/Odd | Specifies that the video file is interlaced at full resolution, and alternating even and odd lines are used. |
| Full Frame Odd/Even | Specifies that the video file is interlaced at full resolution, and alternating odd and even lines are used. |
Enter a value in the Offset field to offset the video’s time code. If a video file is offset, it starts at the same time as the animation, but plays at the specified offset time code. The Offset is displayed in the same measurement as the Frame Rate field in the Transport Controls window.
Use the Play Mode options to set a play type for the selected media.
| Option | Description |
|---|---|
| Free Running | Specifies the loaded video file as free running. Free Running plays the video file automatically, without the need to use the Transport Controls window. |
| Loop | Loops the selected video file. |
The Video Media viewer displays the selected image or video. When the video plays in your scene, it also plays in the viewer.
If a video is selected, the Video Media viewer shows the frames of the clip beneath the video preview. Ctrl-drag the video frames to zoom in or out.