The light settings area contains options for customizing the look and behavior of your lights.
Lets you select one of three light types: Infinite, Point and Spot. For more information about these lights see Light types.
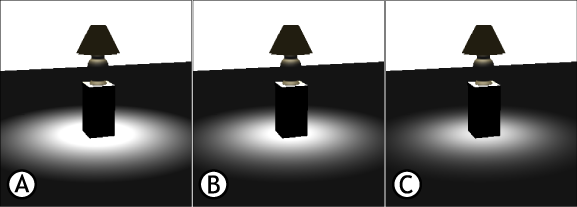
The Attenuation settings lets you specify how the intensity of a light drops off in relation to the distance from the source. Once you add a Dynamic lighting shader, use this setting to set how MotionBuilder calculates the light falloff. There are two options, Linear and Quadratic, that affect lighting falloff. No Attenuation disables the falloff effect.

Light attenuation setting: A. None B. Linear C. Quadratic. Compare the edges of the shadow.
Do not change the attenuation setting if you do not want to the lighting influenced by its distance from the source.
| Setting | Function |
|---|---|
| Linear | This setting produces an even falloff. The equation is (intensity/x). The light will drop off in an even fashion from the point it leaves the light until it illuminates an object. |
| Quadratic | This setting produces an uneven falloff. The equation is (intensity / x squared). The light will make a rapid drop off close to the object and the falloff will then slow the further it gets from an object. |
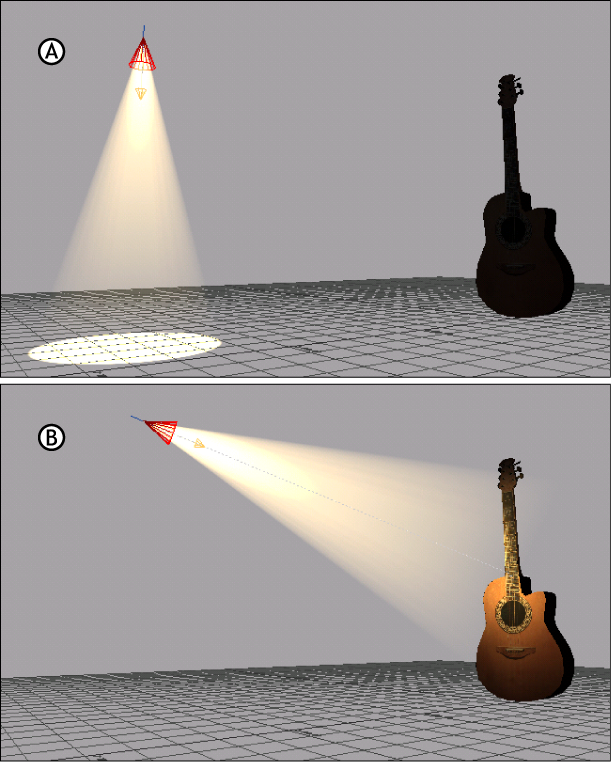
Lets you define a “look-at point” or target for the selected light. When the light is translated, the light’s interest follows it.

Spot light interest A. Spot light with Interest not set. B. Spot light with Interest set on the guitar.
Lets you add and use a model as the Up Vector of a selected light. An Up Vector is a model that controls the orientation of a given light.
This is done by constraining the light to orient its movement toward the Up Vector model's position and prevents the light from flipping, providing more realistic movement of an animated light’s projections. See Defining a light’s Up vector.
Lets you specify the color of the selected light. By default, the color of the light source is pure white. You can animate this setting. See Adjusting light color.
Lets you adjust the brightness of the selected light. You can animate this setting. See Intensifying a light.
Active only for Spot lights, the Cone angle slider lets you adjust the spread or range of light from a Spot light. The smaller the cone angle, the smaller the area of the scene that is illuminated by the light. You can animate this setting. See Defining Spot lights.
Active only for Spot lights, the Fog intensity slider lets you increase or decrease the amount of fog shown in the light’s beam. You can animate this setting. See Defining Spot lights.
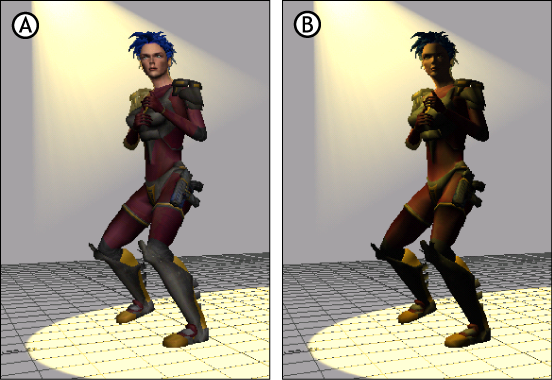
Lets you use the light as an effect in the scene without illuminating objects. For example, the following figure shows a model with Cast Light On Object activated and disabled.

Cast Light On Objects A. Disabled B. Activated
When the Cast Light On Object option is activated, objects are lit. When the setting is disabled, the light effect exists but does not affect the object.
Disabling Cast Light On Object speeds up the display time. The Cast Light On Object option is activated by default. If you want only to have some objects affected by particular lights in your scene, see Selective Lighting shader settings.
Active only for Spot lights, this setting makes the beam of the Spot light shine on the ground. See Defining Spot lights.
Active only for Spot lights, this setting lets you see the actual beam that the Spot light emits and is often used with Fog effects. See Defining Spot lights.
Draw Front-Facing Volumetric light
Active only for Spot lights, this setting lets you see the effect of the light when it is facing directly into the camera. See Defining Spot lights.