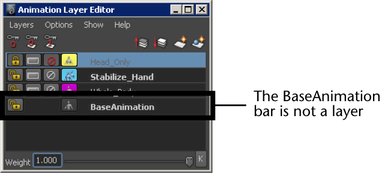
Non-layered animation curves in your scene (base curves of attributes assigned to layers or curves of attributes not assigned to layers) are represented by the BaseAnimation bar in the Animation Layer Editor.
The BaseAnimation bar is automatically added to the stack the first time you create an animation layer in your scene. It is not an animation layer, but is there to represent the non-layered animation.

If you do not plan to work with animation layers in Maya, you can ignore the concept of BaseAnimation.
If your workflow involves creating layered animation on top of existing animation curves, you can lock the BaseAnimation bar to prevent those non-layered curves from receiving keys as you keyframe on layers. The Lock button on the BaseAnimation bar lets you protect those non-layered curves. (See also Load existing animation to work with layers.)
While the BaseAnimation bar can be locked, it cannot be muted, soloed, or parented to layers. If you want to mute or solo the non-layered animation represented by the BaseAnimation bar, you must first extract it to a layer. See Extract animation to or from an animation layer.
If an object has no animated attributes when you create its first animation layer, selecting the BaseAnimation bar does nothing. However, if the object has animated attributes and you add those attributes to an animation layer, the BaseAnimation bar gives you access to the original animation curves of the attributes. You can then extract the original animation onto new layers, or modify the original animation with new layers and merge them later.
If you choose Key in Selected Layer(s) keying mode as you key objects on layers, you must select the BaseAnimation bar to set keys on attributes that are not assigned to layers. If you use Key in Last Active Layer(s) or Hybrid keying mode, BaseAnimation will automatically receive keys for attributes not assigned to layers. (See also Keyframe objects on animation layers.)
Unlike animation layers, the BaseAnimation bar cannot be reordered. It is always at the bottom of the stack of layers, with animation from the layers being added on top of it. While it can visually display at the top or bottom of the Animation layer pane (depending on which stack display order you choose), it is always effectively the bottom layer of the stack. For more information, refer to Animation layer stack.
You can flip the display of all animation layers in the pane using the Reverse stack order option. (See Change the animation layer stack display.)
 Except where otherwise noted, this work is licensed under a Creative Commons Attribution-NonCommercial-ShareAlike 3.0 Unported License