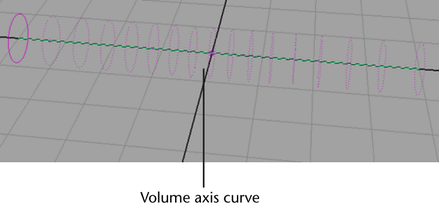
Volume axis curves let you move objects, including particles and nParticles, in various directions along the curve, as well as define a radius around that curve in which the axis field is active. You can select an existing NURBS curve (in addition to the object to which you want to apply the field) when creating a volume curve field. Otherwise, a default curve is created for the volume axis field.
The overall radius of the volume axis field on a curve is set using Section Radius. Using the Curve Radius ramp, you can vary Section Radius along the length of your volume axis curve. When a position marker is added to the Curve Radius ramp, a Radius Scale indicator is placed on the curve in the scene view. These indicators show the points on your NURBS curve where Curve Radius is scaled to specific values. See Curve Radius

To create volume axis curve from an existing NURBS curve
 -select the objects, such as particle, nParticle, or nCloth objects, you want the field to influence with the volume axis
curve.
In the scene view, dotted rings appear around the NURBS curve to indicate that the curve is now a volume axis curve.

To connect a volume axis curve to particle and nParticle objects
 -select (Windows and Linux) or
  -select (Mac OS X) the volume axis field.
To set Volume Control Attributes
For information about other Volume Control Attributes, see Volume Control Attributes.

When a position marker is added to the Curve Radius ramp, a Radius Scale indicator is placed on the curve in the scene view. These indicators show the points on your NURBS curve where Curve Radius is scaled to specific values. For more information, see Curve Radius.

To set Volume Speed Attributes
For information about other Volume Speed Attributes, see Volume Speed Attributes.
 Except where otherwise noted, this work is licensed under a Creative Commons Attribution-NonCommercial-ShareAlike 3.0 Unported License