Using Maya Artisan, you can paint fur attribute values on an area of fur without changing the fur description for the entire surface. For example, you can paint length values on part of a surface to make the painted patch of fur longer than the rest of the fur. You can also comb fur in the direction you want the fur to lie; for details, see Comb fur.
When you paint fur attribute values on a surface, Maya creates a map of the values for each of the fur description attributes that you change. These maps are located in the fur description Attribute Editor (Details > AttributeName > Maps).
You can also paint values on the Equalizer Map, a map automatically generated by the renderer to ensure that fur is distributed evenly over surfaces with uneven parameterization. For details, see Paint equalizer maps.
If you paint fur attributes in scenes that are referenced or you paint fur attributes outside of the Paint Fur Attributes Tool, such as in the Paint Effects canvas, or in an external application, such as Photoshop, you can quickly update all fur maps in a scene. See Update fur maps.
Before using Maya Artisan to paint fur attribute values, learn the Maya Artisan hotkeys for at least the following commands to increase your efficiency as you work with the Paint Fur Attributes Tool:
If these hotkeys do not work, set them by selecting Window > Settings/Preferences > Hotkey Editor and using the information below:
To paint fur attributes using the Paint Fur Attributes Tool
 . The Paint Fur Attributes Tool Settings window opens, followed by the tool settings editor.
You can quickly restore fur attribute values to the prepainted values by deleting the attribute map created when you painted the fur. For details, see Remove maps from fur attributes.
To paint attribute values greater than 1
For details, see Change attribute map value ranges. You can now paint values between 0 and less than the value set for the Multiplier.
When you paint Direction, you are really changing the Polar value to correspond with the direction you are painting. In effect, you are “combing” the fur.
 . The Paint Fur Attributes Tool Settings window opens, followed by the tool settings editor.
Only the fur descriptions attached to the selected surfaces are available.
To restore the fur direction to the fur description values
To fine tune the effects of your combing (for example, to smooth values)
Color feedback is meaningless so you may want to turn it off.
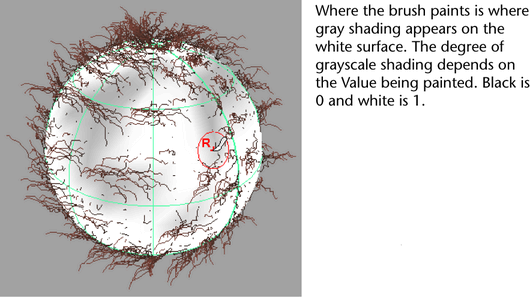
When you paint on a surface with an Artisan tool, such as the Paint Fur Attributes Tool, you can view the grayscale fur attribute value map on the surface as you paint. This provides useful feedback when the changes you are painting are not easily detected with the fur feedback. However, viewing the value map while you paint slows performance.
To view the value map while you paint
. The Paint Fur Attributes Tool Settings window opens, followed by the tool settings editor.
To speed up painting when Color Feedback is turned on (NURBS only)
You can smooth the values you paint using Artisan’s Smooth and Flood operations.
. The Paint Fur Attributes Tool Settings window opens, followed by the tool settings editor.
You can see the effects of smoothing more easily when Color Feedback is turned on. For details, see View the attribute map while you paint.
An attribute map is a two-dimensional image with values that correspond, or map, to attributes of points on a three-dimensional surface. This mapping is relative to the UV parameterization of the surface. Attribute map values are represented by grayscales, with black representing a value of 0 and white representing a value of 1.
Attribute map values are located in the Details section of the fur description Attribute Editor. By default, attribute map value ranges are defined between 0 and 1. You only need to change value ranges when you want to paint or map values other than those defined in this range. For example, you could change the range from 0.2 to 0.5, 2.0 to 3.0, or more commonly, from 0 to 5. For information on painting values, see Paint fur attribute values. For information on mapping values, see Map fur attribute values.
You can set value ranges for all fur attributes except color attributes.
To change attribute map value ranges
Although you will not typically need to, you can modify the equalizer map that is automatically generated when you render by painting directly on the surface. When you modify the equalizer map, you modify the distribution of fur on the surface. For example, you can paint lower values in areas that are denser than you want. For more information, see Equalizer Maps.
. The Paint Fur Attributes Tool Settings window opens, followed by the tool settings editor.
Only the fur descriptions attached to the selected surfaces are available for selection.
Decreasing the Value makes the fur appear more sparse where you paint, while increasing the Value makes the fur more dense.
If you’ve painted a Custom Equalizer Map, when you render the scene, the Fur Render Settings automatically use the custom map. To defer to the default equalizer map, in the Fur Render Settings, go to the Fur Render Options and select Default Equalizer Map from the Equalizer Maps drop-down list. For more information, see Equalizer Maps.
 Except where otherwise noted, this work is licensed under a Creative Commons Attribution-NonCommercial-ShareAlike 3.0 Unported License


